Convert’s No-code Visual Editor and Custom Code Editors: What’s the Difference and When Should You Use Each?
When it comes to visual editors, some people love them, while others prefer to avoid them entirely. It’s true that nowadays you no longer need to be a programmer, coder, or developer to build a website. Many marketing and product teams that relied on development or IT support in the past have now embraced the no-code movement, with its approachability and business-transforming innovations.
Convert’s Visual Editor provides no-code tools, which allow users to design changes on their websites on the fly, with a graphical user interface. Not only does this save money, but it means that business owners can get off the ground and start achieving conversion targets more quickly than before.
However, this innovation in web design still has its limitations, and custom coding can be a better fit for things like using CSS selectors to change multiple similar elements at once, loading an external JavaScript file as part of a variation, and tracking unique custom events.
For this reason, Convert also provides a custom code editor that allows users to make more advanced edits to their pages by writing or importing their code in JavaScript or CSS.
Above all, Convert aims to provide flexibility, accommodating users of all skillsets and preferences. Whether you choose to write your own code or prefer a more simplified approach to testing, Convert has the solution for you!
Quick Tour of the Convert Visual Editor
Convert’s Visual Editor allows you to generate, edit, and format web page content to test out your business hypotheses.
It comes with a number of design tools that may be used to make both basic and advanced changes to the elements in a variation.
Convert’s tool includes an HTML editor (to add new text, images, audio files, or video files) and allows users to rearrange items with a simple drag-and-drop feature, as well as modify and format the font, color, and size of text on their page.
Using the Visual Editor, you can also use strong custom code choices to add your own HTML and JavaScript, so you can fully customize the visitor experience.
Convert writes the HTML and CSS for your variation content as you make changes to it.
Let’s take a quick tour of the Convert Visual Editor, which can be found in your Experience Summary, under the Variations section:
Once you click on it, you will see the Visual Editor.
Here are some helpful beginner tips:
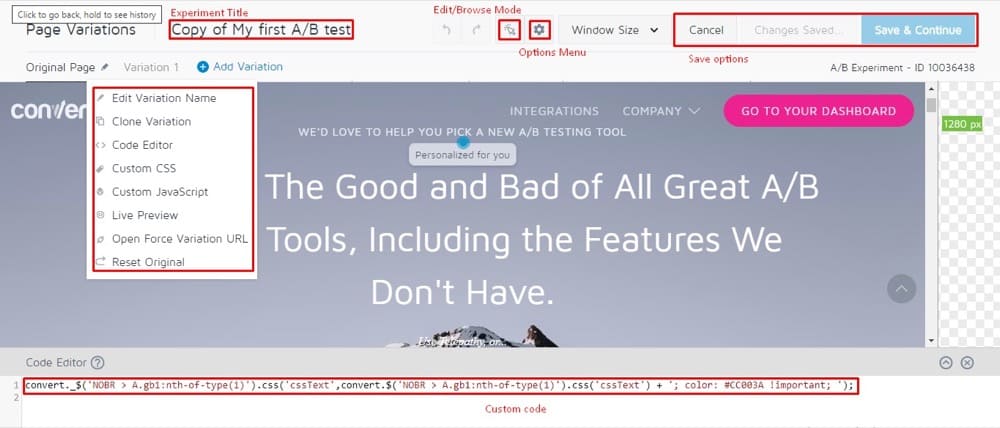
- The experiment title is the name of your experiment. Choose a memorable, descriptive name for your experiment.
- The Save options contain basic tools to save, undo, and redo changes.
- As you work, you can toggle between Edit and Browse Mode.
- The Options menu contains common settings for your experiment, such as Change Editor Page, Element Selection Settings, and Global Experience JS/CSS code.
- The Window Size allows you to view web pages for different tablet/mobile resolutions.
- The variations menu contains common settings for your variations, such as Live Preview.
- The <code> box lets you create variations using JS, CSS, or variation code.
In the following sections, we’ll walk you through how to use some key features of the Visual Editor and some issues that you might face while using it.
When Should You Use Convert’s Visual Editor?
Use the WYSIWYG Editor for Simple Copy Changes
Many experiences will only test a single page, so advanced editing tactics aren’t required. In these cases, you can use Convert’s WYSIWYG (What You See Is What You Get) editor, which is the simplest way to create an A/B test.
You can do things like modify the size of your headline, change the text of your CTA, or move elements across the page, and the editor will produce the JavaScript code to make these changes a reality.
Each time you make a change in Convert’s WYSIWYG editor, the associated code is displayed and made available to edit in the ‘Code Editor’ area (taking advantage of our Smart Insert Convert technology (convert._$)).
You can always change the code to fix any problems that arise along the way.
If you want to insert plain JavaScript without using Smart Insert Convert technology, you can insert it in the Custom JavaScript section, which we will explain later on.
Change Headlines (or Any Text)
Many A/B experiences require you to make tiny adjustments or additions to your website’s existing content, to persuade users to take specific actions.
Some examples of this include adding a captivating headline to your home page, that briefly explains your product or service, or converting lengthier text blocks into bullet points to fit the constraints of your page.
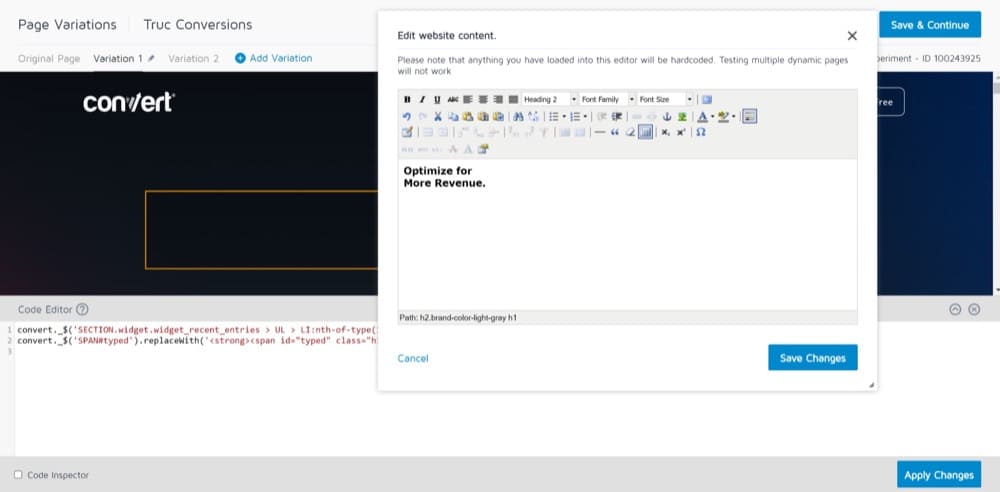
Convert’s Visual Editor allows you to add new bits of text in minutes, and update them as needed. You can then compare the results of your variation pages to the original page to determine which is most effective with your audience. When making inline text adjustments in the editor, use the “Edit Text” option.
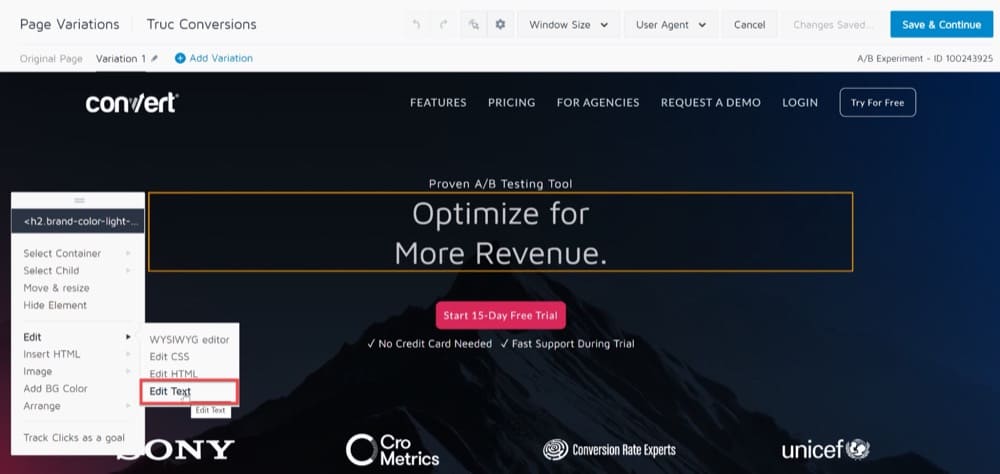
A Text change is less invasive and risky than an HTML modification and has no effect on the document structure (including CSS selectors and other components) or event handlers that may be registered in the target elements.
Making minor changes to a variation’s design, layout, and content structure can be a simple way to improve the performance of a web page.
For example, your audience may respond differently if you make the headline font bold to highlight your brand’s message or change the background size of an image to fit within a subsection.
The Convert Visual Editor allows you to make rapid formatting and styling adjustments that can add visual appeal to your website and attract your site visitor’s attention, without requiring you to update your CSS code.
The embedded CSS Editor allows you to change the styling of an element. Applying CSS tags to an element in your page can change its:
- Background or text color
- Border thickness, color, or style
- Font type, style, size, and color
- Text casing, alignment, and line height

Using the Visual Editor to change CSS attributes is simple for non-coders, but remember to take the following into account:
- The style changes you make will be applied to the exact element you select.
- It can be tricky to undo a change you make since you’ll have to re-execute changes.
- You can only use a limited amount of CSS properties in the Visual Editor.
Insert/Edit HTML Content
The “Edit text” and “WYSIWYG editor” options in Convert’s Visual Editor are the simplest editing approaches for a novice user.
The Convert Visual Editor also allows you to add completely new elements to your variants and make advanced changes for A/B testing.
This includes immediately modifying the element’s HTML code. For instance, you could add a new CTA button to your landing page to make website navigation easier for your clients, or you could add a custom field to your signup form to capture the specific demands of your business’ customers.
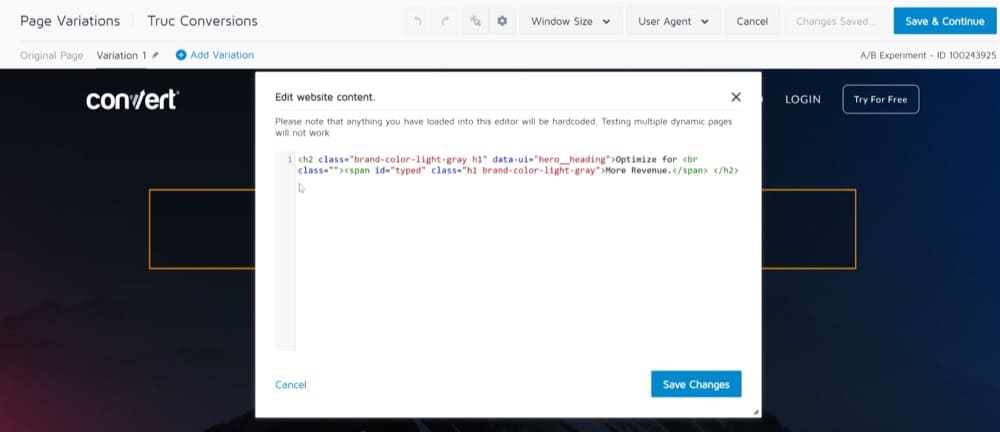
The Edit HTML function is more complex, on the other hand, allowing you to make changes to your page’s HTML code and providing greater flexibility and control over how the code is modified.
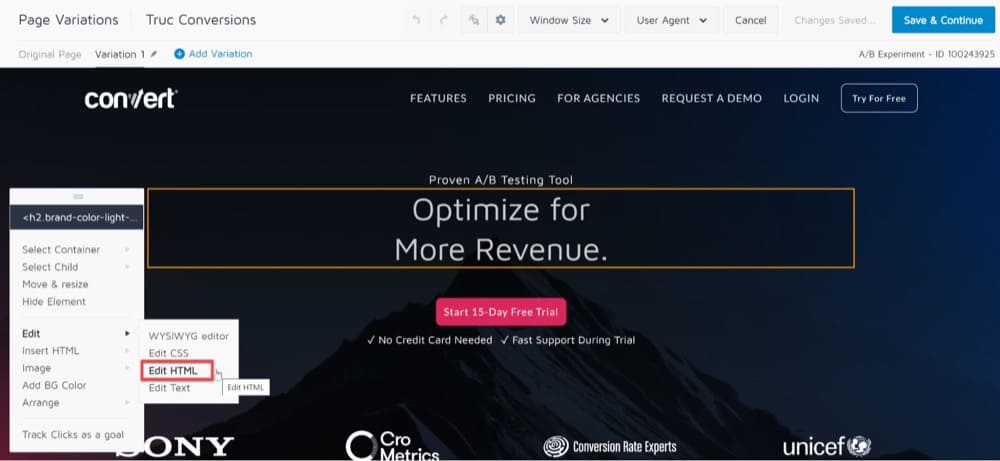
When you select the Edit HTML option for a web page element you want to change, the editor displays the element’s content as raw HTML.
Once you’ve made your changes, Convert then saves the final new HTML content of that element, replacing the element’s original HTML.
The Edit HTML option can be used in the following way:
- Click on the element you want to change in Visual Editor, then select Edit HTML from the menu.

Making advanced changes for A/B testing with the “Edit HTML” option - Once the Edit HTML dialog opens, add the code snippet for the modification (for static content only).

Making advanced changes for A/B testing with the “Edit HTML” option - Click Save Changes.
Tip 1: We do not recommend changing dynamic content created by your website CMS, such as product prices, product details, and other such aspects. When you overwrite dynamic content code, it becomes static and the same material may show up on all pages that utilize that template. Instead, use the Custom JS/CSS options for dynamic content, as this requires custom javascript code to be developed.
Tip 2: Use the Edit HTML option on particular elements of a web page that need minor changes, or if you want to change a single element. A full-page modified HTML action is not recommended.
Tip 3: Avoid using multiple Edit HTML operations on the same collection of items. All essential changes can be made with a single HTML action.
Start a Featured Image A/B Experience
A/B testing is a great way to determine which image performs best on your site.
You can use the Convert Visual Editor to create an “A” and “B” variation of a featured image and compare them against one another. The variant image can then be used to boost conversion rates.
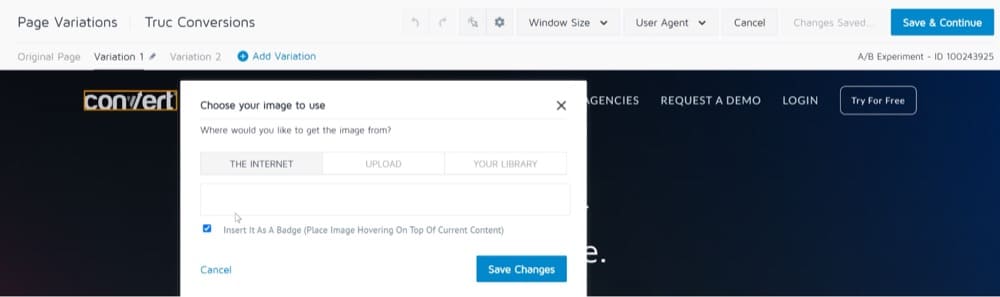
You can also use the “Image” option, displayed when you click on Image in the Visual Editor, to change or add images to your website.
To alter a picture on your website, follow these steps:
- Select the “Image” option.
- Next, a menu will appear that allows you to insert a new image.
- The Image dialog box will then open up.

Creating a feature image A/B testing experience - You can either upload a picture from your local device or simply input the URL from which it was acquired, in the Image dialog.

Creating a feature image A/B testing experience

Another important note is that you must upload different sizes of the same image (1x, 2x, etc.) in order for them to appear correctly on various screen sizes (such as PCs, large HD displays, and mobile screens).
Note: The maximum file size you can upload to your image library is 2MB per image file.
Delete Elements or Hide Their Contents
Convert’s Visual Editor also allows you to hide certain objects or elements from your landing page, to minimize distractions.
To remove an element from a variation, use the “Hide Element” option.
Once selected, the element’s display property will be set to “None”.

Track Clicks as a Goal
When making changes to your webpage in the Visual Editor, it can be useful to track clicks on specific elements and add them as goals to your experience.
Convert allows you to track button clicks on your website and collect visitor metrics as you test variations.
Although Convert has a separate section where you can add conversion goals to an experience, you can also use the editor window to do this when designing multiple website versions.
- Choose the element on the page that you want to track.
- From the menu, select Track Clicks as a goal option.

Tracking clicks as a goal option - A popup appears to name and save your goal:

Tracking clicks as a goal option
Choose the Right Element Selector Path
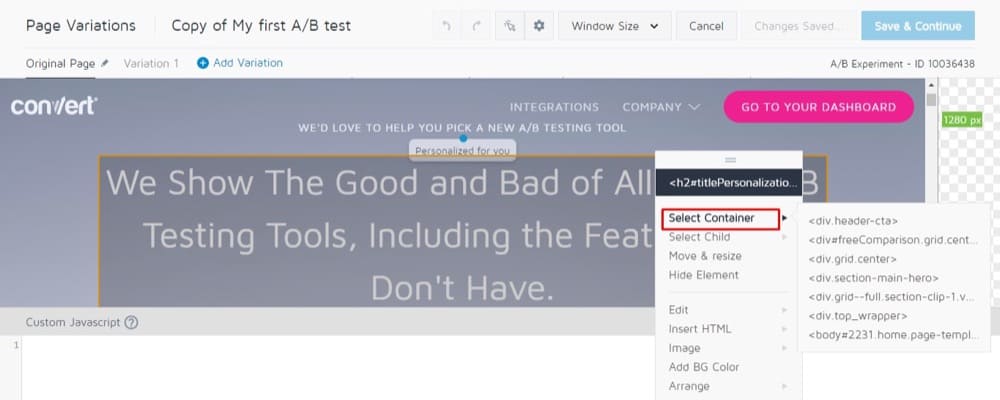
Convert’s Visual Editor allows you to select elements on the page, that are parents of and contain the element you currently have selected in the editor.
This feature is useful if you are having trouble selecting an element in the Editor, or if a CSS change isn’t working as expected.
Simply, click an element within the container you want to track, then choose Select Container. You should see a long list of HTML elements that contain the element.
At the top of the list, you’ll see the next-largest HTML element to the one you selected, and at the bottom, you’ll see the largest HTML element before the <body> itself.
In other words, the list goes from most to least specific.
This is an easy way to help select a broader element that can’t be easily selected with your mouse. Often, you will use this to select an item that you want to Rearrange, or whose CSS attributes you want to edit.
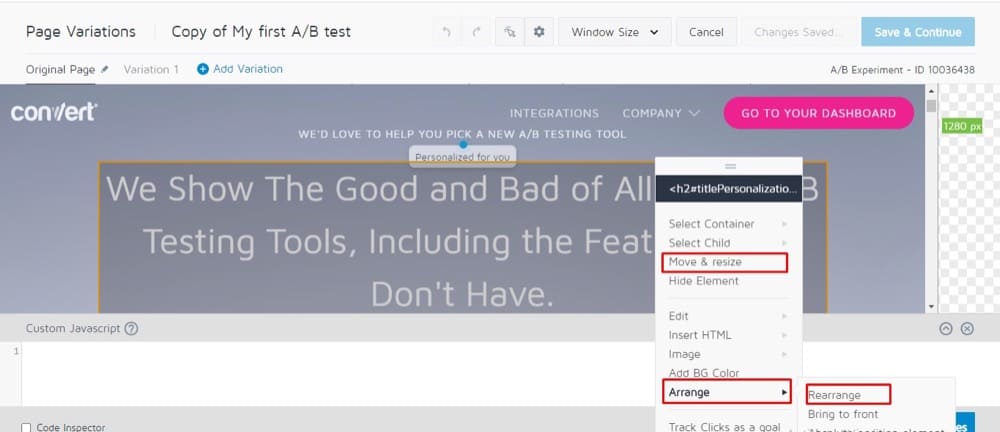
Move and Resize or Arrange Elements
You can move, resize or rearrange a page title, image, or any other element from your variation page, using the Convert Visual Editor.
Relocating items to the proper area on your page will raise the visibility of objects to your users and increase the number of times they click on them.
It also lets you see and select elements that are behind or in front of other elements, making it easier to interact with them.
Move and Resize adjusts elements, using a pixel-calculated move. This is fine for small moves, but not helpful for moving elements across large distances.
You may be tempted to use Move and Resize to drag an element from one side of the page to the other, but different browsers interpret pixel length differently.
Movement over large pixel lengths (several hundred pixels or more) may cause cross-browser compatibility issues.
The best solution when you want to move an element across a large distance is to use the Rearrange tool, which allows you to drag your elements as close as possible to their final placement.
From there, you can use Move and Resize to move your elements to their final placement.
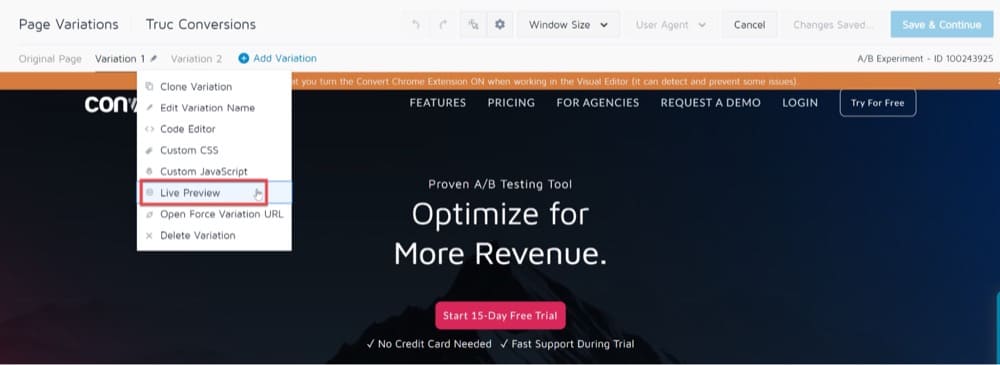
Use Edit/Browse Mode
Convert’s Browse Mode is designed to allow you to interact with your website while it is loaded in the Editor.
For instance, you can use Browse Mode to edit an item on a drop-down menu or within a tray.
Normally, when you click an element in the editor, it brings up the contextual menu, which means you are not able to actually interact with dynamic elements.
But, when you enter Browse Mode, it allows you to interact with your page as you normally would in the browser. Select Browse Mode once your page is in the state you want to modify it in.
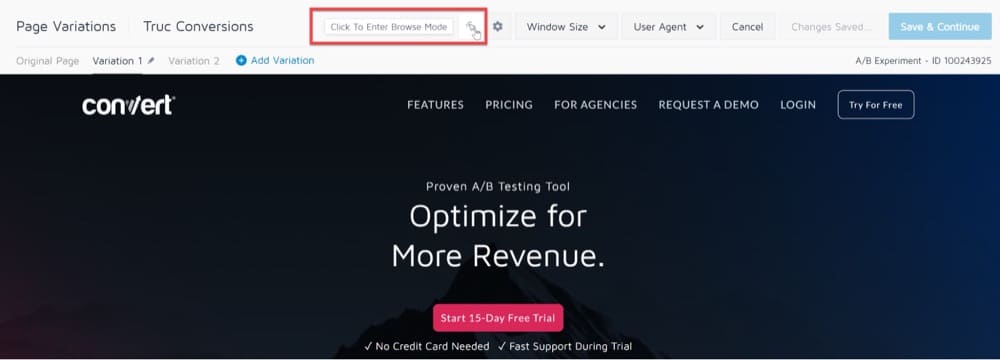
Keep in mind that when you turn on Browse Mode in a variation, this turns off your changes, as you are browsing the original page.
Your changes will remain saved, but in this case, it’s better to test with the live preview option under the Variation menu.
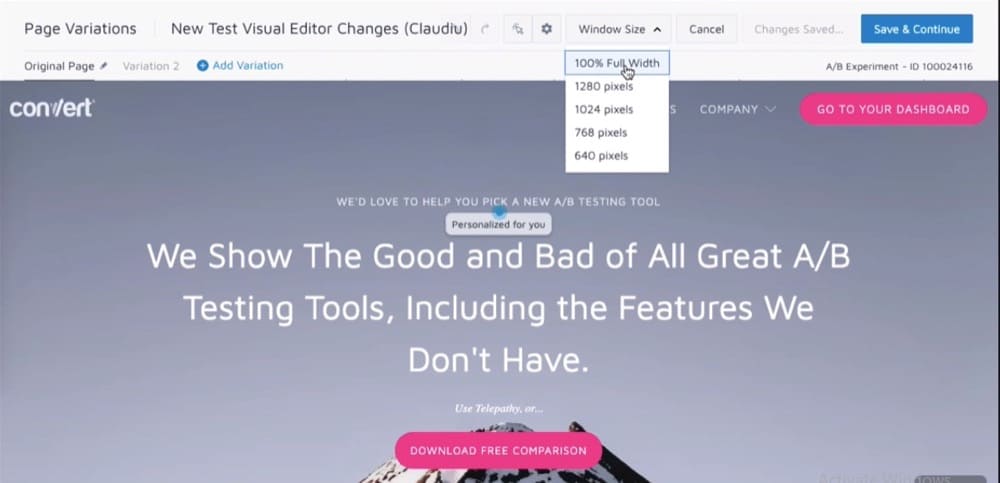
Preview Your Changes on Various Devices with the Window Size Option
You can use the Convert Visual Editor to test the content of your page as it would display to a tablet/mobile user.
To do this, go to Window Size at the top panel of the Visual Editor.
In the Window Size drop-down, you can select the resolution you’d like to use to view the screen.
As of now, Window Size provides resolution options like 1280px, 1024px, 768px, 640px.
Once you select a resolution, the editor will reload, displaying your site in your chosen resolution.
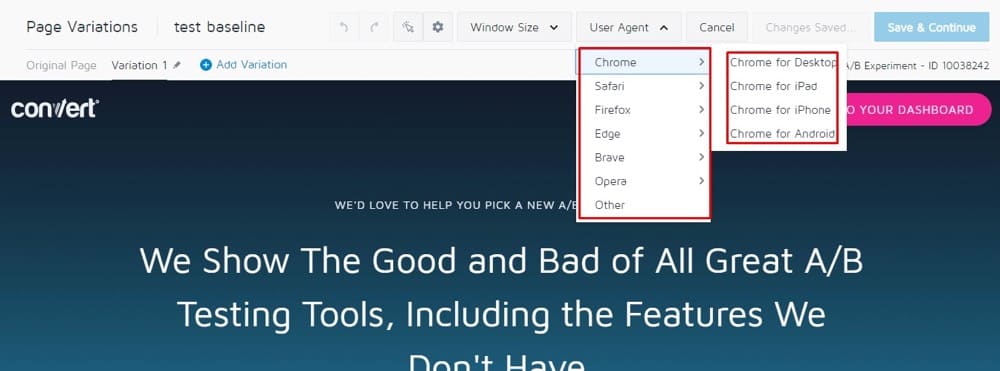
Preview Your Changes in Various Browsers with the User Agent Option
You can use the User Agent dropdown in Convert’s Visual Editor to test the content of your page, as it would be displayed on various browsers and devices.
First, select the browser type, to verify how the web page behaves on different browsers such as Chrome, Safari, Firefox and Edge. Next, you can further filter the browser on the basis of devices like Desktop, Mac, iPad, Android and iPhone.
Issues While You Use the Convert Visual Editor
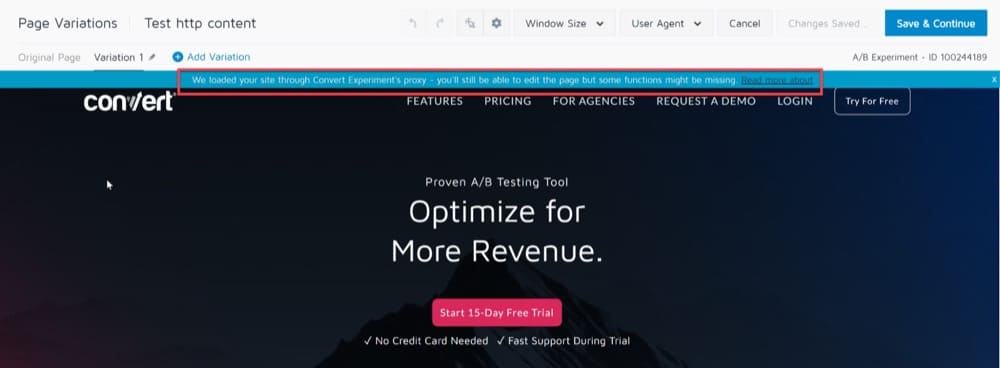
Page Loaded Through Proxy
If you have the Convert Tracking Code installed, you’ll normally see the same browsing session in another tab of your browser, when using the Visual Editor.
However, there have been occasions where certain functionalities of the website are unavailable, even though the tracking code is correctly installed.
For example, maybe a shopping cart is not working as expected (showing as empty) or you are unable to login to a secured area of your website.
Most often, these issues arise because of restrictions your website has when it comes to loading in an iframe hosted under a different domain (through the use of certain HTTP headers).
The following blue warning can indicate this problem, even if the Convert tracking code is installed on your page:
“We loaded your site through Convert Experiment’s proxy – you’ll still be able to edit the page but some functions might be missing. Read more about“.
To overcome this issue, you can switch to using Google Chrome and install the Convert Experiences Debugger Extension.
Once installed, click the extension, add the domains you are using with the experience and turn on the extension:
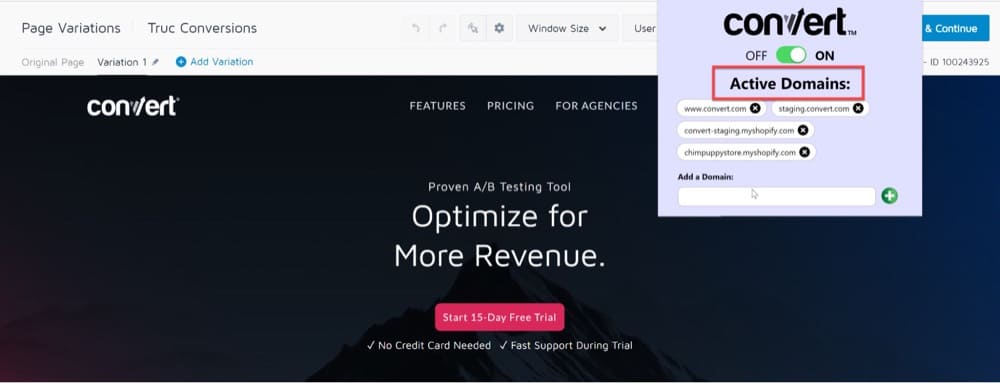
This should remove any problematic headers and allow your page to be loaded inside the Visual Editor, so you can create your experiences without any issues.
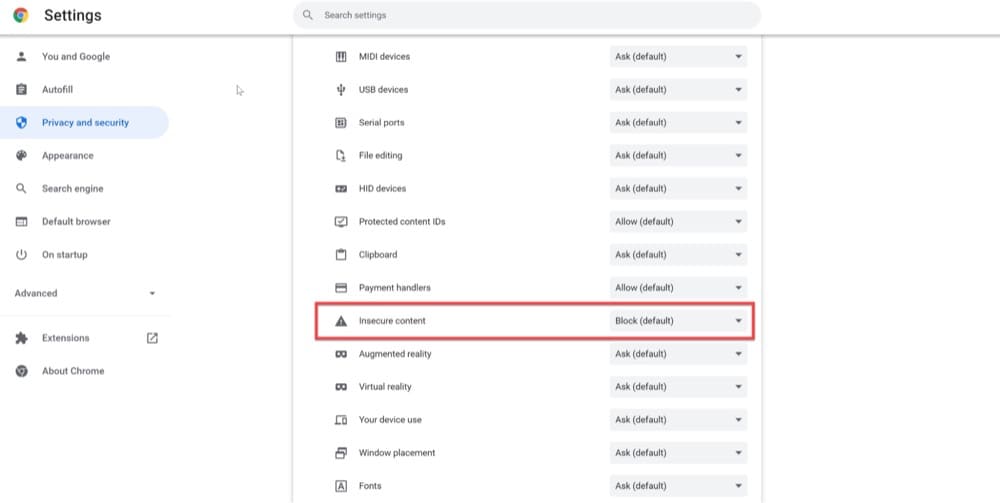
Load Blocked Content
When you attempt to load an HTTP page in Convert Visual Editor, you will notice a notification in your browser stating “The content you are loading is unsafe or insecure”.
This section explains how to allow content loading from an unsafe source or unencrypted content, in the Convert editor.
Websites that ask for user information (names, passwords, etc.) use secure connections (HTTPS) to transfer and receive data.
If an HTTPS page has insecure (HTTP) content (JavaScript or CSS), the browser automatically prevents insecure content from loading and a shield icon appears in the address bar.
Blocking insecure content protects your sensitive information from being compromised.
By default, the Convert Visual Editor loads only secure content via HTTPS.
If you attempt to load an insecure page (via HTTP) in Convert Editor, the browser will display a warning and load your website in compatibility mode.
This warning does not affect your live website in any way and you will still be able to edit the page, although some functionalities may be missing.
To avoid content being blocked, load your pages securely via HTTPS.
To load HTTP pages in the Convert Editor, start by enabling blocked content on your browser.
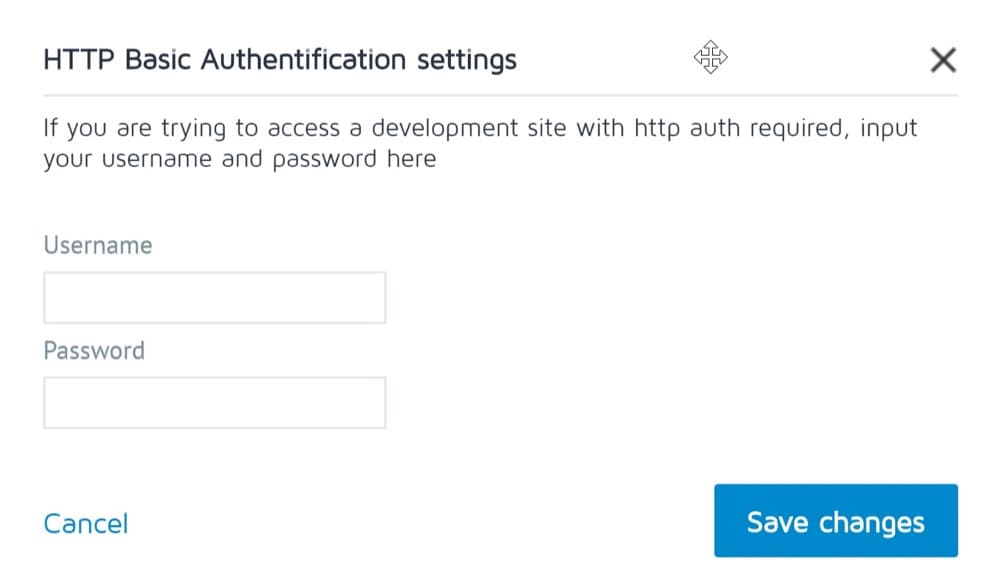
Load Protected Sites
If you have a protected site with a simple username and password (such as a staging or development website), you should be able to use the Convert Visual Editor without a problem.
In the Visual Editor go to Options → HTTP Basic Authentication, and then fill in the information required to access the site.

Testing on SPAs
One of the limitations of the visual editor is that it cannot be used to set up A/B tests for single page apps. If you are using a single-page app, we recommend you look at the custom editors below.
Convert Custom Editors
The majority of Convert’s Visual Editor capabilities are accessible through a drag-and-drop approach.
However, we understand that when a company matures, it may seek to run more advanced experiences, which could be limited by the Visual Editor.
If your company has opted to set up experiences and deployments using custom code rather than a Visual Editor, Convert has just the tool for you.
In addition to our Visual Editor, we provide custom code editors for more technologically advanced users. Convert’s code editors allow users to quickly make adjustments to their pages by writing or importing their code in JavaScript or CSS.
The convert platform is flexible, making it easy to switch from one editor to another and see the changes made in any of them at any time during the experience.
Convert’s custom code editor is often used for the following:
- Executing custom code for visitors who are bucketed into a particular variation (rather than for all visitors).
- Using CSS selectors to change multiple similar elements at once, instead of making individual changes.
- Loading an external JavaScript file as part of a variation.
- Running experiences on single-page apps that execute without requiring the user to reload the page.
- Tracking unique custom events, such as scroll depth and mouse hover.
- Adding API calls for custom metrics.
Convert Custom JavaScript Editor (Project, Experience, and Variation Levels)
Convert enables you to include JavaScript snippets as part of your Project, Experience or even Variation. Although project, experience, and variation custom code are all very similar, one key difference is scope:
Project JavaScript runs site wide which means it can potentially affect all experiences. Experience JavaScript is used at the experience level, whereas variation JavaScript is used at the variation level.
Convert’s custom JavaScript editors use Project JavaScript as their first point of execution, before Experience JavaScript and then Variation JavaScript.
Using Project JavaScript first means you do not have to change your native site’s code in order to run more advanced experiments.
While you can usually use any of the three options for any of the use cases listed above, your choice should be determined by whether you are working at the variation level, the experience level, or the project level.
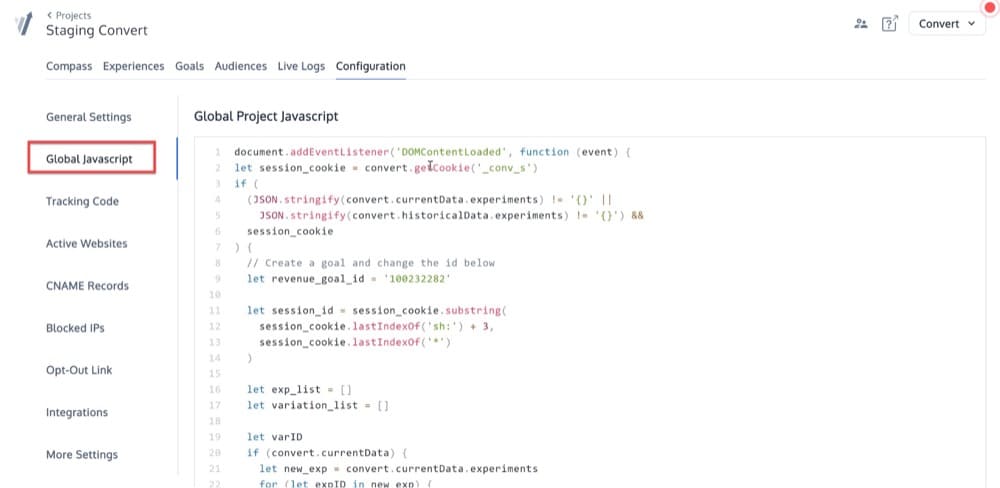
Project JavaScript Editor
Global Project JavaScript editor can be found in the Configuration → Global Project JavaScript area. The code in this section gets included wherever the Convert tracking code is placed.
This code is called before any other codes and is commonly used to include analytics snippets or any code you want to trigger in the experiences in your project.
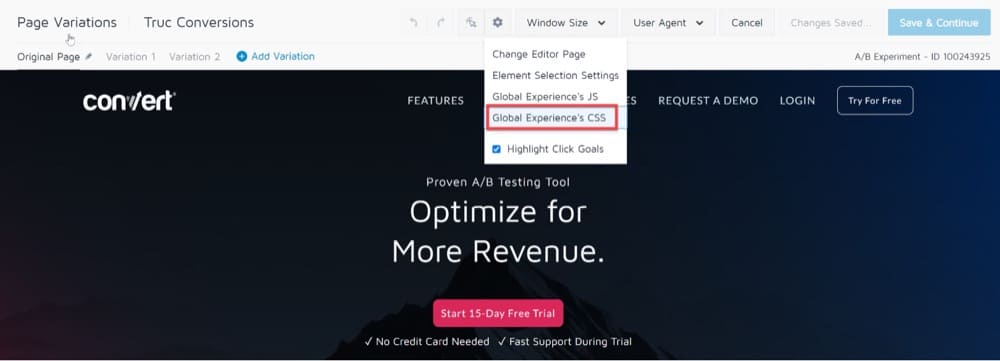
Experience JavaScript Editor
Convert allows you to insert a JavaScript snippet into a page when an experience is triggered. This snippet gets included just like any other library you would include in your web page.
This only applies to experience types that include the Visual Editor, meaning you cannot do this with a Split URL Experiment.
Common use cases for experience level JavaScript code in Convert include:
- Sending Convert information to your analytics service.
- Adding API calls for custom events.
- Adding functions that can be used across multiple variations and calling them with different parameters in the variation code.
Experience JavaScript Editor can be found in the Visual Editor → Cog/Gear Icon → Global Experience JS section.
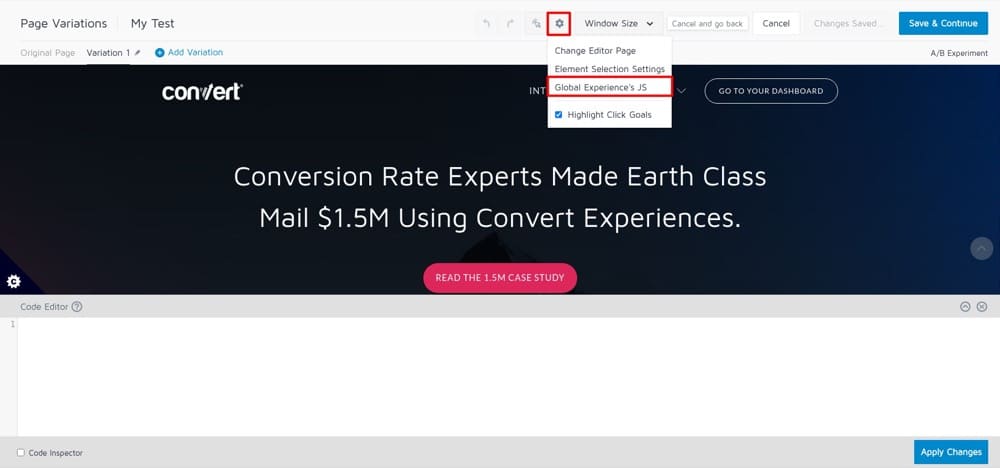
The code is added to the page you are testing or personalizing similarly to how it would be added to the head section inside a script tag.
You can also add JS events, like click or hover events, for your code to trigger.
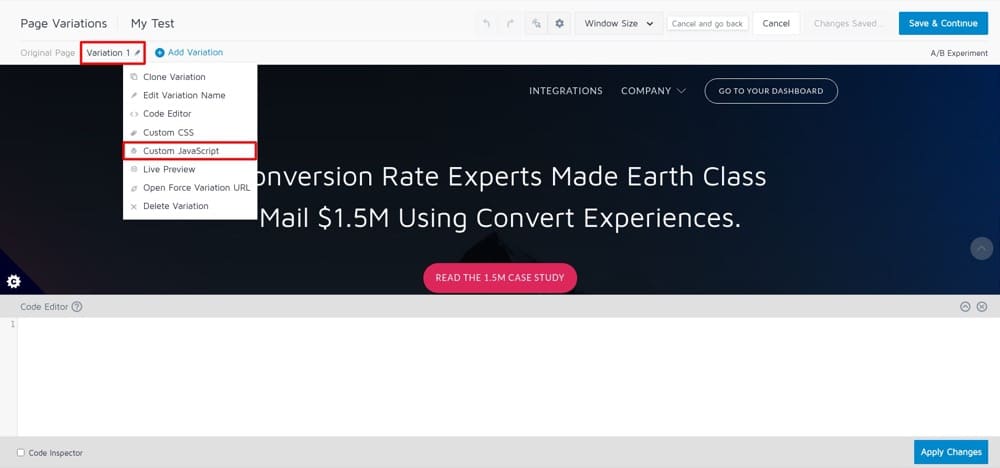
Variation JavaScript Editor
This editor is used to insert any standard JavaScript you desire to include in the variation assigned to each visitor.
This editor is located in the Visual Editor → Variation n (Variation Menus) → Custom JavaScript.
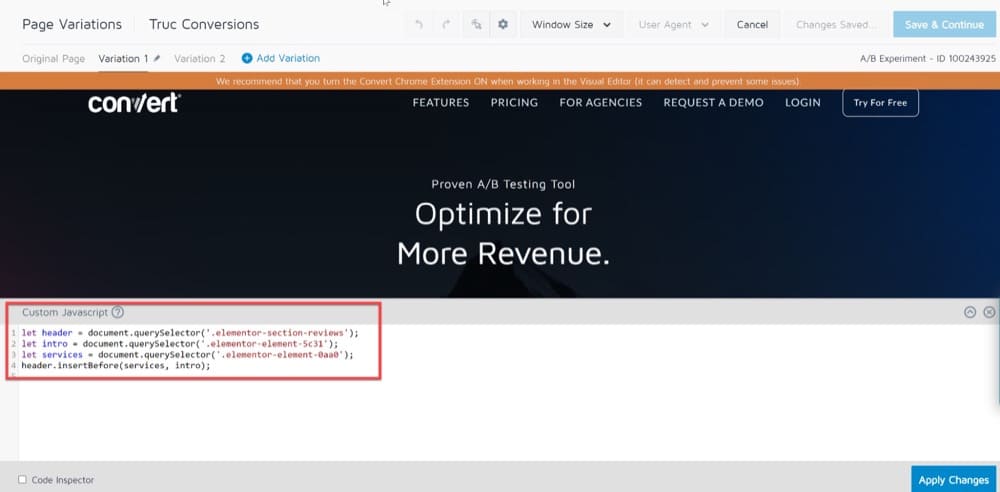
Advanced A/B Test Example with Custom JavaScript
Changing an entire section’s place to a landing page cannot be done with the Visual Editor, but rather requires an advanced test.
Raising the position of the reviews portion of your website is just an example.
The only practical way to do this is to use JavaScript custom code, which requires the following:
- Open a new browser tab in which you are not logged into Convert.
- Navigate to the test’s web page.
- Select “right-click” from the drop-down menu.
- Select “Inspect” from the drop-down menu. This is the Google Chrome DevTools developer tool (a.k.a. what happens on the backend).
- Locate the HTML elements that contain the complete part that you want to test.
- Compose the JavaScript code. (The code syntax for a sample website that we added to Convert is listed below.)let header = document.querySelector(‘.elementor-section-reviews’)let intro = document.querySelector(‘.elementor-element-5c31’)let services = document.querySelector(‘.elementor-element-0aa0’)header.insertBefore(services, intro)let header = document.querySelector(‘.elementor-section-reviews’) let intro = document.querySelector(‘.elementor-element-5c31’) let services = document.querySelector(‘.elementor-element-0aa0’) header.insertBefore(services, intro)
- Return to the Convert editor.
- Execute JavaScript over the whole body of the test.
Convert Custom CSS Editor (Experience, Variation Levels)
In Convert, you can use the custom CSS editors to change the appearance of certain elements on one of your site pages.
For example, maybe you’d like to make a headline stand out more by changing the font or adding a border.
Although you can use the Convert Visual Editor to add, change, and remove site elements, you’ll be able to perform more advanced testing if you have a basic understanding of CSS.
This section shows you how to change the styling of an element with CSS as part of your Experience or Variation.
Experience CSS Editor
Here’s how to style an element on your site with CSS and apply the changes on the experience level:
- Go to your experiment or create a new one.
- At the top of the Visual Editor, select the cog icon and then Global Experience CSS.

Styling an element with CSS and applying the changes on an experience level - Add your own custom CSS code.
- Click Save & Continue.
Congratulations! Now, you can preview your changes and then publish them to the world.
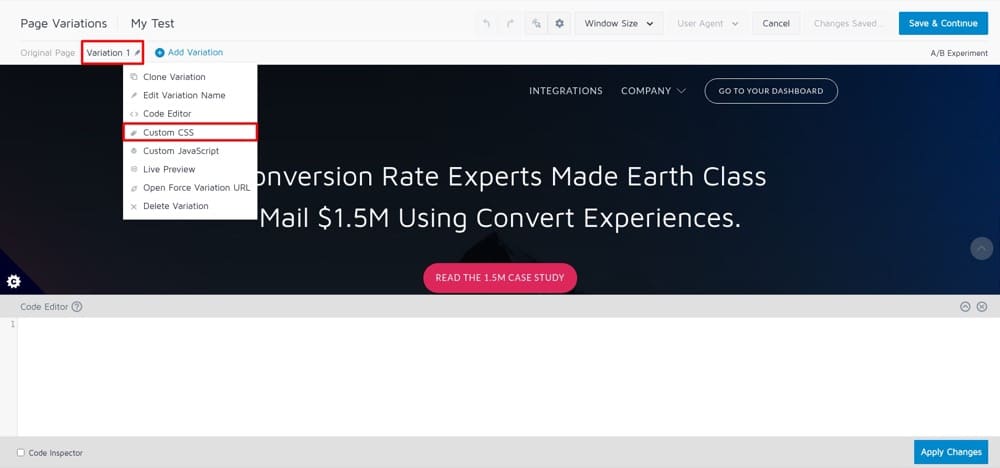
Variation CSS Editor
You can also apply CSS changes on the variation level.
This can be done by going into Visual Editor → Variation n (Variation Menus) → Custom CSS.
This editor allows you to insert plain CSS that will be appended to the web page when the visitor is assigned that specific variation.
Tip: As CSS rules are permanent and not subject to race conditions, CSS changes are more long lasting than changes included in the other editors.
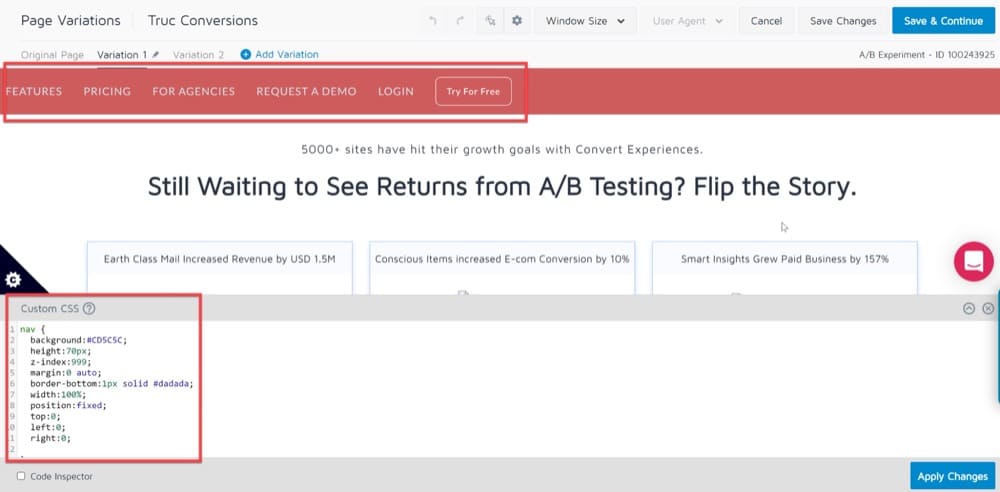
Advanced A/B Test Example with Custom CSS
When people come to your website, you want them to be able to find what they’re looking for quickly.
Scrolling back to the top of a page to navigate a website can be tedious for some users.
Sticky menus provide a simple solution that lets visitors quickly discover what they need with a permanent navigation bar.
Having sticky menus will improve your visitors’ experience and encourage them to consume more content, which will lower bounce rates.
You can create a sticky menu using custom CSS:
nav {
  background:#ffff;
  height:70px;
  z-index:999;
  margin:0 auto;
  border-bottom:1px solid #dadada;
  width:100%;
  position:fixed;
  top:0;
  left:0;
  right:0;
}
Conclusion
In today’s world, there is a need for both no-code solutions and custom code editors.
Convert provides both no-code solutions, which help more businesses to access the digital economy, as well as custom code editors that give more tech-savvy users the ability to further customize their websites.
Coding is a skill that will continue to expand, with developers producing ground-breaking A/B testing ideas using custom code editors. Just the same, no-code solutions will continue to help ease the website-building process for businesses that want to establish themselves quickly and begin converting customers!
Convert’s visual and code editors are available for all our clients. If you are interested in our products, feel free to ask for a demo!


Written By
Dionysia Kontotasiou

Edited By
Carmen Apostu