How to Add Sliders to Your Shopify Store and Make the Most Of Them (+ Insights from Business Owners)


A Shopify slider is a rotating display element on your store that showcases products, testimonials, or promotions in a compact, interactive format.
Customers typically want to read reviews, see products from every angle, and explore discounts before they click “Add to cart.” If you cram all that onto one page, you risk overwhelming them.
Sliders let you tap into those conversion triggers without drowning the page in images and copy.
In this guide, you’ll learn:
- What Shopify sliders are and how they look on real stores
- How to add sliders to your Shopify store
- The best Shopify slider apps in 2026
- The difference between sliders and carousels
- What business owners and experts say about using sliders on Shopify
Key takeaways
- There are five major types of Shopify sliders: testimonial, logo, product images, popular products, and banner sliders.
- Sliders can boost conversions when designed well, but Baymard research shows 46% of ecommerce homepage carousels have UX issues.
- Most modern Shopify Online Store 2.0 themes ship with a built-in slideshow section, so you can add a slider through the theme editor without writing any code.
- Best-performing sliders share a few traits: high-quality images with brief text, fewer than five slides, manual controls on mobile, and fast load times that boost Core Web Vitals.
- AI is reshaping how sliders are built, with apps now offering AI image generation, dynamic product recommendations, and AI-assisted layout suggestions.
- A/B testing is the only reliable way to know if a slider works on your store. Test slider vs. no slider first, then refine from there.
What are Sliders on Shopify?
A slider is essentially a slideshow on your Shopify store. It can be automated (it starts playing automatically based on a set of rules) or manual (only moves when users click on it).
With the exception of testimonial sliders, most Shopify sliders are image-based, which is great for showing (potential) customers what you offer and what they can expect. And they work!
Luke Lee, the co-founder of Ever Wallpaper says: “I recently added an image slider to my Shopify store, and I’ve been very happy with the results. Image sliders are a great way to showcase products, highlight special offers, and add visual interest to your store.”
Burak Ozdemir, the founder of Set Alarm Online, echoes this sentiment: “When used correctly, [Shopify sliders] can help to highlight certain products or features, and make it easy for customers to learn more about what the store has to offer.”
Here are some of the most popular kinds of sliders with examples:
- Testimonial slider – A testimonial slider rotates through customer reviews, ratings, and photos in one block. It’s a clean way to layer in social proof without scattering quote boxes across the page.
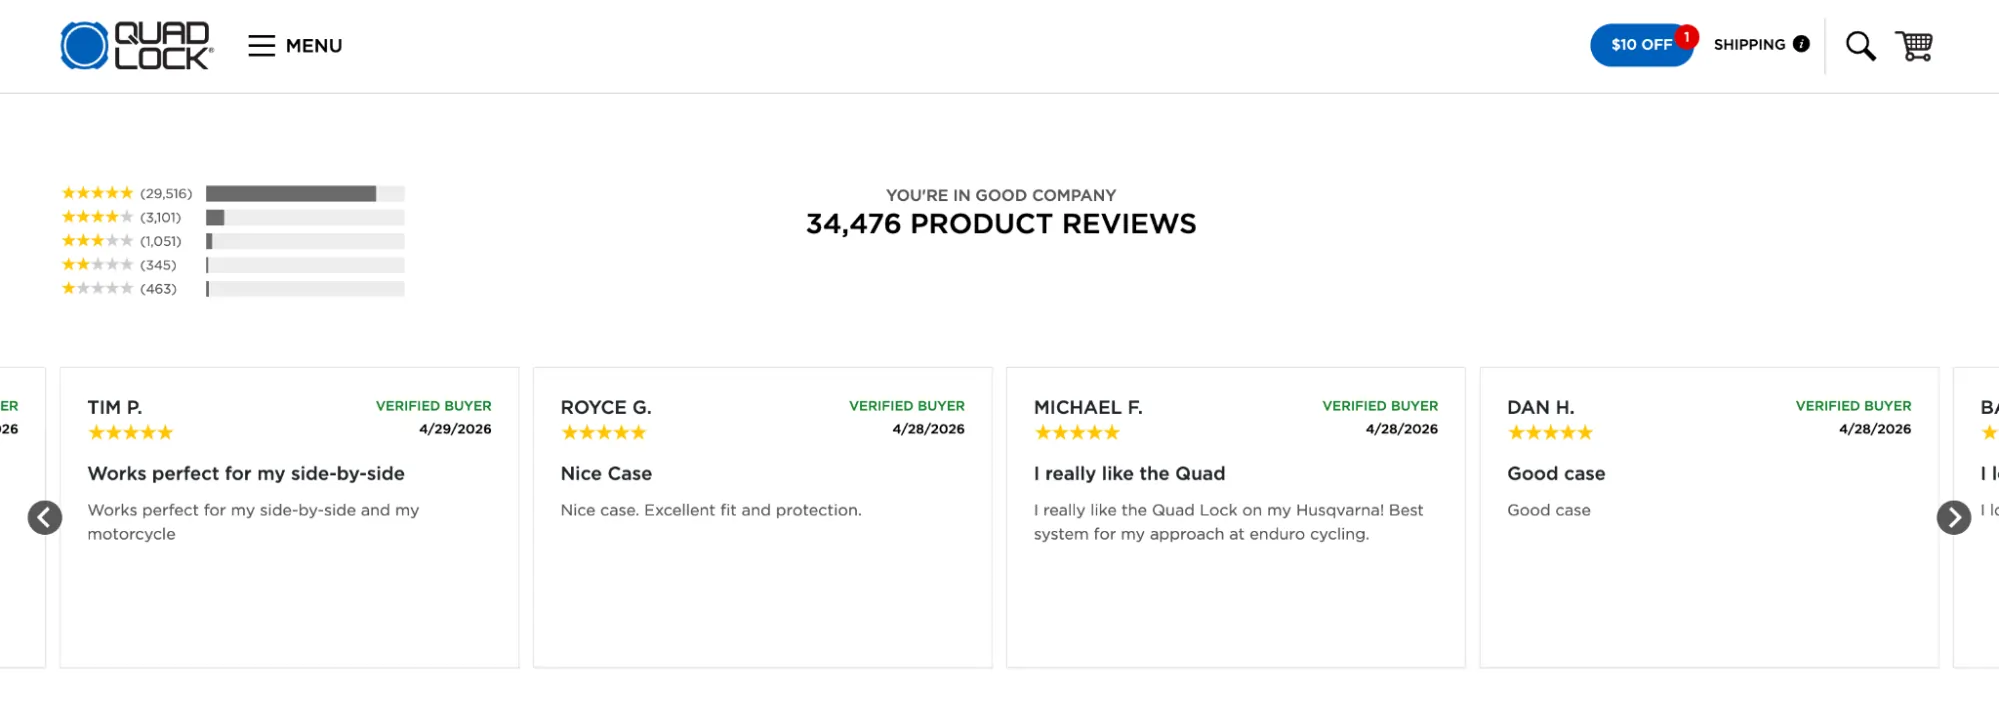
QuadLock, a company that sells secure, patented smartphone mounting systems for active lifestyles, uses a testimonial slider on every product page. Shoppers can click through reviews using the left and right arrows at their own pace.
- Logo slider – A logo slider scrolls through the brands you’ve worked with or supplied to. For B2B stores especially, it helps lender credibility and build trust with prospective buyers.
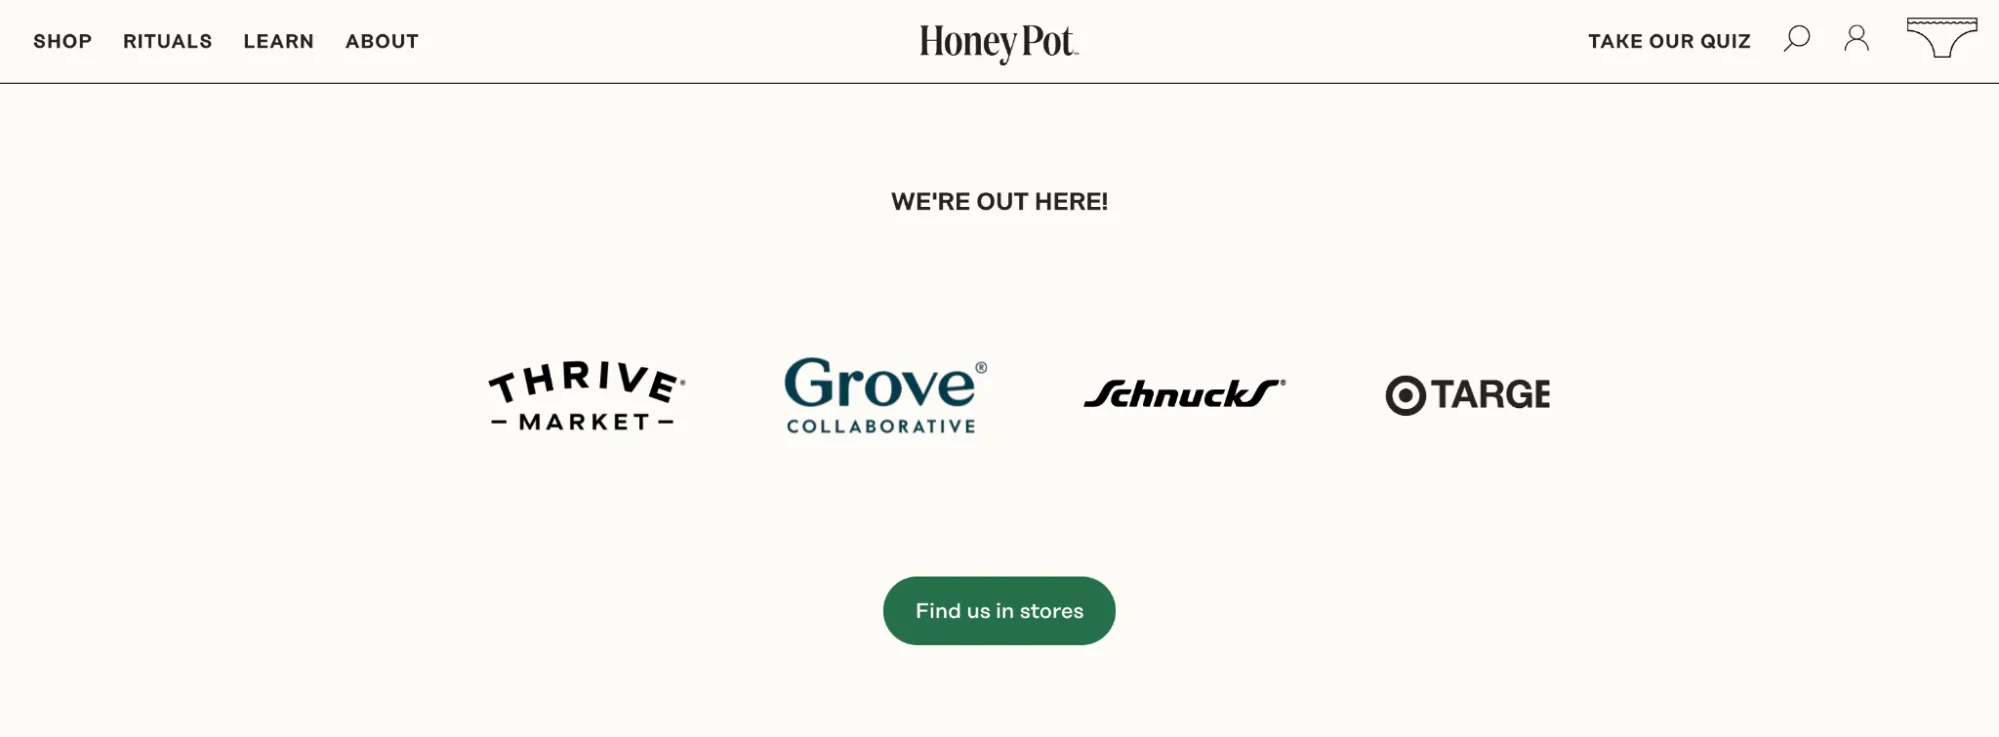
The Honey Pot, a feminine care brand, uses an automatic logo slider to show the major retailers stocking its products, including Thrive Market, Walmart, Walgreens, CVS, and Publix.
- Product images slider – A product image slider lets shoppers view a single item from multiple angles in one frame. You can add captions that highlight key product attributes so buyers know exactly what they’re looking at.
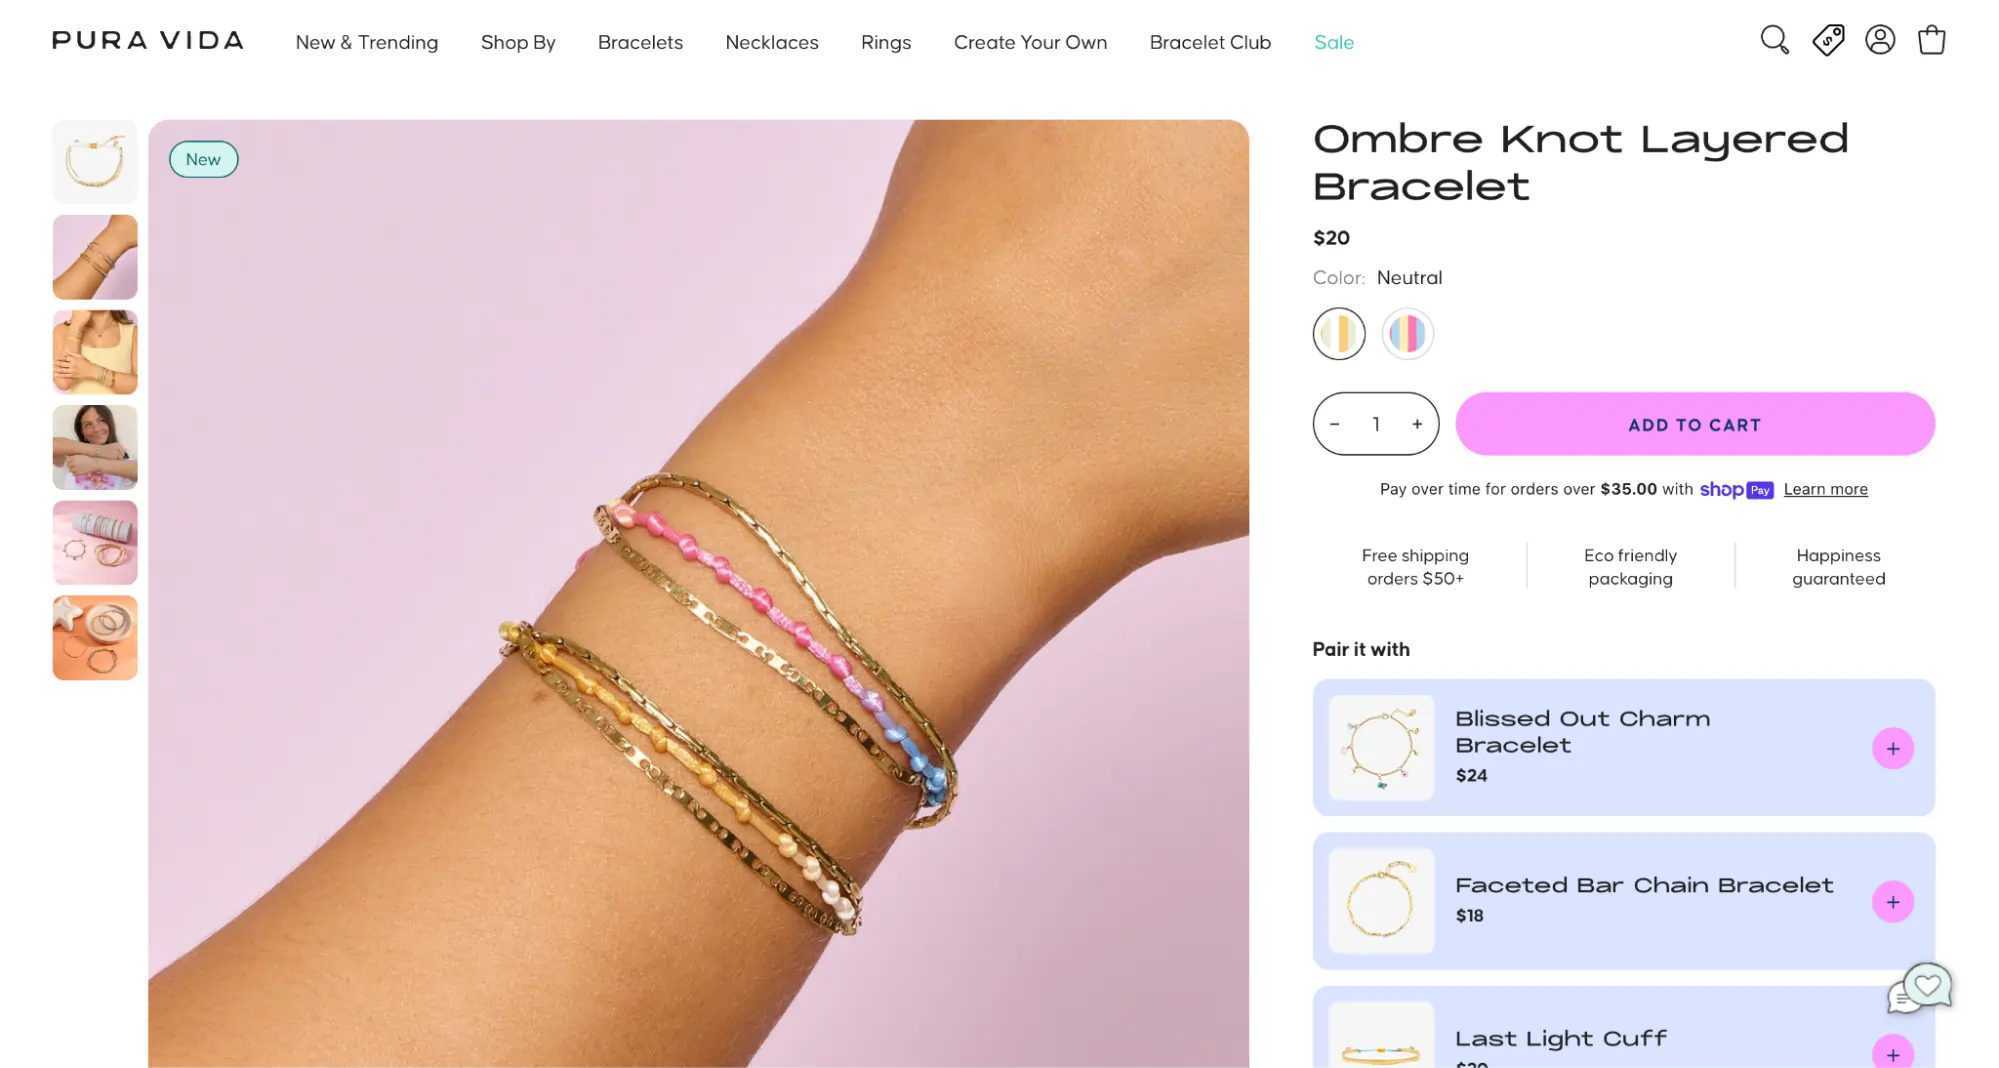
Pura Vida uses a vertical product image slider with six shots of each piece. You can see the bracelets stacked, separated, and worn, so shoppers get a feel for how they actually look before they buy.
- Popular product slider – A popular product slider showcases bestsellers or trending items in a single rotating display. When buyers face too many choices, seeing what others picked makes it easier for them to make a decision.
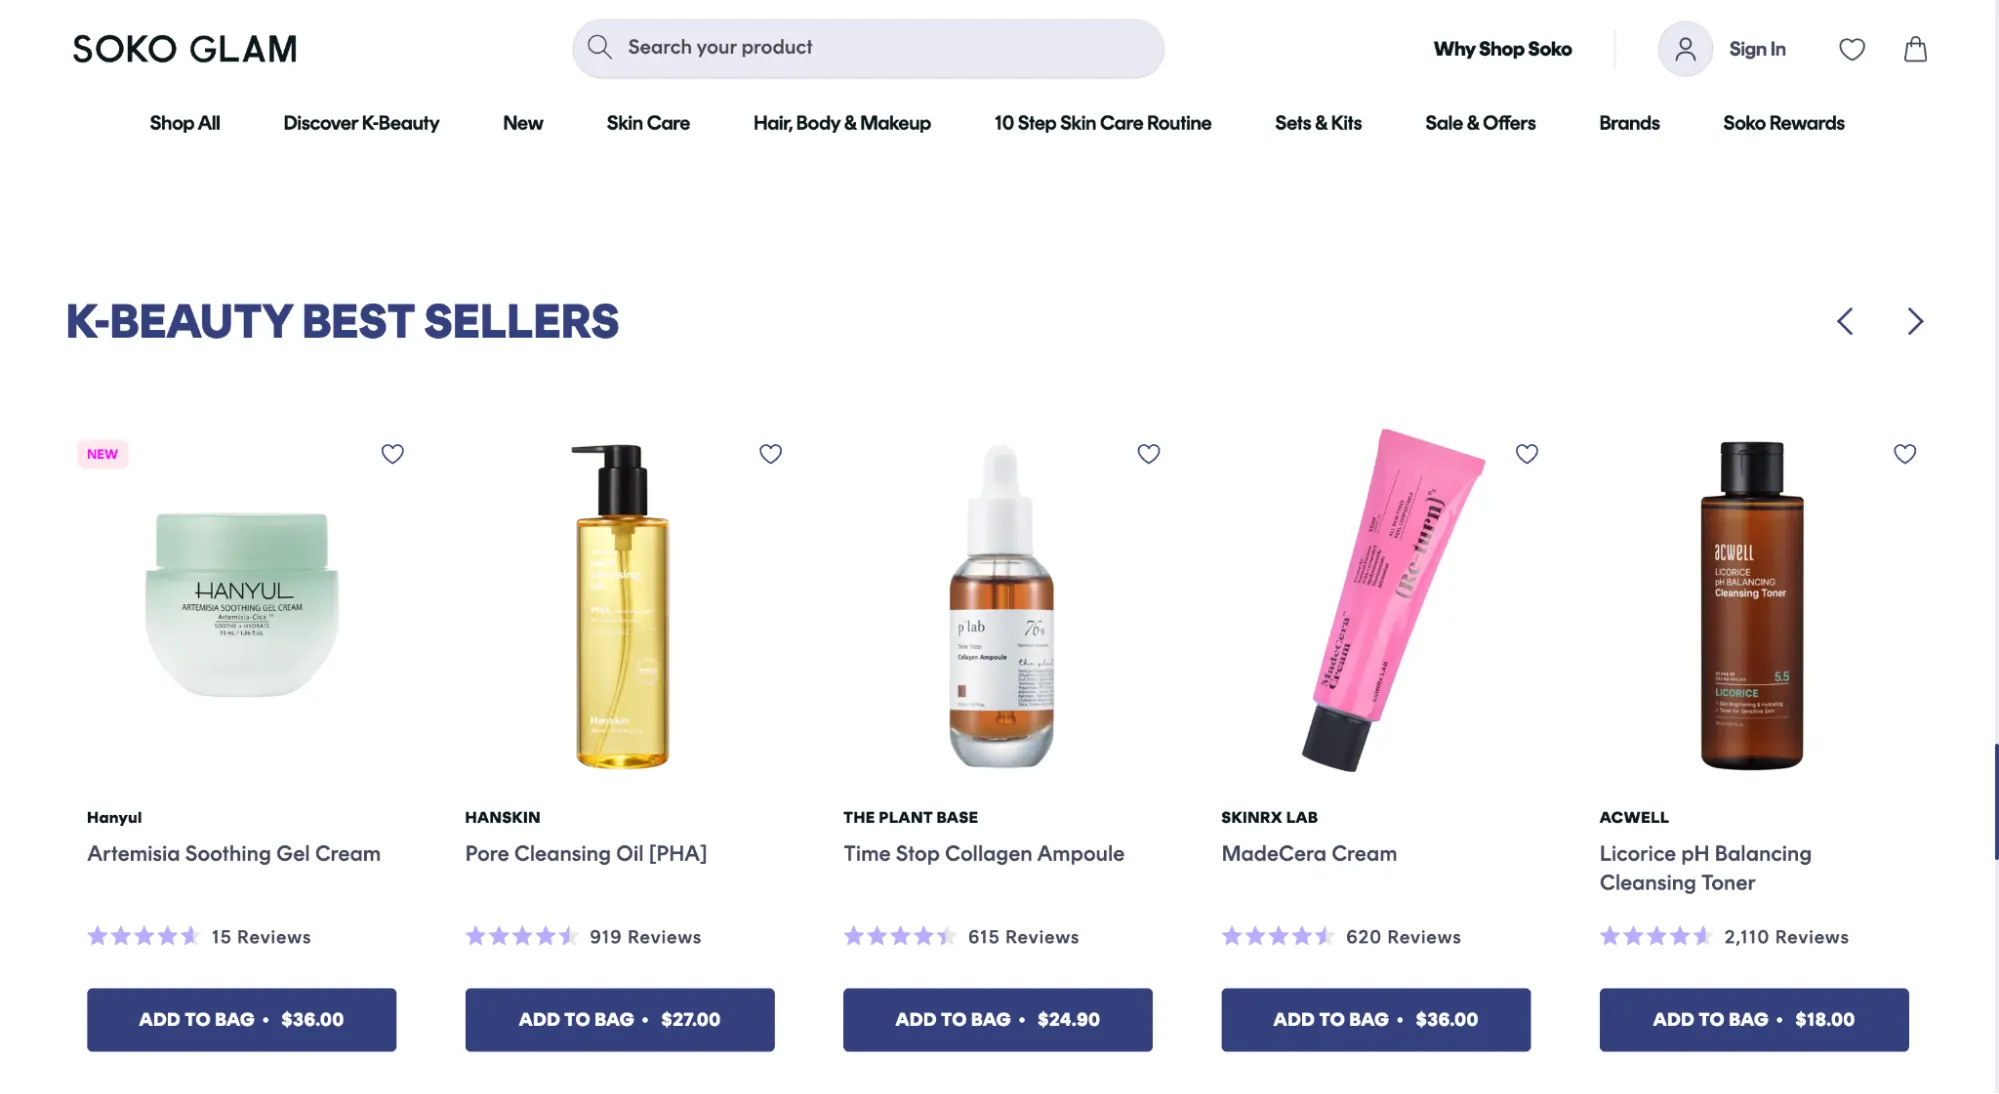
K-beauty retailer Soko Glam uses a manual slider to highlight its bestselling products, so first-time visitors can see what’s worth their attention.
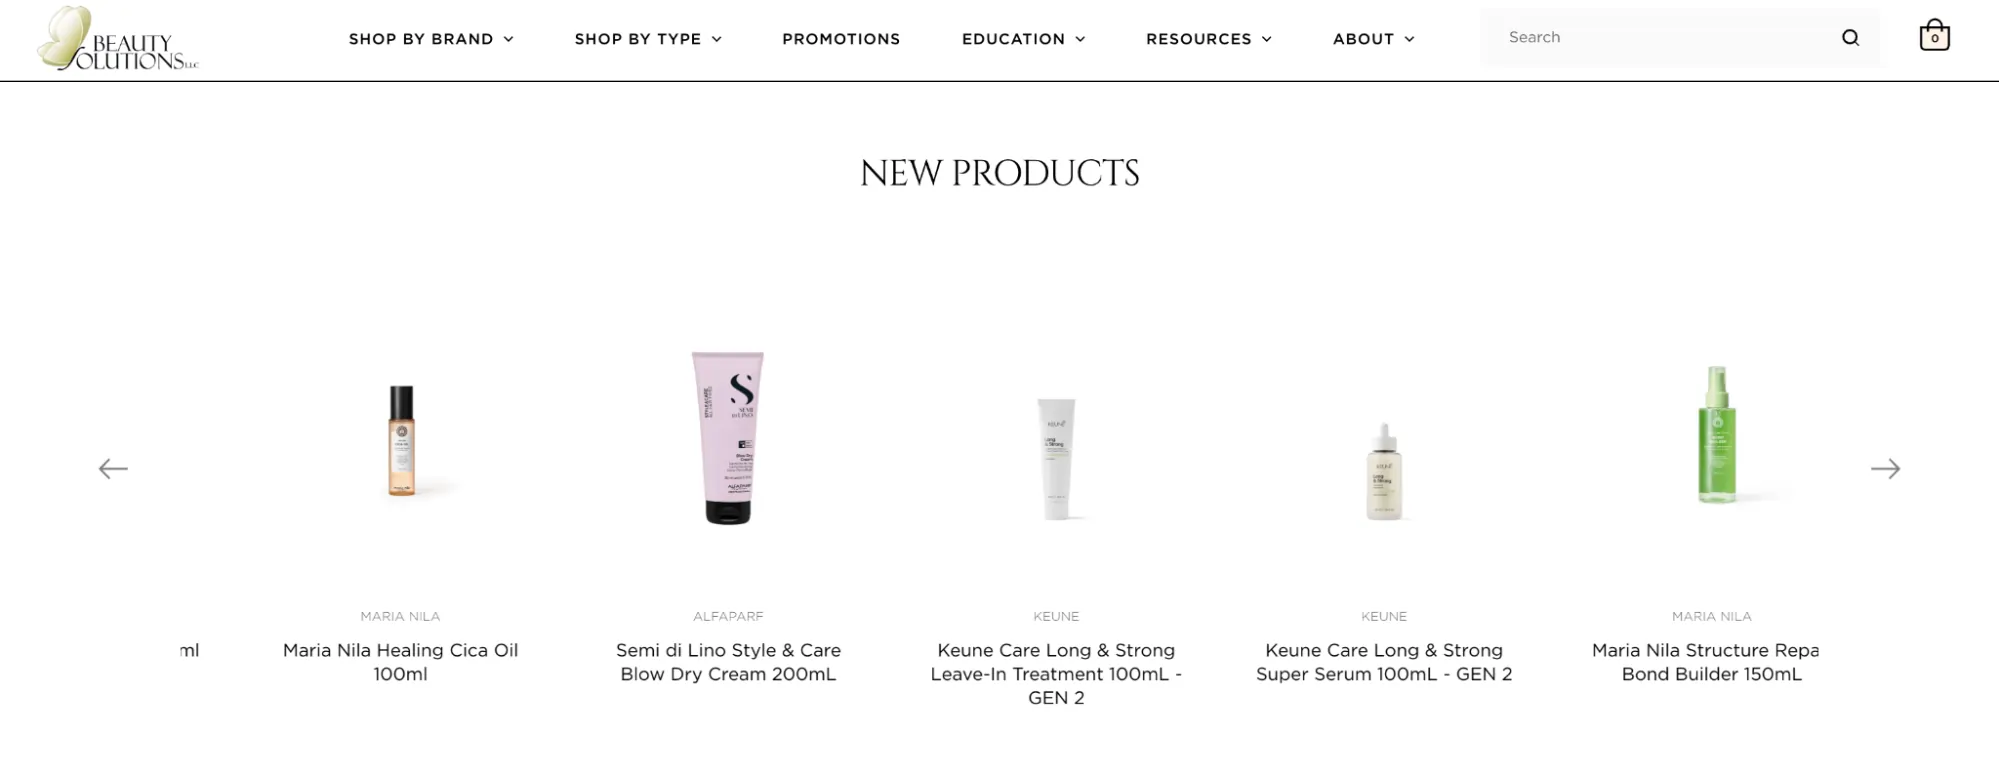
Skincare retailer Beauty Solutions takes a different approach, using an automatic slider to feature new arrivals, with each image linking straight to the relevant product page.
- Banner slider – A banner slider rotates through promotional messages like discounts, seasonal offers, or new arrivals. It’s useful when you have more than one thing to highlight but don’t want competing CTAs fighting for the same hero spot.
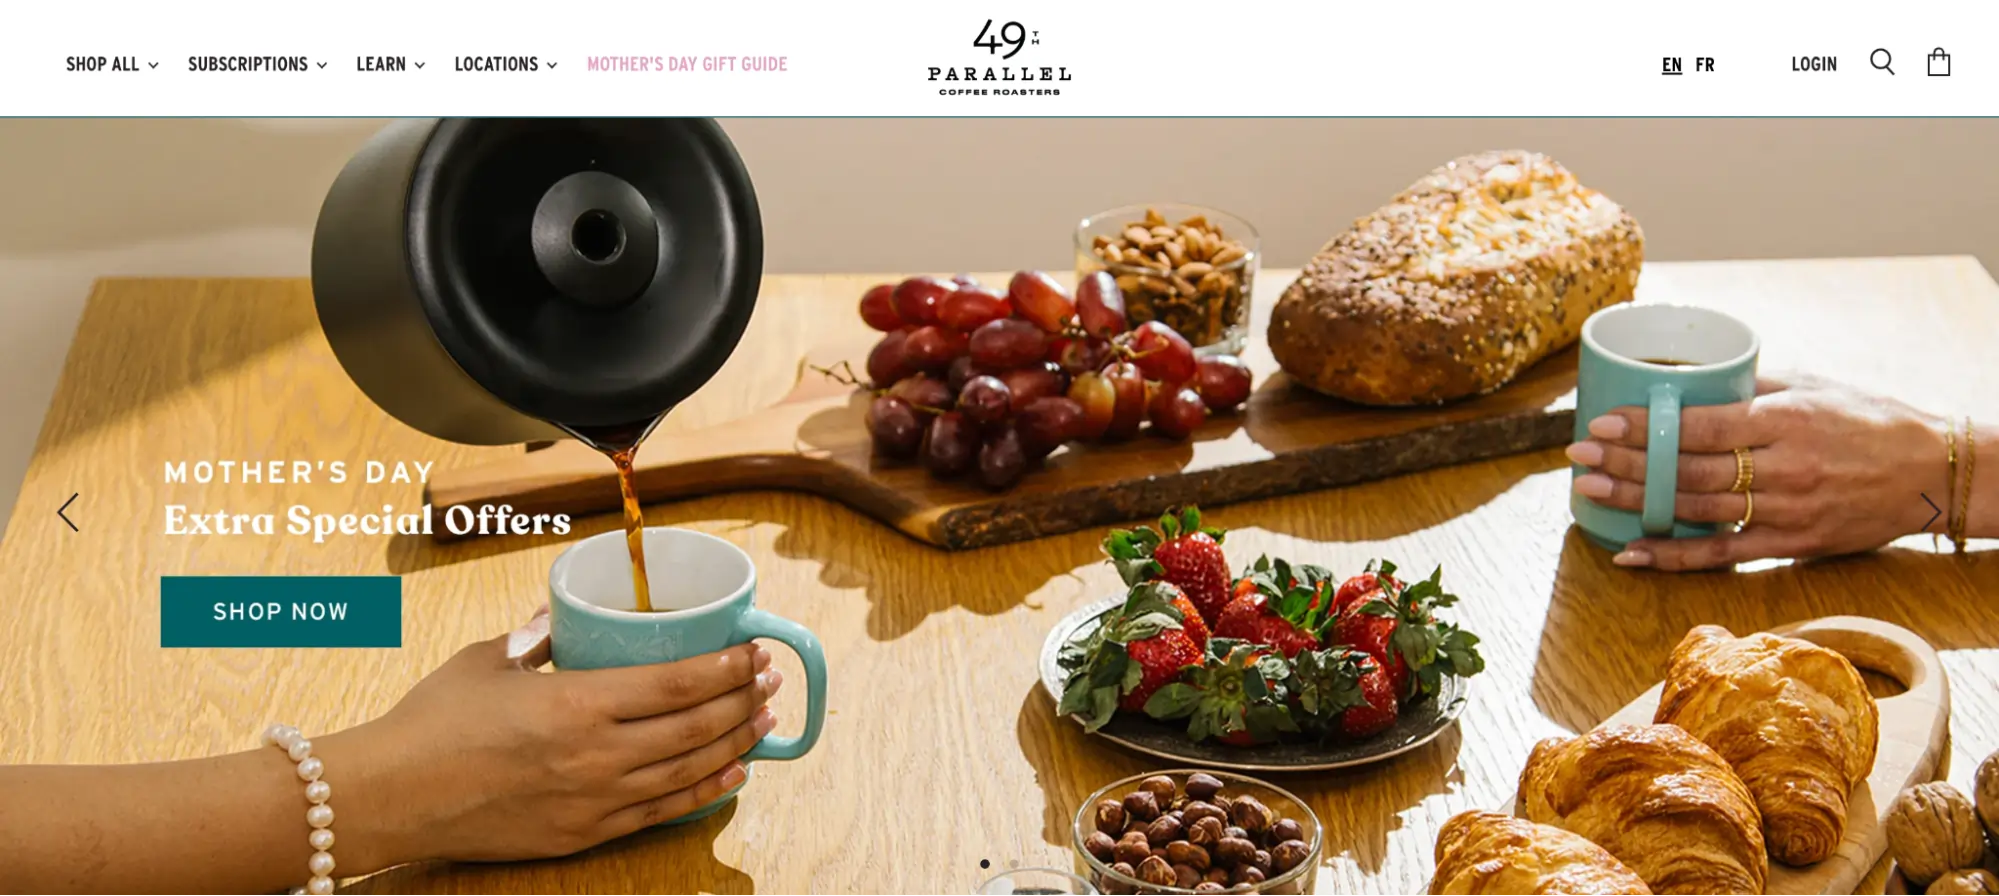
For example, coffee company 49th Parallel runs a two-slide manual banner on its homepage to spotlight Mother’s Day specials.

Beard & Blade, an Australian men’s grooming store, uses its banner slider to flag new arrivals like the Hero Sonic electric toothbrush and Evo’s styling clay and moulding paste.
Note: Sliders perform better when shoppers know there’s more to see. If there’s no cue that more slides are coming, most people won’t bother clicking through.
I have tested different types of Sliders on my Shopify clients over the years. We find that the best performing Sliders give some sort of hint that there are more to look at. One client in particular did very well by putting ‘Deal #1 of 3’ in their first Slider, then of course had Slider #2 and Slider #3 with even more deals.
Jeff Moriarty, Digital Marketing Ninja at JMoriarty Marketing
Do Shopify Sliders Actually Work? What The Data Shows
Research from the Baymard Institute found that 33% of ecommerce sites use a homepage carousel (similar to a slider), but 46% of those carousels have UX performance issues.
At the same time, business owners like Luke Lee, Burak Ozdemir, and Jeff Moriarty have rolled out sliders on their (or their clients’) stores and seen great results. So which is it?
It comes down to two things:
- Performance: Can bots crawl sliders, and do sliders slow sites down? Yes and no. Bots can crawl sliders, so making them SEO friendly matters. And not every slider app tanks your site speed, though some definitely do.
- Persuasiveness: Do sliders actually push people to buy? The only way to know for sure is to A/B test them. This means testing one version with a slider and one without.
Tim Brown did exactly that on a client’s homepage. Here’s what he found:
“Replacing a slider with a static image promo of the highest selling product and buttons with hover states improved conversions by 30% (with a statistical significance of 98%).
This test did what I thought it would do, but the key here is having more direct evidence to help steer this client and others away from sliders on their home page. I’m not the only one who’s had this experience, and I’ve read plenty of case studies with similar results.
The issue is thatpeople perceive sliders as if they are ads, thus they don’t interact with them, especially if there aren’t ways to easily navigate on the slider or if the navigation is tucked away.
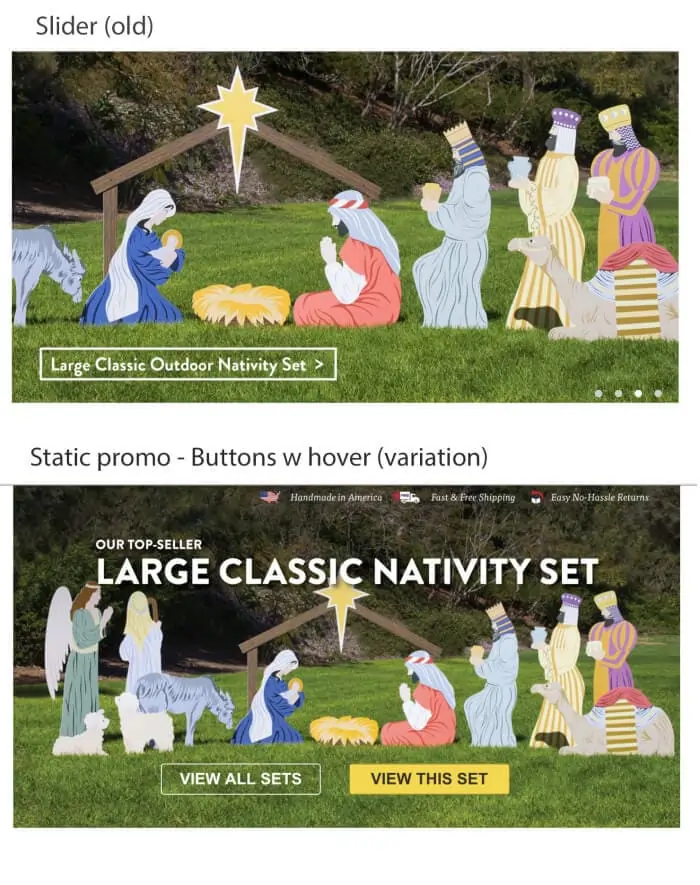
Takeaway: Remove sliders in the key home page promotion area, and use this to tell your story or promote high-selling products or key services instead. Another big takeaway is that, if you’re optimizing for clients, A/B testing something is a lot more compelling to them than talking about “best practice” or encouraging ideas based on other things I’ve read.”
Tim isn’t alone in his skepticism. Emily Amor, SEO Manager at Digital Darts, doesn’t recommend using sliders at all.
They cause confusion and can overwhelm visitors who come to your store. By the time they’ve registered one image, it’s already moved onto the next.
Furthermore, giving your customers too many options can distract them from the primary reason they came to your store in the first place. Instead, give your visitors a direct path to get there, with no distractions. Options are usually the by-product of poor strategy.
Emily also points out that slider plugins can slow down page load times, which hurts the user experience. Sliders are also hard to design well and don’t always behave consistently across devices and browsers.
Dean Kaplan of Kaplan Collection Agency agrees on the too-many-options problem, saying: “Sliders seem to offer the promise of being able to deliver multiple messages on the same page, but I have almost always found that focusing on a single message and call to action (CTA) is much more effective.”
So where does that leave you?
Baymard’s data says 46% of product carousels have UX issues, but that also means 54% don’t. Plenty of stores (and business owners) use sliders well and see them pay off, which is partly why they’re still so common.
We’ll cover best practices for designing Shopify sliders that actually work, but first, let’s clarify the difference between sliders and carousels.
Sliders vs. Carousels: What’s The Difference?
Sliders and carousels are essentially the same thing, with one key difference: carousels show multiple slides at once, while sliders show one slide at a time. So if a slider rotates a single product image, a carousel might display three or four products side by side and rotate the entire row.
Carousels work best when you want customers to see more options at a glance, like with logos, testimonials, or bestselling products.
Here’s a table showing the difference between sliders and carousels:
| Slider | Carousel |
||||||||||||||||
|---|---|---|---|---|---|---|---|---|---|---|---|---|---|---|---|---|---|
| Definition | A slider rotates through one slide at a time, showing a single image, message, or product per frame. | A carousel displays multiple slides at once and rotates the whole group, so shoppers see several items side by side. | |||||||||||||||
| Layout | Sliders take up the full frame with one piece of content, which makes each slide feel like its own moment. | Carousels split the frame across three or more items, which lets shoppers compare or scan options without clicking. | |||||||||||||||
| Best for | Sliders work well for hero banners, feature promos, and single-product spotlights when you want shoppers to focus on one thing at a time. | Carousels are a better fit for logo walls, testimonial rows, bestseller grids, and product galleries when you want to show a lot in one go. | |||||||||||||||
| UX risk | Shoppers often don’t realize there’s more to click through, especially if the navigation arrows are subtle or hidden. | The frame can feel visually noisy, and multiple CTAs in view at once can pull attention away from the action you actually want shoppers to take. |
When to use carousels
Use carousels when you want more viewable content to occupy the same real estate on your page, making it more likely that buyers will see it.
Here are some do’s and don’ts to keep in mind:
Do’s:
- Do use a carousel when people expect it. For example, to show customer reviews, best selling products, or new arrivals.
- Do use a carousel when it saves people time, effort, and clicks.
- Do use it to compare two different products.
Don’ts
- Don’t use a carousel in the hero section of the homepage because it can confuse visitors.
- Don’t push information onto users that doesn’t benefit them, only the company.
- Don’t let it become a place to dump content. If you can’t justify its use, don’t have one.
Best practices for using carousels
- Use a manual carousel so users are in control
- Use arrows or dot navigation to let users navigate
- Keep the text in these carousels short and clear
- Make sure the carousel can be swiped the same way on mobile devices
How to Add Sliders to Your Shopify Store
Since Shopify rolled out Online Store 2.0 in 2021, most modern themes now ship with a built-in slideshow section, so you can add a slider through the theme editor without writing code. There are two main paths to choose from.
Path 1: Use your theme’s built-in slideshow section
This is the easiest method, and it works for most basic use cases like homepage hero banners, promo slides, or simple image rotations.
Step 1: Open the theme editor
In your Shopify admin, head to Online Store → Themes. Find your live theme and click Customize to launch the drag-and-drop theme editor. This is where you’ll handle most of your theme customization without needing to touch any code..
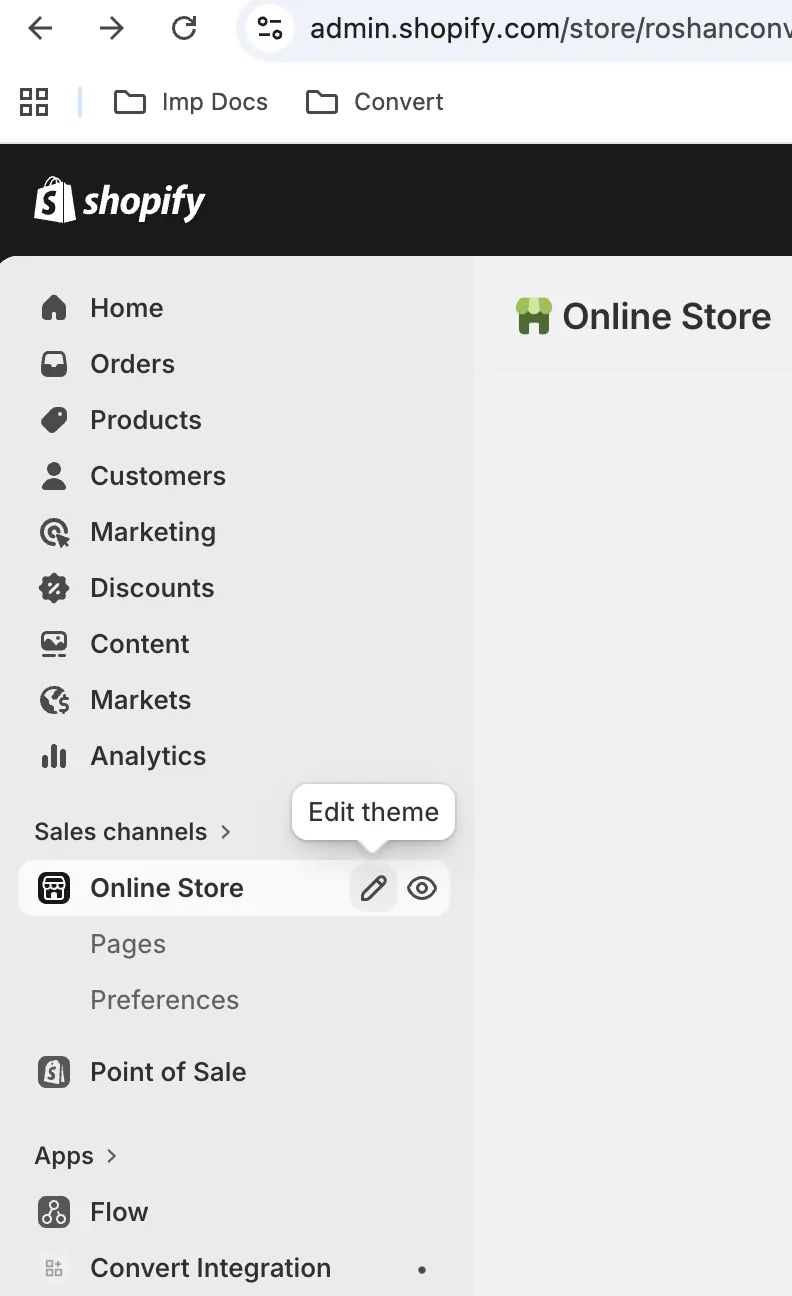
Step 2: Add the slideshow section
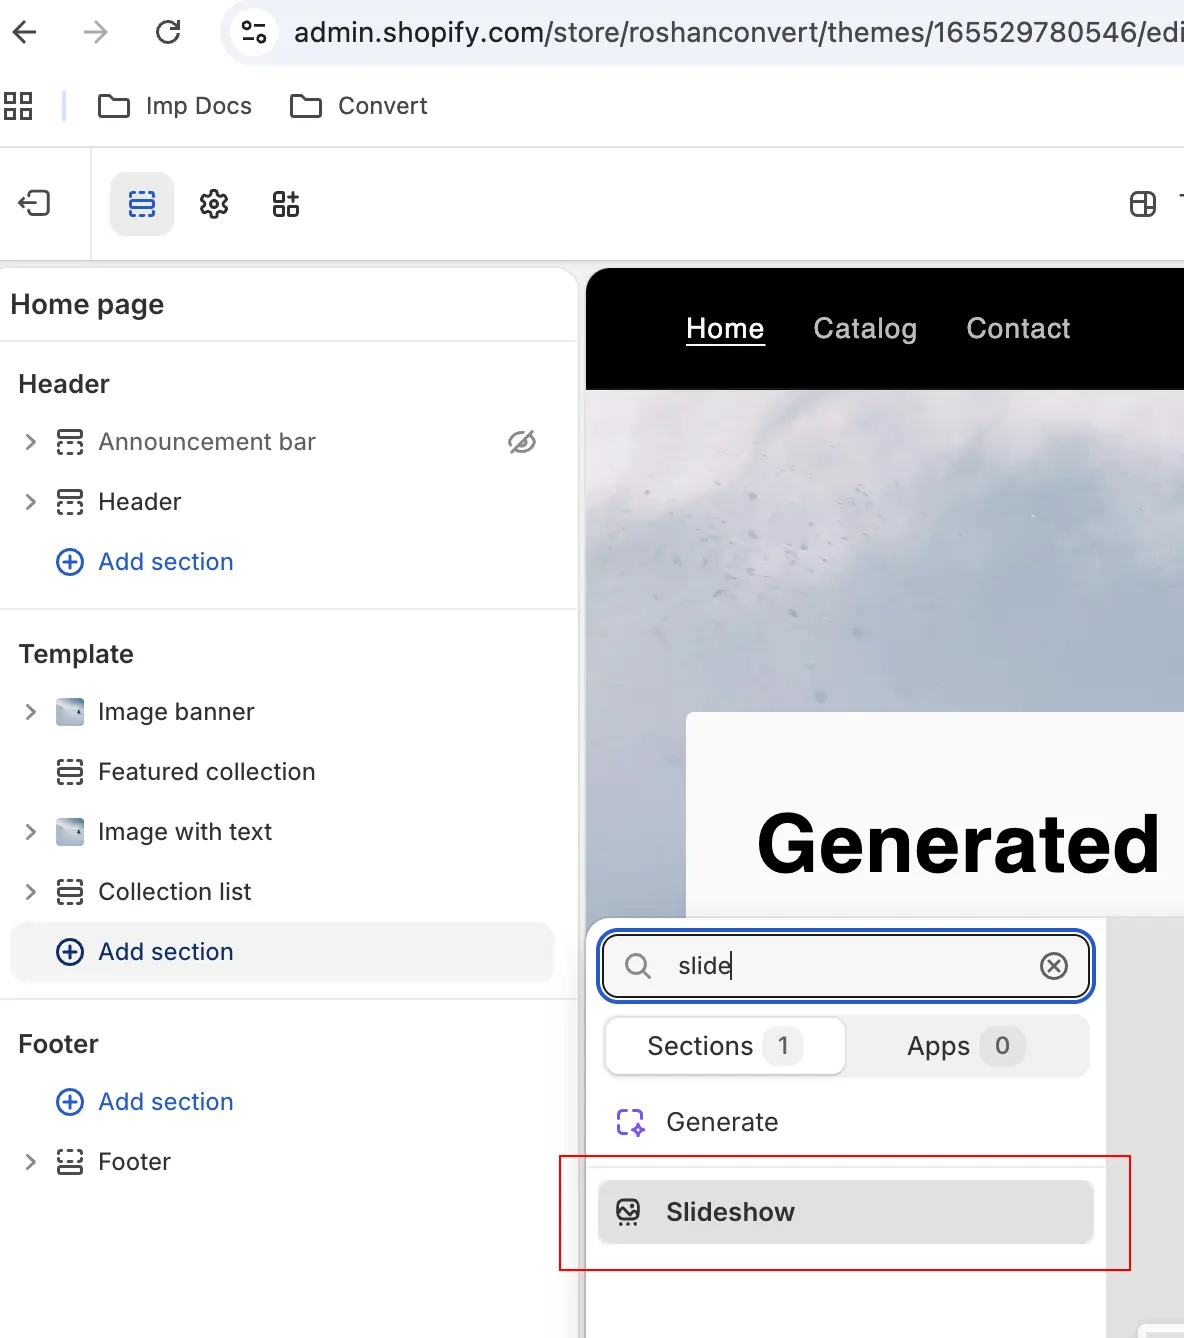
In the theme editor sidebar, click Add section and search for Slideshow. Drop it into the position you want on the page. Most modern Shopify themes (Dawn, Sense, Studio, Craft, and others) include this section by default.
Step 3: Add and customize your slides
Click the slideshow section to open its settings. From there, you can add new slides, upload images, write headlines and copy, link CTA buttons, and adjust rotation speed, transitions, and autoplay behavior.
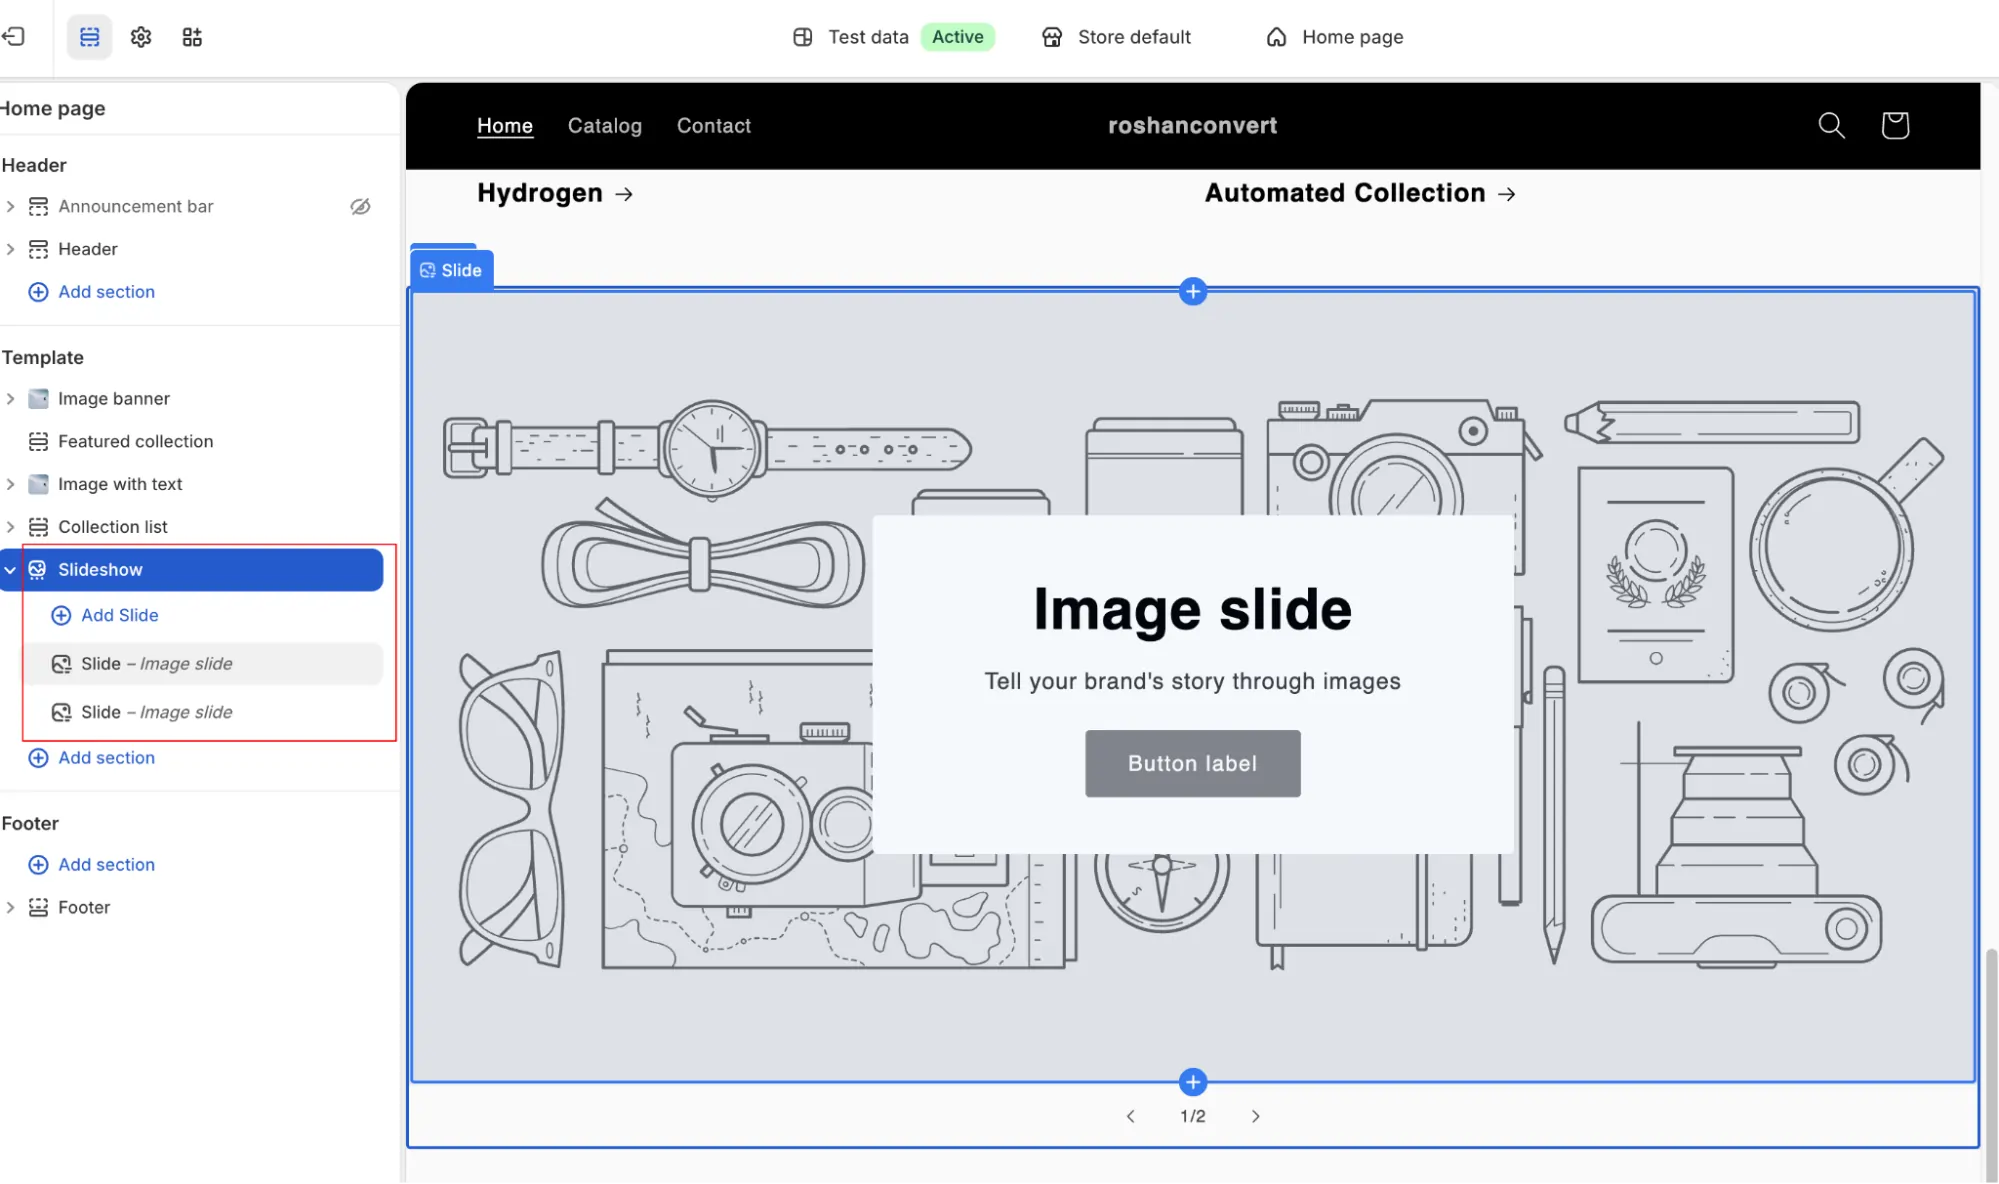
You can reorder each slide by dragging it into the position you want.
Step 4: Preview, test, and publish
Use the device toggle in the editor to preview your slider on desktop, tablet, and mobile before going live. Once everything looks good, click Save, then Publish.
Path 2: Use a Shopify slider app
If your theme’s built-in slideshow feels limited, a slider app gives you more flexibility. This is a good fit if you want specialized stuff like product carousels with add-to-cart functionality, video sliders, testimonial sliders, or asymmetrical layouts.
Step 1: Install the app
Browse the Shopify App Store, pick a slider app that fits your needs, and click Add app to install it. (We cover some of the best app options below.)
Step 2: Build your slider in the app’s editor
Most slider apps open into their own drag-and-drop builder, separate from the Shopify theme editor. You’ll usually start by picking a template or layout, then add your slides one by one.
From there, you can upload images or videos, write headlines and CTAs, set transitions, and adjust autoplay, speed, and navigation controls. The exact options depend on the app, but the workflow is similar across most of them.
Step 3: Embed it on your store
With Online Store 2.0, most modern apps let you add the slider directly as a section in the theme editor, the same way you’d add the built-in slideshow. However, older apps may still give you a code snippet to paste into your theme.
Step 4: Test and publish
Preview the slider across devices to make sure it loads cleanly and behaves the way you want. Then publish.
💡 Note: If you need something more custom than what the theme editor or apps can offer (think bespoke animations, unique layouts, or tight integration with other theme features), Shopify still allows code-based customization.
You can edit your theme’s Liquid, CSS, and JavaScript files directly through Online Store → Themes → Edit code. If you’re going this route, duplicate your live theme first so you have a clean backup to fall back on if anything breaks.
If you prefer video tutorials, watch this video from How To Shopify where someone explains how to add a featured product slider to your Shopify store.
Link to YouTube video: How To Add a Slideshow to Shopify (2026 Easy Tutorial)
Top Shopify Slider Apps in 2026: Key Features and User Reviews
Here are nine of the best Shopify slider apps you should give a try:
- POWR Image Slider & Carousel
- SmartBN: Banner Slider
- Image Slider Pro
- Slider Revolution & Sections
- GG Product Page Image Slider
- Ada IQ: Slideshow Image Slider
- OctoSlide Slider & Carousel
- GA: Image Slider & Slideshow + AI
- Zestard Banner Image Slider
| Slider app | Rating | Key differentiator |
Pricing |
||||||||||||||||||||
|---|---|---|---|---|---|---|---|---|---|---|---|---|---|---|---|---|---|---|---|---|---|---|---|
| POWR Image Slider & Carousel | 4.4/5 | Built-in AI image generation for sliders | Free plan available. Paid plans range from $1/month to $14/month | ||||||||||||||||||||
| SmartBN: Banner Slider | 4/5 | Code snippets you can embed in a Liquid file or page for placement flexibility | Free plan available. The paid plan costs $15.99/month | ||||||||||||||||||||
| Image Slider Pro | 4.6/5 | Mobile-responsive design that works across different kinds of pages | Free plan available. Paid plans range from $6.99/month to $19.99/month | ||||||||||||||||||||
| Slider Revolution & Sections | 4.9/5 | Multilingual and RTL support for stores selling across regions | Free plan available. Paid plans range from $4.99/month to $99.99/month | ||||||||||||||||||||
| GG Product Page Image Slider | 4.9/5 | Video and 3D model support, including AR previews | Free plan available. The paid plan costs $8.99/month (7-day free trial) | ||||||||||||||||||||
| Ada IQ: Slideshow Image Slider | 4.3/5 | Add slideshows through the Theme Editor UI or with a one-line code snippet | No free plan available. It costs $2.99/month (10-day free trial) | ||||||||||||||||||||
| OctoSlide Slider & Carousel | 4.9/5) | Lazy load support to keep slider-heavy pages from dragging down PageSpeed | Free plan available. The paid plan costs $7/month (3-day free trial) | ||||||||||||||||||||
| GA: Image Slider & Slideshow + AI | 4.8/5 | A library of ready-made templates for fast setup | Free to install. The paid plan costs $9.99/month (7-day free trial) | ||||||||||||||||||||
| Zestard Banner Image Slider | 5/5 | Mobile, tablet, and desktop responsive design across every slider | No free plan available. It costs $4.99/month (7-day free trial) |
1. POWR Image Slider & Carousel
Pricing: There’s a free plan available. Paid plans currently range from $1/month (Starter) to $14/month (Business)
Rating: 4.4/5 (97 reviews)
This app lets Shopify store owners build customizable sliders, carousels, hero banners, and slideshows without any coding. It’s geared toward visual storytelling, with options to showcase products, logos, or new releases through different layouts and transitions.
Key features
- Multiple layouts to choose from, including slider, carousel, and hero
- Custom transitions, slider speed, and CTA buttons on each slide
- SEO alt text fields for every image to help with discoverability
- Image protection that disables right-click to prevent copying
- Built-in AI image generation to create slide visuals from text prompts
Positive review
“The best app for image sliders I’ve found so far! I’ve used others that are glitchy, having loading issues with images and don’t have as many customization options as POWR image slider & Slideshow. Their customer service is also amazing- they have a chat feature and have been available to help me with all my sliders immediantly. 10/10 all around experience with this app!” — Chloe Rose Swimwear
Critical review
“Waste of money. Did not manage to create a simple logo slideshow—no help from the team, either. Do not recommend.” — Elan Skincare
2. SmartBN: Banner Slider
Pricing: There’s a free plan available. The paid plan costs $15.99/month.
Rating: 4/5 (49 reviews)
This slider app lets Shopify store owners upload, customize, and display image and video banners as responsive sliders across their store. It’s best suited for merchants who want a quick way to spin up multiple promotional sliders without overcomplicating things.
Key features
- Supports both image and video sliders, including full-width mode
- Bulk upload feature to add multiple banner images at once
- Clickable banners that let you assign a link to each slide
- Preview tool to test sliders before pushing them live on the storefront
- Embedded code snippets you can drop into a Liquid file or page for placement flexibility
Positive review
“After hours of looking for a simple image carousel that does not cost an arm I came across this app and I was saved. might take a little time to understand but it is super simple to use and very very customizable. Even the free version will have everything you need, just in smaller numbers.” — Mini Mushroom Farms
Critical review
“We are using this app and facing some issues regarding slider, images not loading on the page. I have sent 4 emails in the last 5 days but still did not get any response. Bad service.” — BigHaat
3. Image Slider Pro
Pricing: There’s a free plan available. Paid plans currently range from $6.99/month (Basic Plan) to $19.99/month (Premium Plan)
Rating: 4.6/5 (58 reviews)
This app lets Shopify store owners build banner sliders, logo carousels, and lookbook-style sliders without writing code. It’s great for merchants who want a flexible way to display visual content and link slides to products, collections, or external pages.
Key features
- Multiple slider styles, including banner, logo carousel, and lookbook layouts
- Bulk image upload with control over slider speed, captions, and hover effects
- Clickable slides that can link to products, collections, pages, or external URLs
- Content scheduling to set sliders to go live or expire on specific dates
- Mobile-responsive design that works across home, product, and collection pages
Positive review
“Love this app, helps me create gorgeous lookbook pages on my Shopify store. During times I needed support, they answered via email within the day. Highly recommend!” — Tayma Martins
Critical review
“Meets most of our needs. Part of the banner is cut off when running the banner at the bottom of our index page, but we’ve been running it elsewhere. Would like the ability to turn off thumbnails for either layout. Otherwise it’s clean and convenient.” — Barnett Products
4. Slider Revolution & Sections
Pricing: There’s a free plan available. Paid plans currently range from $4.99/month to $99.99/month (7-day free trial)
Rating: 4.9/5 (171 reviews)
This app lets Shopify store owners build banner sliders, video sliders, slideshows, carousels, and other store sections through a drag-and-drop editor. It’s one of the more feature-heavy options on this list, with a deep template library and support for multiple media types and animation styles.
Key features
- 600+ ready-made templates for sliders, hero sections, banners, and landing page elements
- Supports multiple content sources, including images, videos, products, and testimonials
- Advanced animation effects and motion options like Lottie, Particle, and Whiteboard animations
- Social media feed integration with YouTube, Vimeo, and Instagram
- Multilingual and RTL support for stores selling across regions, plus Shopify 2.0 compatibility
Positive review
“This app seems to be exactly what I’ve been looking for for our site. There’s a learning curve to creating the slides, but the online support is SUPER helpful and attentive. Thanks!” — The Crispery
Critical review
“Terrible support. App was working fine for weeks and now that we have a massive sale running, the slider is showing blank. Was told it was likely other apps, but we haven’t installed any new apps in the last week-or-so when it was working fine.” — The Bod Society
5. GG Product Page Image Slider
Pricing: There’s a free plan available. The paid plan costs $8.99/month (7-day free trial)
Rating: 4.9/5 (165 reviews)
This app replaces the default product page gallery on Shopify stores with a customizable slider that supports image carousels, zoom, thumbnails, and video. It focuses specifically on the product page experience, which makes it a good pick for stores that want shoppers to inspect products in more detail before buying.
Key features
- Image slider with arrows, thumbnails, magnify zoom, and lightbox view
- Video and 3D model support, including AR previews directly inside the gallery
- Variant-specific image slideshows that show only the selected variant’s photos
- Mobile-optimized with Instagram-style swipe navigation
- One-click install with options to customize layout, colors, and carousel behavior
Positive review
“The app works well. It’s a definite upgrade over the built-in gallery and support for it is excellent. I’ve experienced a few issues/had some customization requests for it and literally everything has been resolved within a matter of a couple of hours.” — Eve Bands
Critical review
“I have been trying to reach out to the developer for about a week to get help with this app. It isn’t functioning on my site, despite troubleshooting with the recommendations shown inside the app. I need the developer to respond or I will cancel my subscription and find a new app.” — ZUP Boards
6. Ada IQ: Slideshow Image Slider
Pricing: No free plan available. It costs $2.99/month (10-day free trial)
Rating: 4.3/5 (20 reviews)
This app lets Shopify store owners build slideshow galleries to highlight bestsellers, new arrivals, or any other product imagery on their store. It keeps things straightforward, with a single flat-rate plan and direct integration into the Shopify Files library.
Key features
- Upload images from your computer or pull from existing product images in your store
- All uploaded images are saved to your Shopify Files library, so they’re easy to reuse elsewhere
- Add slideshows through the Theme Editor UI or with a one-line code snippet
- Unlimited slides and slideshows on a single flat-rate plan
Positive review
“This is a great app, the best part is that you can create separate slideshows with different images for desktop and mobile formats for the same website. The app is designed in a way that it’s extremely simple to use while at the same time is very versatile. Viktor, the app’s developer, is extremely quick to respond to inquiries and is very proactive.” — Family T-shirts
Critical review
“The app is causing me major compatibility problems with my theme. I’ve contacted support several times and never heard back. And yet I’ve waited a long time! I don’t recommend it!” — Alsancia
7. OctoSlide Slider & Carousel (formerly FoxSell)
Pricing: There’s a free plan available. The paid plan costs $7/month (3-day free trial)
Rating: 4.9/5 (24 reviews)
This app lets Shopify store owners build customizable product sliders and carousels to highlight bestsellers on the homepage, collection pages, and beyond. It leans into conversion-focused features like one-click add-to-cart and built-in analytics.
Key features
- One-click Add to Cart button on any product slider to shorten the path to purchase
- Compact and enlarged slider layouts, with zoom-on-hover for product images
- Built-in analytics that track sales performance from each individual slider or carousel
- Lazy load support to keep slider-heavy pages from dragging down PageSpeed
- Full Online Store 2.0 compatibility with mobile-optimized responsive design
Positive review
“We’ve been using the FoxSell Slider app on our Shopify store, and the team has been fantastic to work with. We had an issue with images in our product slider being cut off, and they quickly added a new setting to fix it perfectly.” — Missing Pen
Critical review
“After installing and clicking on check theme compatibility, it’s stuck there and wont provide further options to include app in my store” — My Store
8. GA: Image Slider & Slideshow + AI
Pricing: This app is free to install. The paid plan costs $9.99/month (7-day free trial)
Rating: 4.8/5 (8 reviews)
This app lets Shopify store owners build product carousels, banner slideshows, and image sliders to highlight bestsellers, promotions, or new arrivals. It leans on pre-made templates and AI-assisted design to help merchants set things up quickly.
Key features
- Customizable layouts, transitions, and slider speeds with no coding required
- A library of ready-made templates for fast setup
- Buttons that link slides to product, collection, or promotional pages
- Image hover effects to add interactivity to each slide
- Responsive design that adapts to any store page across devices
Positive review
“Looks good on our website and functions well. The support team have been great when we needed help with adding it to pages on our custom theme.” — Sugar Valley Lda
Critical review
“Amazing app if it genuinely is free its great – I’ve only just started using it, one slight improvement would be dynamically changing size of images between mobile and desktop, but amazing otherwise.” — Meerkats Multisport
9. Zestard Banner Image Slider
Pricing: No free plan available. It costs $4.99/month (7-day free trial)
Rating: 5/5 (2 reviews)
This app lets Shopify store owners build multiple responsive sliders and display them across single or multiple pages on their store. It’s a solid pick for merchants who want different sliders running in different parts of the store, each with its own style and content.
Key features
- Create one or more sliders and assign them to single or multiple pages
- Set different slider styles independently for each slider you create
- Auto-generated shortcodes that you can paste into any location on your store
- Search and filter tools to manage slides and categories from the admin
- Mobile, tablet, and desktop responsive design across every slider
Positive review
“Thanks to the developer team.. great work. Helpful with the special solution for different viewport banner performance issue.” — Pesoclo
Critical review
There are currently no critical reviews of the app yet.
How to A/B Test Sliders with Convert Experiences
Sliders are a controversial idea for good reason. When done wrong, visitors can get annoyed, bounce from the page, and your conversion rate may drop. A/B testing is the only reliable way to know whether a slider is actually pulling its weight on your store.
Rich Page, conversion expert, shares a few A/B ideas you can use:
- Test having a single image vs. rotating slides
- Test using an explainer video vs. slides
- Test the height and width of your slider
- Show sliders to the right target audience
- Try adding social proof in different ways
Here’s how to test sliders properly using Convert Experiences.
1. Understand what exactly you’re testing
Before you build anything, get specific about what you want to learn. Common slider tests fall into a few buckets:
- Slide order – Moving a high-priority offer to slide one, or putting your bestseller before your newest arrival
- Slide content – Swapping images, headlines, or CTAs (for example, testing “Shop Now” vs. “See What’s New” as your CTA copy)
- Slider behavior – Switching from auto-rotate to manual, slowing the transition from 3 seconds to 5, or cutting your slide count from six to three
- Slider vs. no slider – Replacing the slider entirely with a static hero image
This step matters because it shapes how you’ll build the variation. Simple content swaps (like changing a headline or image) can usually be handled in the Visual Editor without writing code, while behavior changes, like adjusting rotation speed, will need custom JavaScript.
2. Create an A/B experiment in Convert
Once you know what you’re testing, set up a standard A/B experiment in Convert:
- Pick the page where the slider lives (homepage, product page, collection page, etc.)
- Choose your traffic split between the original and your variation (a 50/50 split is the standard starting point, but you can adjust based on the number of variations, your traffic volume, and risk tolerance)
You’ll handle all of this through Convert’s experiment creation workflow.
3. Modify the slider
There are two main ways to make changes to a slider in Convert: the Visual Editor and custom JavaScript.
Option A: Visual Editor (for simple changes)
Use the Visual Editor when:
- The slider content is static in the DOM (meaning it’s part of the HTML when the page loads, not injected later by JavaScript)
- You’re only changing text, images, or links
From there, you can click into individual slides, edit headlines, swap images, update button copy or links, and hide or show specific slides.
⚠️ Heads up: Many sliders are injected dynamically by JavaScript libraries, which means the Visual Editor may not apply reliably when the slider re-renders. If that’s the case, use custom JS instead.
Option B: Custom JavaScript (recommended for most sliders)
This is the more reliable approach for most slider tests, especially when the slider is built on a library like Swiper, Slick, or Owl Carousel. Use JavaScript when:
- The slider is controlled by a JS library
- Slides load asynchronously after the initial page load
- You need to change behavior, like rotation timing, transition style, or slide order
Typical strategies include:
- Waiting for the slider to load before running your changes. Sliders often initialize a moment after the page loads, so if your code runs too early, it’ll target elements that don’t exist yet. Use polling or a MutationObserver to wait until the slider is ready before applying your variation.
- Reordering slides by moving them within the DOM:
var slider = document.querySelector(‘.slider’);
var slides = slider.querySelectorAll(‘.slide’);
slider.appendChild(slides[2]); // move the third slide to the end - Replacing slide content dynamically with new images, text, or links.
- Reinitializing the slider after you’ve made DOM changes so the library picks them up. The exact method varies by library. Swiper has `update()`, Slick has `reInit`, and Owl has `refresh.owl.carousel`.
4. Handle flicker and timing issues
Sliders are notorious for causing flicker, since they often initialize after the page loads. Without a fix, shoppers may see the original slider for a split second before your variation kicks in, which messes with both the user experience and your test results.
To prevent this:
- Use Convert’s anti-flicker snippet to hide the entire page body until your variation code runs. If you want to hide just the slider area, add a tiny inline style on the slider container that the variation code will remove after it executes.
- Trigger your variation code as early as possible in the page load (ideally in the head, before the slider library initializes)
- If your slider library supports it, delay the slider’s initialization until your changes are applied
5. Track the right goals
Pick goals that actually tell you whether the slider variation worked. The right metric depends on what you’re testing, but options include:
- Clicks on slider CTAs – useful for testing copy, button color, or slide order
- Slide interactions – arrow clicks, dot navigation, swipes (good signal for whether shoppers are engaging with the slider at all)
- Downstream conversions – add-to-carts, signups, or purchases (metrics that matter for revenue)
In Convert, you can track clicks through goals and attach event listeners to specific slider elements for more granular data.
For example, if you want to know whether shoppers who clicked slide two converted better than those who clicked slide one, you can fire a custom goal for each slide click and segment the results in your report.
6. QA thoroughly
Slider tests break easily, so QA is non-negotiable before you push the experiment live. Check that:
- The variation works on both desktop and mobile
- Slide transitions still run smoothly
- There are no duplicate slides or broken navigation
- The variation loads consistently across different browsers and sessions
Catching these issues before launch saves you from running a test on a broken variation, which gives you bad data and a wasted test cycle.
👉 Read: QA-ing Client-Side & Server-Side Experiments
7. Run the test long enough to reach statistical significance
A lot of slider tests get called too early. You see the variation pulling ahead in the first few days, call it a winner, and ship it, only to find out later that the result wasn’t reliable. To avoid this:
- Calculate your sample size before launch. Use Convert’s A/B testing calculator to calculate how many visitors you need before the test can give you a reliable answer. All you have to do is put in your baseline conversion rate, the minimum effect you want to detect, and your confidence level.
- Run the test through full business cycles. A minimum of one to two weeks is the standard, since shopper behavior shifts between weekdays and weekends. If your store has weekly or monthly patterns (like payday spikes or weekend traffic surges), make sure your test window covers them.
- Don’t check results every day. Don’t peek at results daily. Checking your test every few hours leads to early-stopping bias, where you call a winner based on partial data. Instead, set a check-in cadence (every few days at most) and stick to it.
- Wait for both statistical significance and a meaningful sample size. Hitting 95% confidence on a small sample doesn’t mean much. You need enough visitors to trust the result and a confidence level that says the difference isn’t random.
Best Practices to Follow when Optimizing Shopify Sliders
Now that you know how to include sliders in your Shopify store and what apps to use, here’s how to design ones that actually convert.
1. Use high-quality images with relevant text
The images on your slider are the first thing shoppers notice, so blurry or pixelated visuals will hurt your store’s credibility. Will Cannon, the founder of Signaturely, advises paying attention to the visual side:
“Customers prefer to look at images rather than read texts. Make your slider appealing to the audience by providing attractive images to them rather than long texts.”
But going text-free isn’t always the answer. Burak Ozdemir points out that a short caption helps shoppers understand what each image is about, especially when the visual alone doesn’t tell the full story.
The best move is a mix of both: sharp, high-quality images paired with brief, relevant text that gives context without crowding the slide.
2. Show the most important slide first
Most shoppers won’t scroll through every slide, so your first one has to do the heaviest lifting. Lead with your USP, the overarching reason someone should buy from you, so visitors get a good reason to keep going.
If the first slide doesn’t hook them, the rest won’t get a look in.
3. Set a slow rotation time on desktop
If you’re running an auto-rotating slider on desktop, give shoppers enough time to actually read each slide. Too fast and they’ll miss the content and have to wait for the slide to come back around. Too slow and they’ll lose patience before reaching the next one.
Rich Page suggests a rotation time of around 3 seconds, which gives most shoppers time to scan a headline and an image before the next slide loads.
4. Provide prominent manual controls, especially on mobile
Auto-rotation is more forgiving on desktop because shoppers have a visible cursor, larger screens that show the navigation clearly, and hover states that often pause the slider when they want a closer look.
Mobile doesn’t have all that. Screens are smaller, there’s no hover to pause anything, and shoppers are usually scrolling fast or reading on the move. A slider that keeps moving on its own can frustrate users.
Dean Kaplan recommends using a static slider on mobile with clear, tappable arrows or dot navigation so shoppers can control the pace themselves.
5. Ensure slide content loads quickly
High-quality images tend to be large files, which can drag down your slider’s load time. And shoppers won’t wait around for a slow slide, especially on mobile.
“The worst slider issue I came across with one of my clients is when they didn’t compress the images and uploaded sliders that were over 50mb each,” says Jeff Moriarty. “Almost no one saw them, because they didn’t load by the time the visitor either scrolled down or went to another web page.”
Here are a few quick fixes:
- Size images correctly for the slider dimensions instead of uploading the largest version you have
- Compress files (past a certain point, shoppers can’t tell the difference in quality anyway)
- Use modern formats like WebP for smaller file sizes without quality loss
- Lazy load slides below the fold so they only load when shoppers reach them
- Cut down on extra styles and fonts that slow rendering
This matters for Core Web Vitals too. A heavy slider in the hero section can tank your Largest Contentful Paint (LCP) score, and a slider that shifts as it loads can spike Cumulative Layout Shift (CLS). Both signal a poor user experience to Google, which can reduce your store’s rankings.
6. Have fewer than 5 slides
Too many slides leads to analysis paralysis, and shoppers tend to bail before getting through them all. Instead, be intentional: have a strong reason for each slide you include, and cut anything that doesn’t earn its spot.
Luke Lee of Ever Wallpaper recommends keeping it tight: “Avoid using too many slides—three or four is usually plenty. Too many slides can be overwhelming for visitors and make it difficult for them to find the information they’re looking for.”
Fewer slides also means fewer images to load, so your page loads faster.
7. Use an asymmetrical layout for carousels
If you’re going with a carousel, try an asymmetrical layout. Airbnb and Booking.com both ran A/B tests and landed on nearly identical layouts: one large “feature” image with smaller thumbnail-style images around it.
This setup gives shoppers a clear focal point while still letting them browse other options at a glance.
8. Use engaging copy on all slides
Every slide is a chance to engage visitors and use a different selling angle to convert them. So, lead with headlines that speak to specific benefits or pain points, and pair them with action-based CTAs that tell shoppers exactly what to do next.
Don’t waste a slide on filler copy. If a slide can’t make a clear case for itself, it shouldn’t be there.
9. Optimize the images in your sliders
Image choice goes deeper than resolution. The type of image you use, the emotions it evokes, and how the people and products are positioned all shape how well your slider converts.
You should also refresh your slider images regularly. Burak notes that stale visuals can quickly become outdated and less effective at fulfilling their purpose of attracting attention.
Images are funnels too, which is why we made a Shopify image optimization guide based on real image-driven A/B tests.
How AI Is Changing Shopify Sliders
AI is showing up in more slider tools, and it’s helping Shopify merchants set things up faster and with less manual work. Here are a few ways it’s being used right now:
- AI image generation for sliders
Some apps now build image generation directly into the slider editor. POWR Image Slider & Carousel, for example, lets you create slide visuals from text prompts without leaving the app.
This is useful when you need quick concept visuals for a campaign, a placeholder while professional photography gets finalized, or seasonal banners that don’t justify a full photo shoot. - AI-powered product recommendations in carousels
Instead of manually picking which products go in your “popular” or “you might also like” carousel, some tools now populate them dynamically based on visitor behavior.
The carousel adjusts in real time to show items that match what each shopper has browsed, added to cart, or bought before. This makes the slider feel personal without you having to update it. - AI-assisted layout and design
A few apps now suggest optimal slider configurations based on your store type, products, or theme. They can recommend slide count, image dimensions, transition speed, and CTA placement, taking some of the guesswork out of designing a slider that performs.
While AI can help you set up sliders faster and save valuable time, it doesn’t replace the basics. Your slider(s) will only convert well when you follow best practices like having clear messaging, using high-resolution images, and optimizing sliders for fast page load.
Sliders Work When You Test Them
Shopify sliders can be a great asset when they’re built and used well, but best practices only get you so far. Every store, audience, and product is different, so the only way to know what actually works for yours is to put your slider in front of real shoppers and measure what happens.
Convert Experiences helps you do exactly that. From simple content swaps to full slider vs. static hero tests, Convert gives you the tools to A/B test sliders (and pretty much everything else on your Shopify store) on a privacy-first platform.
No matter the kind of hypotheses you want to test, Convert has your back. Try it free for 15 days.
FAQs
A slider is a rotating display element on your Shopify store that showcases products, testimonials, or promotions in a compact, interactive format. It cycles through one slide at a time and can include images, text, CTAs, and even videos.
Yes. Most Online Store 2.0 themes, including Dawn, Sense, Studio, and Craft, ship with a built-in slideshow section. You can add it through the theme editor by clicking Add section, searching for Slideshow, and dropping it into your page.
From there, you can upload images, write headlines, link CTAs, and adjust transitions without writing any code.
They can, but it depends on how you set them up. High-resolution images, too many slides, and bloated slider apps can drag down load times and hurt your Core Web Vitals scores, like LCP and CLS.
To keep things fast, compress images, use modern formats like WebP, lazy load slides below the fold, and limit your slider to fewer than five slides.
It depends on your goals and audience. Many experts don’t recommend sliders because shoppers often perceive them as ads, miss content when slides rotate too fast, and get distracted by competing CTAs.
Others have used them with great results, especially when paired with clear navigation and a strong first slide. The best move is to A/B test both on your store and let your data decide.
A slider rotates through one slide at a time, showing a single image, message, or product per frame. A carousel displays multiple slides at once and rotates the whole group, so shoppers see several items side by side.
Sliders work best for hero banners and feature promos, while carousels are better for logo walls, testimonial rows, and bestseller grids.
Some of the top Shopify slider apps in 2026 include POWR Image Slider & Carousel, SmartBN: Banner Slider, Image Slider Pro, Slider Revolution & Sections, OctoSlide Slider & Carousel, and Ada IQ: Slideshow Image Slider.
Each one fits different needs, from simple banner sliders to advanced product carousels with built-in analytics.
Yes. Some slider apps now have AI image generation built right into the editor. POWR Image Slider & Carousel, for example, lets you create slide visuals from text prompts without leaving the app.
This is handy for quick campaign visuals, placeholders while waiting on professional photography, or seasonal banners that don’t justify a full photo shoot.
The simplest way is to test one version of your page with a slider against a version without one. Use a testing tool like Convert Experiences to split traffic between the two and track conversions, click-through rates, and revenue per visitor.
You can also test variables within sliders, like slide count, rotation speed, or static vs. auto-rotating, to see what drives better engagement.


Written By
Althea Storm
B2B SaaS Writing, A/B Testing, A/B Test Duration +4 more
B2B SaaS Writing, A/B Testing, A/B Test Duration, Shopify Conversion Optimization, Experimentation in Tourism, Personalization for Lean B2B Teams, Experimentation Industry Analysis Show less
Edited By
Carmen Apostu