Targeting and Triggering: The Key to Tuning Your A/B Testing Accuracy
Strategically combining targeting and triggering in your A/B tests produces reliable results by focusing tests on the right audience at the right time.
Key points:
- Targeting controls who is included in the experiment while triggering defines when the variation is applied during the user’s experience.
- Targeting narrows the audience based on specific criteria like device, location, or behavior.
- Triggering applies your variations at specific moments, enhancing the relevance of your test without affecting who is included in the experiment.
Both targeting and triggering must be aligned with your test goals to ensure accurate and reliable A/B comparisons.
Sharp, conclusive results you can trust, or diluted results that take too long to reach statistical significance?
That’s the two-sided coin of thinking consciously about targeting and triggering in A/B testing vs not doing that.
Targeting defines who is included in the experiment, and triggering decides when the variation is applied during the user’s experience. When done right, these two lead to more accurate A/B test results by ensuring the right users are exposed to your variations at the most impactful moments.
Let’s learn a bit more about them so you don’t risk getting a wash of inconclusive noise from incorrect targeting and triggering or from simply not paying attention to them at all.
What Is Targeting?
Targeting establishes the criteria for participant inclusion in the experiment. That is, it defines who is eligible to be assigned to variations (including control and test groups).
By default, if no target audience is specified, targeting includes everyone who visits the page or uses the feature you’re testing. But in most experiments, audience targeting is used to narrow down a subset of users or web visitors based on specific criteria—such as device type, geographic location, traffic source, etc.
Let me illustrate. You want to test two distinct positions for the add-to-cart button in the mobile version of your ecommerce store, measured by add-to-cart rates. Would it make sense to expose this test to everyone?
Including desktop or tablet users would skew the results because they wouldn’t be experiencing the test on their devices.
Targeting allows you to ensure only mobile visitors are included, filtering out irrelevant data.
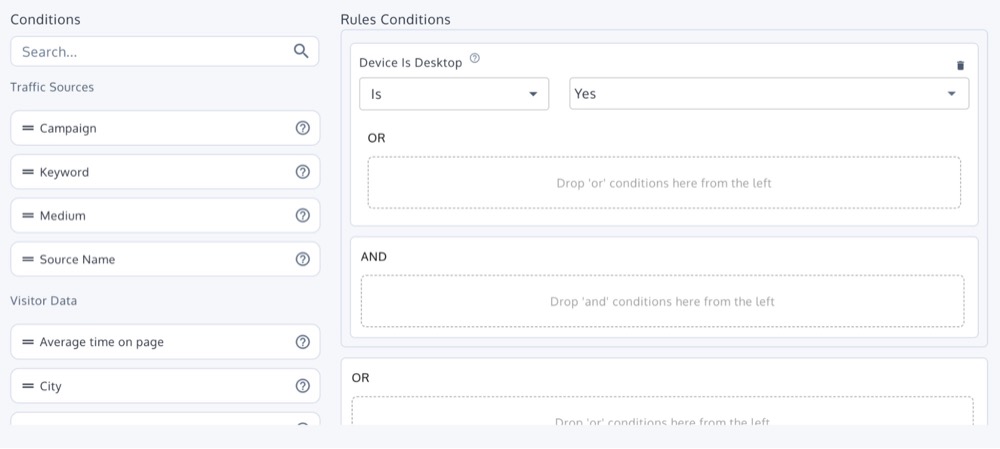
A/B testing tools like Convert provide functionality that allows you to define your audiences. With Convert Experiences, you get an advanced targeting engine with 40+ stackable filters, and the flexibility to use data locked in 3rd party systems.
What Is Triggering?
Triggering defines the exposure conditions that activate treatment assignment. It answers the question: When should a web visitor or user experience this test?
The default mode for triggering tests in most A/B testing tools is page load. But this can become a problem in certain types of tests and skew the data you collect.
Here’s how: If only 20% of users scroll to see your test changes, you’re including 80% who never saw them in your results. Even though users are evenly assigned to variations, if many never reach the test area due to trigger conditions, your data can become diluted.
Customizing triggers—such as setting them to scroll depth or specific interactions—controls when variations appear. Since users are assigned to variations before these triggers are evaluated, use audience targeting to include only users likely to engage with the tested element.
You need triggers to control when the variation is applied, ensuring that it enhances the user experience at the most relevant moments in their journey.
At this point, there’s a vital thing to understand about triggering and targeting:
How Targeting and Triggering Work Together
First, let’s get on the same page about ‘bucketing’.
Bucketing is the process whereby your A/B testing tool randomly assigns users to control or variation groups in an A/B test. This ensures each user has an equal chance of being exposed to the control or a variation experience.
Targeting and triggering complement each other by addressing the pre-bucketing and post-bucketing phases of the test.
Pre-bucketing: Targeting establishes who is eligible for the test, narrowing the audience to include only those relevant to your goals. Once users are bucketed into control or variation groups, triggering comes into play during the post-bucketing phase.
Post-bucketing: Triggers determine when the variation is applied during the user experience, ensuring that changes appear at the most relevant moments.
Using triggers like scroll depth or element visibility allows variations to be applied at key engagement moments. However, these are evaluated post-bucketing, meaning participants are already assigned to a variation regardless of trigger activation.
This will help you use both tools correctly.
When Should You Use Targeting and Triggering
Here’s a rule of thumb for understanding targeting and triggering in A/B testing:
Reminder: Targeting defines who is included in the experiment, while triggering determines when the variation is applied during the user’s experience.
If the goal is to focus on a specific audience segment—like device type, traffic source, or even the weather condition at their current location—targeting is the knob to tune. If you want to include users in the test only when they’ve reached a certain point in their journey or a particular element, triggering does it for you.
You can use this framework when deciding how to set up tests for complex user interactions or multi-page journeys. I’ll show you how using three scenarios below:
Scenario #1: Mobile vs desktop experiences
Analytics data showed that users from mobile devices are less likely to interact with the free trial promo on a landing page. You decide to test changing the position of the promo for mobile device users only.
Targeting by device type ensures that desktop interactions don’t interfere with your results, so you’re only focused on mobile-specific insights.
Scenario #2: Page elements tests
For elements lower on the page or shown only when interacted with, a custom trigger like scroll depth or element visibility helps focus the test on users who actually engage with the tested element.
For example, you’re testing a footer-based newsletter signup form. Setting a scroll-depth trigger would ensure that the test activates only for users who scroll far enough to see the form. This way, your results only reflect actual engagement.
Scenario #3: Feature access in logged-in vs logged-out states
Certain features, like wish lists or in-app messaging, may only be accessed when logged in. Targeting based on user status (logged in or logged out) works here.
It’s possible to use a combination of both triggering and targeting. This comes in handy when you want only a certain subset of your audience to experience the test at a specific point in their journey.
For example, you want only logged-in users to access discount codes for a special ‘grant a wish’ promo you’re running when they open their wishlist.
Other applications where triggering and targeting helps maintain an undiluted test result:
- Regional promotions vs localized campaigns: Targeting by location.
- High-impact features in the user journey, like product recommendation modules: Both targeting and triggering adjustments prevent sample contamination from less-engaged users
- User-specific content based on behavioral data: Targeting based on behavioral data such as days since last visit or number of visits.
- The user came in from a Facebook ad vs Google ad: Targeting based on traffic source.
Precise targeting and carefully chosen triggers that align with your experiment design work together to create more meaningful, actionable insights, minimizing noise and maintaining the integrity of your test results.
Best Practices for Implementing Targeting and Triggering in A/B Tests
Targeting and triggering bring vital flexibility and precision to your A/B tests. But they can also make things more complicated if not used correctly.
Here’s how to avoid complexities and errors:
1. Align with Test Goals
Before you begin adjusting any targeting or triggering settings, clarify your test objectives. Ask:
- What outcome are we trying to measure?
- Which users are most relevant to this goal?
- When should users be counted as participants?
For example, if you’re testing a promo pop-up meant for returning customers, aligning your targeting to include only returning visitors will ensure only relevant user behavior is reflected. If the pop-up only displays after spending 7 seconds on the page, using a time-delay trigger will make sure only users who’ve seen it are counted.
2. Avoid Over-targeting
Don’t layer too many targeting criteria for that extra layer of precision – it reduces statistical power and introduces selection bias.
Example: If you’re testing a homepage banner for new users on mobile devices in a specific city, adding more targeting criteria (e.g., only Samsung users or only Safari browsers) could overly limit your sample and make statistical significance more elusive.
Stick to the criteria that closely match your goal and avoid unnecessary filters that could make results harder to analyze.
3. Document Your Decisions
Document your audience targeting and test triggers so your team can replicate successful configurations or troubleshoot issues.
Note down:
- Why did you choose certain audience segments?
- What triggers are active in your test?
- What other deviation from default settings are you using?
4. Refine Trigger Settings
A/B testing can’t be a set-it-and-forget-it practice. You have to monitor test results after setup for signs of potential issues like sample ratio mismatch (SRM), dilution, or other issues.
Sample ratio mismatch (SRM) occurs when the actual traffic allocation between variations doesn’t match the expected distribution due to issues in the bucketing process.
In A/B testing expecting a 50-50 split, SRM manifests if one variation receives significantly different traffic than intended. SRM can be caused by errors in experiment setup or implementation, such as incorrect audience targeting or flaws in the bucketing code.
Since triggers are evaluated after bucketing, they do not cause SRM but can lead to data dilution if users are bucketed but never experience the variation.
If you notice data dilution—where many users are assigned to a variation but few experience it due to trigger conditions—consider adjusting your targeting criteria or triggers to better align with user behavior.
5. Maintain Consistency between the Control and Variants
Both the “A” and “B” versions of your test must have the same entry points and visibility. Any mismatch will render your results invalid.
Balanced and consistent triggering and targeting settings keep comparisons fair and avoid sampling bias, so your results reflect the outcome of the tested change and nothing else.
Targeting in Convert Experiences
Here’s what you can do with Convert’s targeting features (which includes both locations and audience):
- Audiences: Audiences are groups of visitors defined by specific criteria you set, such as device type, location, browser, behavior, and more. When you assign an audience to an experiment, only users who meet the audience conditions get to be included (or bucketed) in the experiment. You can create advanced audiences with over 40 stackable filters for precise targeting.
- Locations: Locations specify where your experiment should run based on URLs or specific pages on your site. There are two ways to use it:
- URL targeting: You can specify which URLs should activate experiments with exact matches, URL paths, or even URL parameters.
- Page tags and JS conditions: To go granular, you can set custom page tags or JavaScript conditions for on-site variables like page category or product type.
There’s even more you can do:
- Combine various user data and interactions to define advanced audiences
- Target people where they’re included or excluded from another experiment
- Include or exclude people based on IP addresses
- Cookie-based targeting that tracks visitor behavior and segmentation across sessions, etc.
Triggering in Convert Experiences
Convert provides flexible, powerful test triggering features based on location settings and Dynamic Triggers:
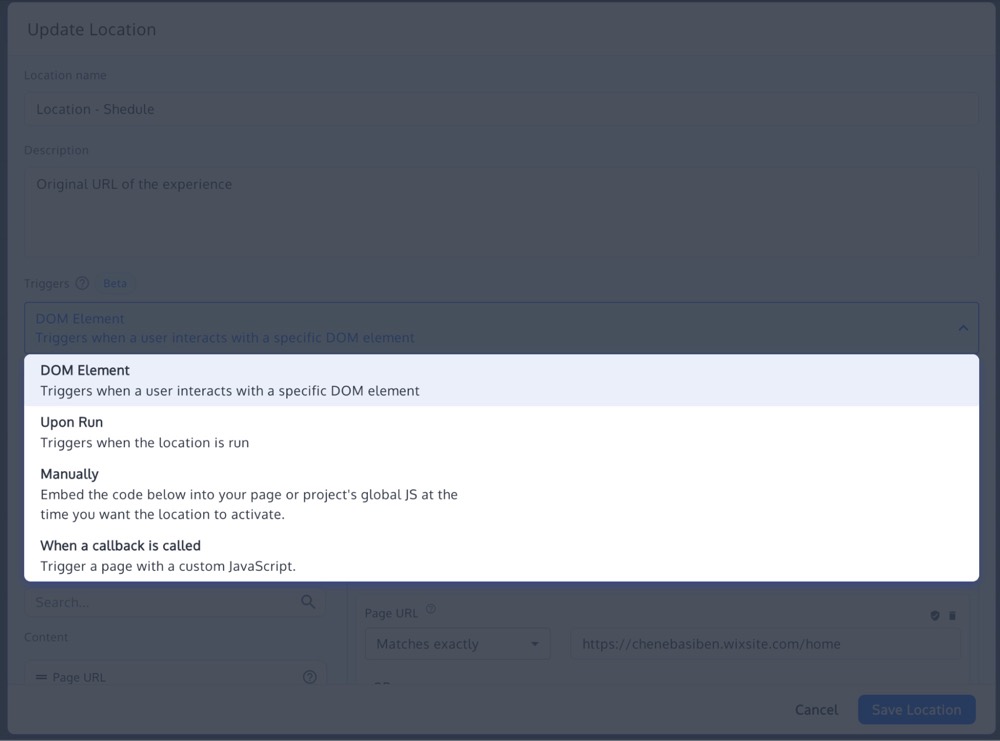
- Upon Run trigger: This activates the variation immediately the location, i.e., page, is run. It is used for standard A/B tests where the variation is applied as soon as the page loads.
- Basic location targeting: This shows how the lines between targeting and triggering can be blurred. Basic location targeting can be used to trigger tests. That is, you can set experiments to trigger based on specific URLs, URL paths or include/exclude query parameters. You can even use custom JavaScript variables to trigger tests on pages that match specific tags.
- Dynamic triggers: Ideal for Single Page Applications (SPAs) and dynamic content, these triggers control when the variation is applied after a user has been assigned to a variation. You can activate the variation when a user interacts with specific elements on the page (e.g., clicks, hovers, or when an element comes into view) or when specific SPA content loads. This ensures that the variation is applied at the most relevant moment in the user’s experience.
- Manual and callback triggers: This activates experiments only when specified programmatically through code. This is useful for complex conditions like multi-step forms or specific user flows. Callback triggers allow for custom logic by activating the variation after certain events, API responses, or asynchronous actions. This provides flexibility to control when the variation is applied based on complex conditions unique to your application’s behavior.
How Targeting and Triggering Fit Together in Convert
In Convert, targeting is implemented through Audiences and Locations. Audiences define the who and Locations specify the where, in line with everything we’ve discussed so far.
Triggering in Convert is implemented in Locations. There, you can find Dynamic Triggers, which allow you to control the exact moment during a user’s session when the variation’s changes are applied.
The process that enables this is divided into the pre-bucketing and post-bucketing phases I explained earlier.
In the pre-bucketing phase:
- Convert evaluates whether a user meets the audience criteria
- Locations are checked to confirm the experiment applies to the page the user is visiting
- Upon Run triggers are immediately evaluated to determine if the experiment should run on that page
The result in this phase: Only users who meet the audience and initial location conditions are bucketed into the experiment.
In the post-bucketing phase: After users are bucketed into control or variation groups, dynamic triggers determine when the variation’s changes are applied during the session.
Here’s an example…
You want to test a new feature—a BOGO promo banner—for logged-in users on the checkout page, but only after they’ve viewed a specific product.
For targeting:
- Create an audience that includes only logged-in users
- Set the location to the checkout page URL
For triggering, use a trigger that activates the variation only after the user has viewed the specific product. This could involve a custom JavaScript condition or a DOM Element trigger tied to the product detail section.
Result:
- Who: Only logged-in users are included in the experiment
- Where: The experiment runs on the checkout page
- When: The variation is applied only after the user has viewed the specific product
Next Time You Run a Test…
Consider whether targeting and triggering can improve the reliability of the data you’re collecting. Use these tools strategically, iteratively adjusting your settings to ensure your tests deliver clear, reliable insights.
Written By
Uwemedimo Usa

Edited By
Carmen Apostu


