How to Connect the GTM Data Layer with Your A/B Testing Tool
What Is a Data Layer?
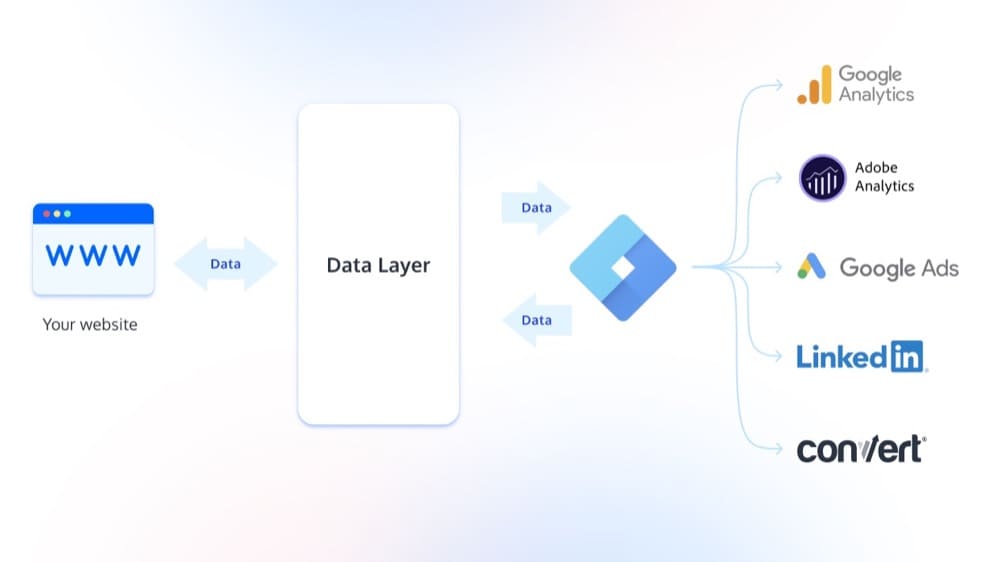
A Data Layer is a medium layer between your website and your tag management solution (such as Google Tag Manager or Tealium), where you can store, process, and exchange data.
Technically speaking, it is a JavaScript object that needs to be inserted between the <script></script> HTML tags on your website.
You can think of it as a layer where you can keep all your website data accessible.
When you add data into the Data Layer, it becomes easily readable by a tag management container which makes it perfect for transferring to various other platforms like analytics or A/B testing tools (think Google Analytics, Adobe Analytics, Google Ads, LinkedIn, Convert Experiences, etc.).
The data in your Data Layer can also be pulled the opposite way, for use on websites, to provide personalized content and more targeted user experiences (more on this towards the end of the article).
More data in the Data Layer means better marketing.
With the information you collect on your users’ behavior, it’s easier to serve them with relevant content and personalized experiences, which creates a win-win situation:
better content = more engaged users = boosted sales.
What Information Can I Store in a Data Layer?
You can add a plethora of attributes to your Data Layer, but sticking to the ones that are relevant for your website is key. You need attributes that are meaningful in order for everything else to have context and be organized.
How do you know what data is important on your website?
The answer to that is simple: It’s whatever is important to your organization. Answering the following questions is a great place to start:
- What information can I collect that will help me and my business understand the interaction between my visitors, my website, and my products?
- How can I drive visitors to my website?
- How can I offer a truly engaging user experience?
- How can I push visitors to spend more on the products I want them to?
- How can I make sure that visitors are returning to the site?
The starting point for implementing a Data Layer is, therefore, a wider business discussion that incorporates a clearly defined strategy, business requirements, and goals.
The data that you will add to the Data Layer is entirely up to you and your team. However, if you’re struggling to get started, here’s a list of common types of data pushed to the Data Layer from a website.
1. Elements that Are Visible on the Website
All data that can visually be seen on your website and that visitors can interact with can be pushed to the Data Layer.
This means that content such as testimonials, logos, social media, headings, CTAs, and images can be made available for other tools to use. Typically, this data is pushed by using elements and classes, but it can also be done directly from the DOM.
2. Data Available on Source Code
The next layer of website data that you can push can be found in the source code. This can be used to enhance website analytics if you use custom variables defined in the source code or to enable a better serving of content.
3. Cookie Data
Another common category of data that can be pushed to a Data Layer is cookies and their associated values.
For example, let’s say you want to display a message at the top of your website when the cookie value “utag_env_mycompany_main” gets changed. You’d then need to add a property to the Data Layer, using the cookie name. When its value changes, it will properly generate/populate its Data Layer value and display the message on your web page.
4. Database Data
Data from a cloud database can also be pushed to the Data Layer. This can include user data, transaction details, and anything else that you store in your databases.
This data is inaccessible to other external tools without a Data Layer, so by pushing it there, you can use it in marketing campaigns, analytics, and optimization processes.
5. E-commerce Tracking Data
Another very common use for the Data Layer is e-commerce tracking. E-commerce tracking holds useful information about products and orders, so you can push this to your Data Layer and use it later on analytics platforms, for example, to see how your e-commerce site is performing.
A few other types of e-commerce data you can push are:
- product information: id, name, price, sale price, category, size, color, etc.
- order information: id, subtotal, tax, total, shipping, discounts, etc.
- user information: id, city, state, country, preferences, first/last, etc.
- page information: timing, promotions visible, products visible, category, region, currency, etc.
- search information: term, num results, suggested terms, etc.
- event information: event name, the label of a button clicked, etc.
6. Third-Party Application Data
If you are using third-party scripts like live chat modules or embedded forms, then data from these systems can also be sent to the Data Layer. For example, if someone submits a form, then you can push this form submission data and make it available for use by other tools.
Why Do I Need a Data Layer?
Simply put, the Data Layer is essential for making informed business decisions. It aggregates important data from diverse sources (like those we’ve presented above) and it organizes it in a way that can help you monitor three main areas:
- your website,
- your tools,
- and your organization.
Let’s illustrate this through an example. Imagine you were the Marketing Director of a startup with a newly launched website. From the get-go, it would be important for data collection and use to be consistent across all platforms. To make that happen, you’ll need to work with your dev team to set up a Data Layer that gets populated with information that is highly relevant for your organization’s growth.
So, how will the Data Layer impact your activity in each of the three areas?
Let’s go through them one by one.
It Collects All Website Data Consistently
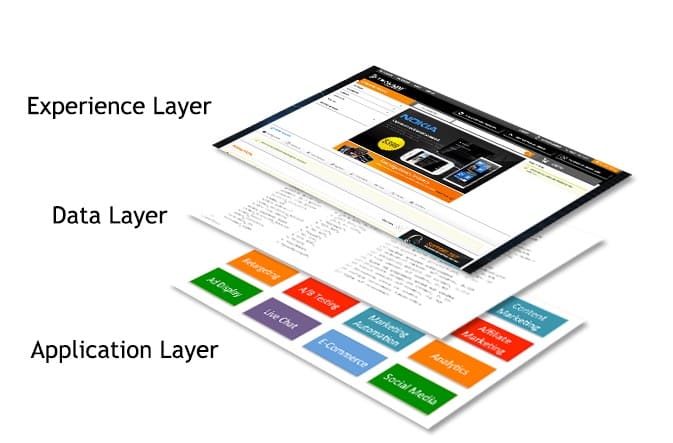
All websites consist of three distinct layers, each serving a different purpose:
- The experience/presentation layer is what the visitor sees. It’s built with HTML and CSS.
- The data layer, defined as a Javascript object, is the layer for collecting and managing the data that is produced.
- The application layer is made up of all the third-party apps you connect to your website, like Google Analytics, Adwords, Facebook, and more. These usually are JavaScript scripts.
Of the three layers above, only one is required.
Can you guess which? (Hint: it’s not the layer we’ve been talking about so far and that’s an issue.)
Well, every website needs to have a presentation layer; otherwise, you don’t really have a website.
Almost every website has some sort of application layer in place since nowadays we rely on third-party applications a lot.
However, not all sites have a Data Layer, and without one, you need to depend on the other two layers to get vital insights.
If you trust the presentation layer to give you the insights, any time your developers do a simple HTML/CSS change, that will also affect the data you are collecting and using.
If you use the application layer for it, then each tool will collect its own data separately and have different naming conventions and slightly different values, thus not allowing you to aggregate the data and check your website’s overall performance.
By using the Data Layer, you can avoid these problems. You’ll have a central data collection point that contains all the data you need. This data won’t change with every simple design change and will use the same terminology across all the different apps you use.
It Integrates with Other Tools to Ensure Data Integrity
By using the Data Layer, you make sure that each tool you are connecting to your website will have the correct data it needs.
Let’s take a look at Segment’s Data Layer:
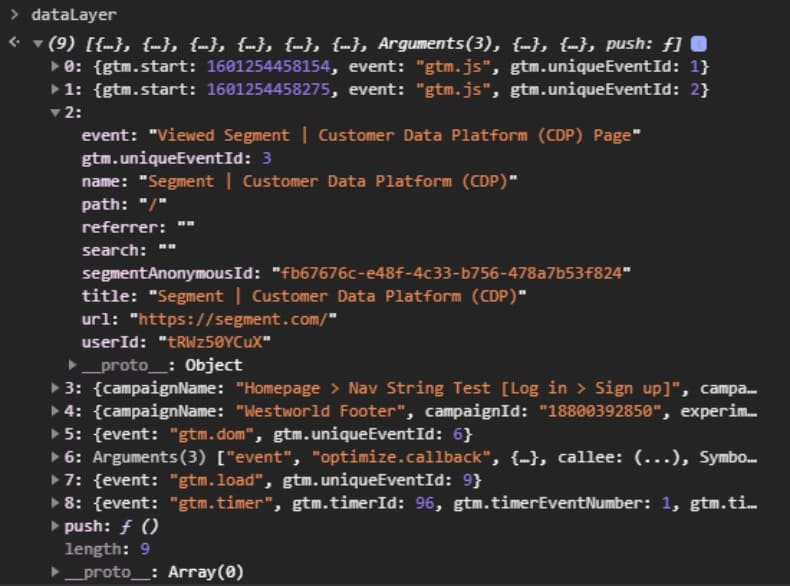
Here, the Data Layer starts with “dataLayer” and lists out a few events and their values. All of these values can be accessed by tools like GTM, Google Analytics, Facebook, Instagram, Convert Experiences, LinkedIn for later analysis.
All of the tools above will use the same name for the defined events. For example, all of them will know that the traffic came directly to your site as the referrer value is empty. Even though the definition of the Data Layer can get more complex than that (and it’s the reason why you need specialized developers), at least you can rest assured that you send consistent data across different applications.
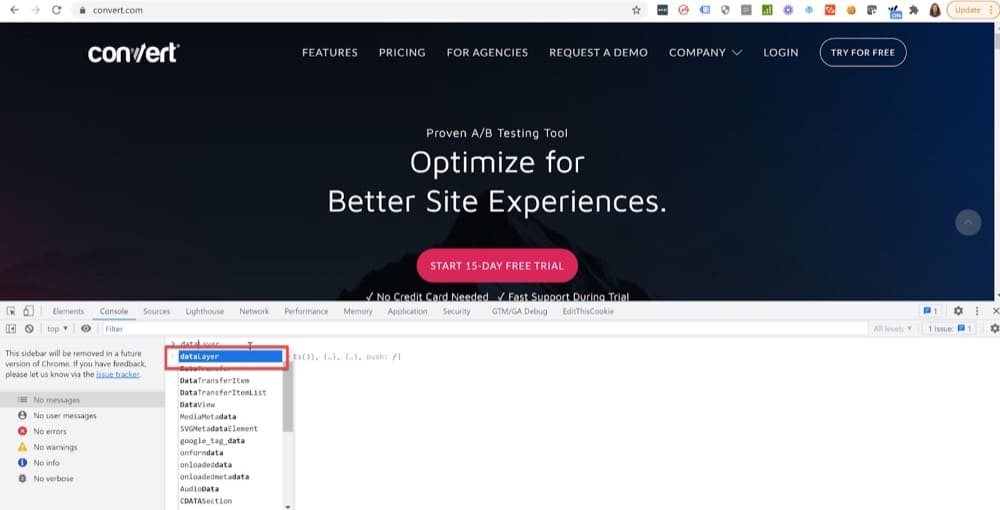
To find the Data Layer of any site, simply open the Google Chrome console, type “dataLayer” and hit enter.
Here’s what it looks like:
It Helps Create a Solid Data Management Policy
A Data Layer brings marketers and developers together. Each of the two parties needs to bring their own expertise to set it up correctly and use it wisely.
Marketers need to define and set their own expectations and objectives, while developers need to take these requirements and turn them into meaningful attributes into the Data Layer.
Together, these teams can create a strategy for collecting data that the entire organization can benefit from.
What Does a Data Layer Look Like?
Let’s get into the nitty-gritty. What does the Data Layer actually look like?
Each vendor has a different Data Layer format, so the answer isn’t so straightforward. There’s a lot of ways it could look like. But to make it easier, let’s look at a couple of common vendor-specific layers, followed by some common tag management ones.
Google Analytics (GA)
gtag('config', 'GA_MEASUREMENT_ID', {
 'page_title' : 'productpage',
 'page_path': '/products
});
gtag('event', 'product_seen', {
 'name' : 'product123',
 'value' : 3549,
 'event_category' : 'JS Dependencies',
 'dimension1': 'products'
});
As you can see, GA does each data point as a function call with attached data. Because everything is configured like this, each page or action is essentially an event. GA’s data layer is very specific to just their tag, so using their data with other vendors requires either a separate data layer or integrations.
Adobe Analytics (AA)
s.pageName = "productpage";
s.prop5 = "product123";
s.eVar5 = "products";
s.events = "event1,event1";
s.t(); //or s.tl() for events
Unlike GA with mostly named parameters, Adobe Analytics mainly uses numbered variables called props, eVars, and events. There are some reserved names as well, but most are enumerated, then named within the AA product interface.
Like GA, AA’s data layer is very specific to just their tag, so using their data together with other vendors requires either a separate data layer or integrations. However, since all the data is attached to a global “s variable”, any other vendor can access it, as long as it isn’t deleted after a session.
Tealium
utag_data = {
 page_name: 'homepage',
 page_type: 'home',
 currency: 'USD',
};
// for events
utag.link({
 ...some data like above
});
Tealium’s tag manager is built for many vendors, so the data layer isn’t specific to any one vendor. They provide two separate flat tracking layers, one for the page view and one for events.
Any vendor can access the utag_data object on the page, but most vendors will be implemented through the tag manager, where the data layer can be supplemented for each specific vendor as needed.
Google Tag Manager (GTM)
dataLayer = [{
 pageName: 'homepage',
 pageType: 'home',
 currency: 'USD',
}];
// for events
dataLayer.push({
 ...some data like above
});
Similar to Tealium, the GTM variables can be named whatever you want and there is a page view and event setup that are different. However, similar to GA, GTM’s Data Layer is all event-based, so you don’t have to have any page view code and could just implement everything with dataLayer.push().
W3C
digitalData = {
pageInstanceID: "MyHomePage-Production",
page:{
  pageInfo: {
    pageID: "Home Page",
    destinationURL: "http://mysite.com/index.html"
  },
  category:{
    primaryCategory: "FAQ Pages",
    subCategory1: "ProductInfo",
    pageType: "FAQ"
  },
  attributes:{
    country: "US",
    language: "en-US"
  }
}
};
Similar to Tealium and GTM, the W3C data layer can use all your own custom variable names and isn’t vendor-specific generally. However, this standard is much more well defined and each data layer section is somewhat grouped into types.
Data Layer Best Practices
As you can see, using Data Layer can get pretty complex pretty fast. So keeping it as concise as possible will save you lots of time and trouble.
Here are a few additional best practices to make your Data Layer work for you, not against you:
- Naming convention – Name all your events and attributes within the Data Layer in a way that is unique, but also easy to understand by everyone in your company.
- Create documentation – Even though it can look simple in the beginning, your Data Layer can become complex (and what happens if the teams working on it change?) You need to have a place where you document all the variables used in the Data Layer.
- Plan the developers’ work – Since the Data Layer is a joint effort between marketers and developers, plan your developers’ time ahead of time. Organize everything that needs to be added, then structure all other on-the-fly changes in batches to optimize dev work time.
- Consider website changes – When the team makes website changes, share with them what changes need to be transferred to the Data Layer. This way you save time and money and everyone is happy.
What GTM Data Layer Variables Are Useful in A/B Testing?
Now that we’ve covered the theoretical part, let’s teach you the know how through some practical examples.
As explained before, when used properly, a Data Layer supercharges your event tracking capacities.
Let’s go through some powerful use cases with their associated GTM Data Layer variables that can be used in A/B testing.
Widget Tracking
Let’s say you want to A/B test your live chat widget to see how engaged your website users are. You won’t be able to do it by accessing your tag management system variables, because the chat widget is an external part of the website that loads when a visitor views a page.
So you’ll need to use the GTM push method to send all user actions related to the chat widget to the Data Layer and then use them in your A/B testing.
You can generate automatic data layer events, like the ones below, when users interact with live chat on your website. For example, collect data and/or trigger conversions any time a user begins a chat, sends a message, enters their email, or a chat agent responds:
dataLayer = [{
 'livechatStarted': true,
 'livechatMessagefromAgent': Agent_A,
 'livechatMessagefromUser': Maddie,
 'livechatUserEnteredEmail: true
}];
Single Page Applications (SPAs)
SPAs behave differently than normal sites because they rewrite content on the same page URL rather than load completely new page URLs.
That’s why tracking on Single Page Applications (SPAs) requires some extra work. By default, they require a custom implementation to track everything correctly.
A/B tests on SPAs usually need to be handled differently than other experiments too. Because the URL visitors navigate on isn’t changing, it cannot trigger experiments using standard methods.
One way to do it is to manually implement all your custom events (a task that is very time consuming). Another way is to use your Data Layer to trigger the experiences.
When new content is loaded on a SPA site, or when a user action takes place on a SPA page, you could update the Data Layer.
Here’s an example Data Layer where we track the page name — when that is changed, it triggers the A/B test:
dataLayer = [{
pageInstanceID: "Launch Demo Site",
        page:{
            pageInfo:{
                pageID: '2745374',
                pageName: 'acs demo - product listing page'
            }
}];
Webform Tracking
Another common use case for GTM Data Layer in A/B testing is testing web forms.
When a user is entering data through a form, you can take advantage of the Data Layer to push critical information from the form into the Data Layer automatically. For example, every form submission includes the form ID, form placement & location, and all the data submitted by the user.
You can then use the form data in your A/B tests to personalize content based on user-entered values and boost your upsell and cross-sell rates.
dataLayer = [{
formAutomaticValues: {
    formID: 3826,
    formFieldValues: {
      FirstName: {
        id: 'FirstName',
        value: 'test',
        label: '*First Name',
        name: 'FirstName',
        type: 'text'
      }
}];
Various Custom Analytics Actions
Hope the examples above gave you an idea of where Data Layer can be used.
As you can see, the scope of a Data Layer is broad.
While it can help with complex tracking, you can also take advantage of it for less complex cases to trigger:
- custom events of any kind, like clicking on a CTA, selecting a field from a drop-down menu, changing images on a carousel, or
- custom dimension values, such as user subscriptions, user purchases.
How to Use the GTM Data Layer with Your A/B Testing Tool (and Other Tools in Your Tech Stack)
As we have seen so far, the Data Layer can be used for all sorts of things.
Let’s now look at how you might use it with your A/B testing tool in order to put even more power behind your testing! We’ll go over each step in-depth then show some examples of what it looks like when using it for A/B testing!
We’ll cover each step in Convert Experiences, so if you’re already a user, let’s explore each of the steps below together. If you aren’t, sign up for a free trial and give it a try! (You’ll need to create an account, but no credit card is required.)
Push Convert Experiences Data to the GTM Data Layer
One way to use the Data Layer with your Convert account is to push A/B test data to your Data Layer and, from there, use it in other tools.
Make sure both the Convert tracking code and the GTM code are added to your page. Convert Experiments fired on pages will be pushed into the GTM default dataLayer object for further processing.
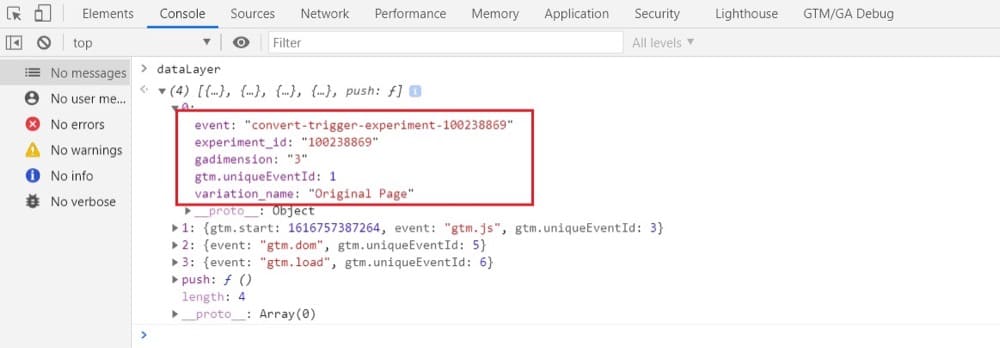
Here are 4 key elements of the Convert object pushed to the GTM dataLayer to look out for:
- “event” – it will typically look like this: “convert-trigger-experiment-{experiment_id}”
- “experiment_id” – contains the ID of the experiment that’s fired in the Convert Experiences app;
- “variation_name” – has the value variation name of the selected variation, as found inside the Convert Experiences app
- “gadimension” – if a Google Analytics integration is enabled and a dimension is chosen, then this contains the value of the dimension set in the GA integration.
Here’s an example of what this looks like:
dataLayer.push({ "event":"convert-trigger-experiment-1234", "experiment_id":"1234", "variation_name":"test variation", "gadimension":"1" });
And if you use the Google Chrome console with the Convert Debugger extension to debug potential issues, this is what it looks like when Convert pushes data to the GTM Data Layer:

Use the GTM Data Layer to Send Convert Experiences Data to Google Analytics
Your valuable data shouldn’t just live inside Google Tag Manager, so let’s show you how to send it to other tools you might have in your stack.
We’ll start with Google Analytics.
So how do you use data layers in Google Analytics?
First, let’s analyze how to send the variation triggered to Google Analytics (Universal Analytics analytics.js or Global Site Tag gtag.js) through a Custom Dimension. To send data over to Google Analytics, we will use a Custom Event.
Each time you create an experiment you will have to assign it a Custom Dimension in GA (and make sure it’s created before launching the experiment!).
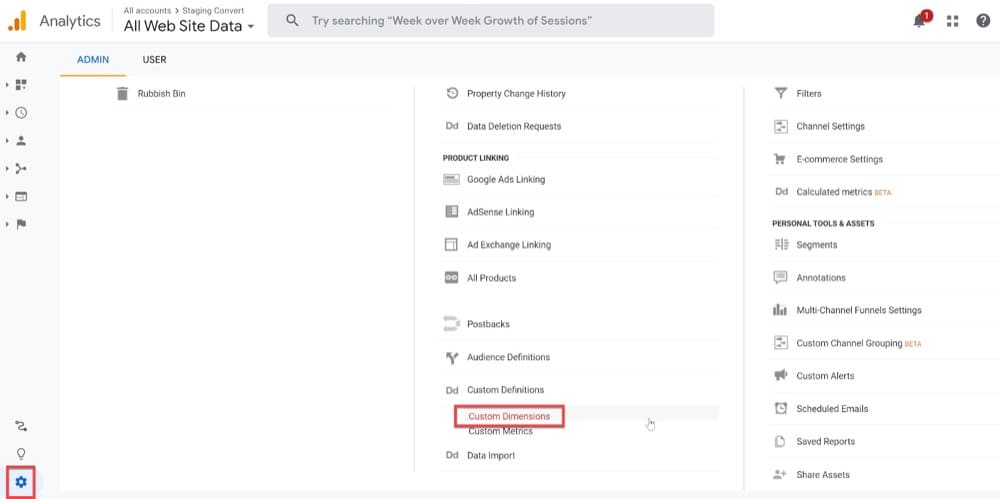
1. Create a Custom Dimension in GA
First, go to the Admin section in GA and find Custom Dimensions:
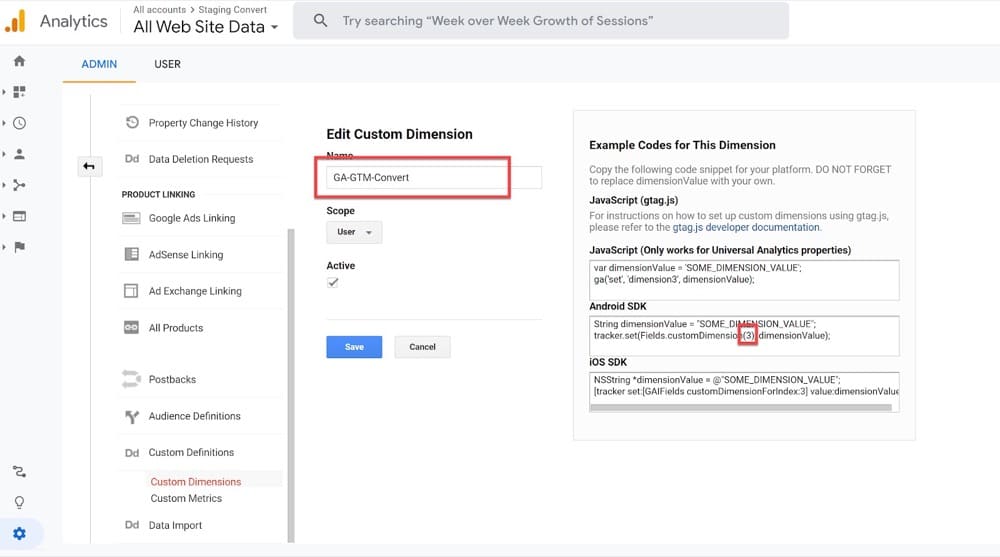
Then, create a new Custom Dimension of User scope and remember the index value:
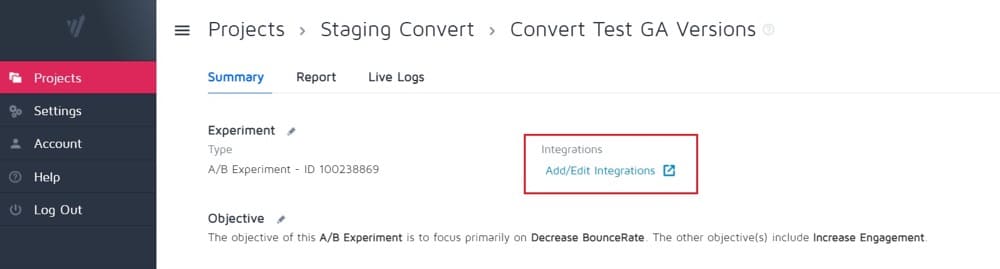
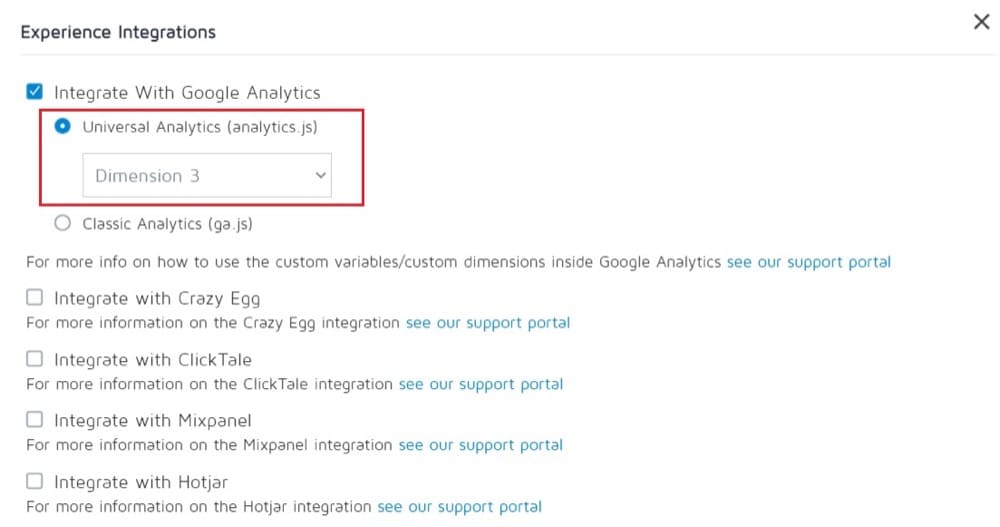
2. Enable the GA integration
In Convert Experiences, go to your A/B test summary page, and, from the Add/Edit integrations, enable the GA integration:
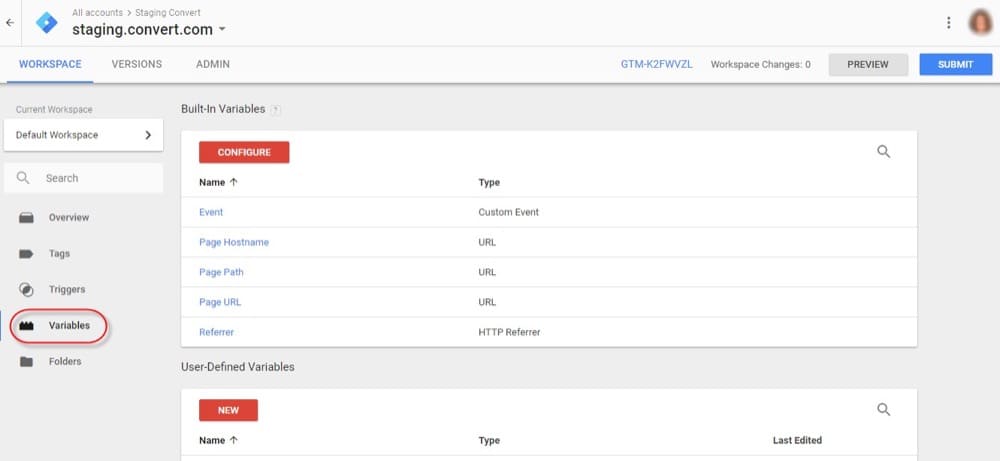
3. Create the Experiment ID Data Layer variable in your GTM account
The Experiment ID Data Layer Variable will store the Convert experiment_id values.
To create the variable, open Google Tag Manager and go to Variables:
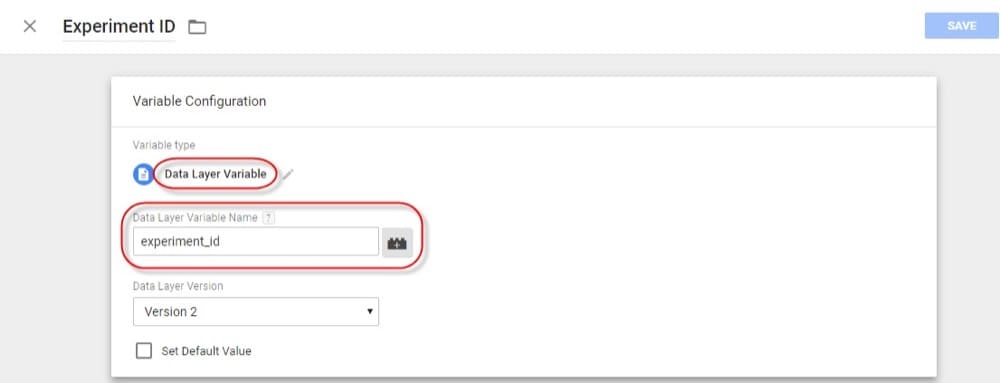
Give it a descriptive name, assign the type Data Layer Variable and fill in experiment_id in the Data Layer Variable Name field:
4. Create the Dimension Data Layer variable in GTM
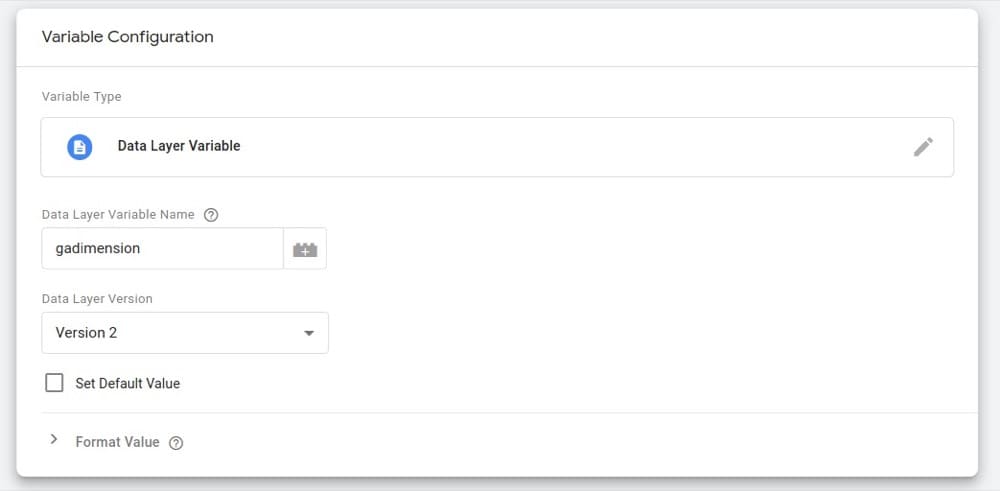
The Dimension Data Layer Variable from GTM will store the Convert gadimension values.
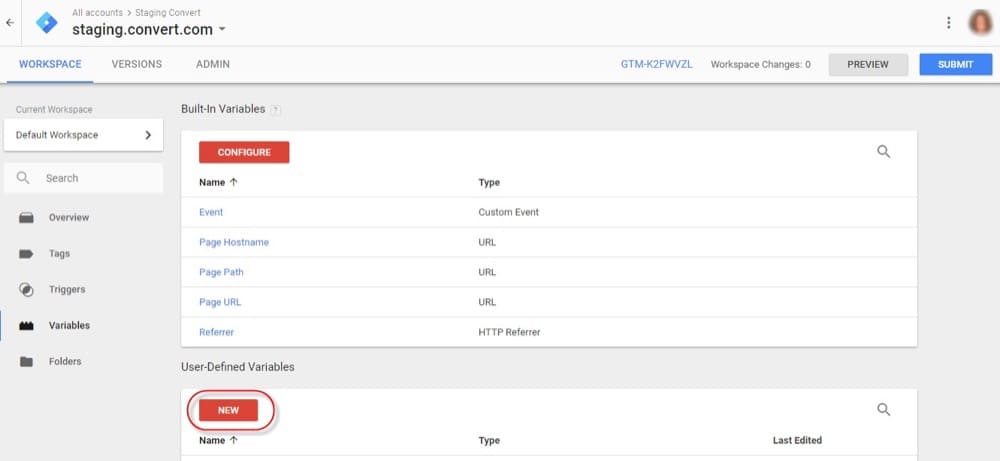
To set it up, same as before, go to Variables and create a new User-Defined Variable.
Give it a descriptive name and pick the Data Layer Variable under Variable Type. Then, hit Save:
5. Create the Variation Name Data Layer variable in GTM
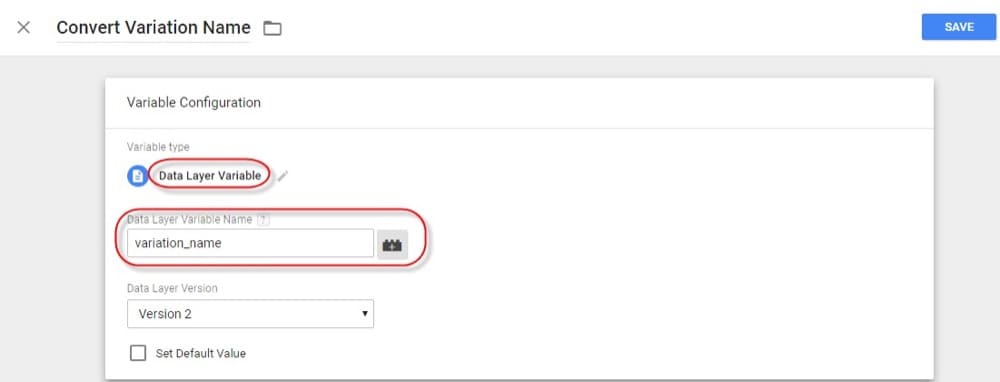
The Variation Name Data Layer Variable will store the Convert variation_name values.
To create it, once more, go to variables and create a new User Defined Variable. Give it a name and assign it as a Data Layer Variable. Don’t forget to hit Save:
6. Create a new GTM Tag
In GTM, find Tags, then New:

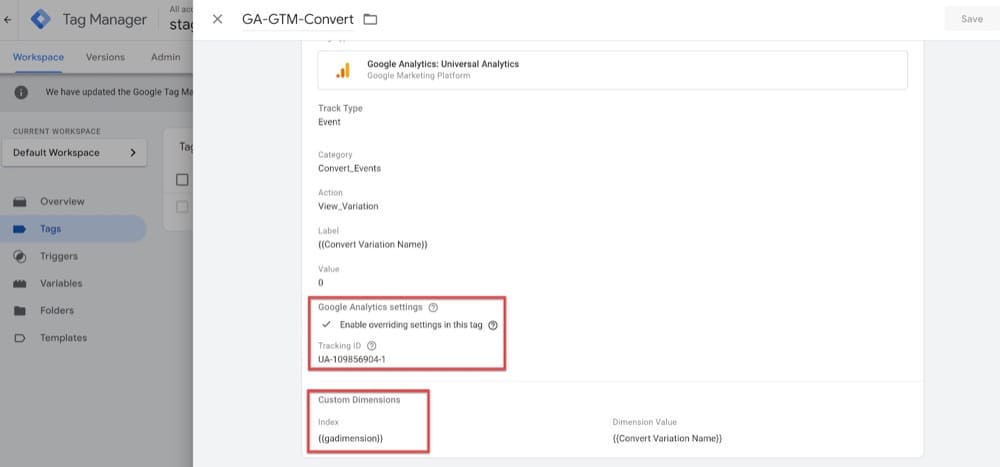
Give your tag a name. Pick Type Universal Analytics as your Tag Type and Type Event as the Track Type. Fill in all the other fields, as shown in the example below:
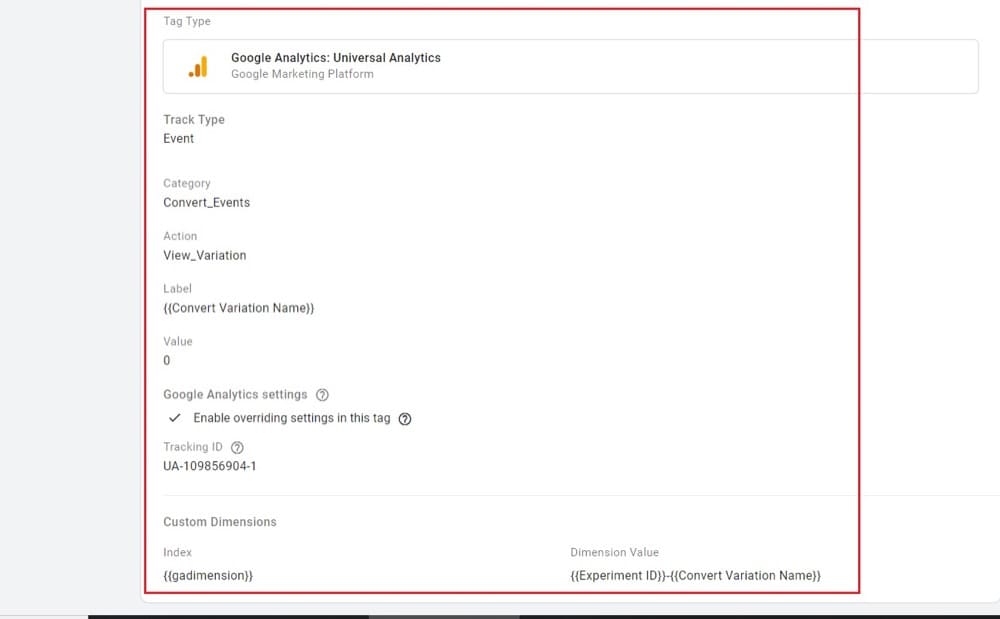
Don’t forget to select your GA account at this step. Add the Custom Dimension we talked about above, then just use the GA Dimension GTM Variable we created earlier:
Select the triggering rule to fire the tag. To create a new trigger, click Trigger Configuration, name your trigger, then select Some Custom Events:
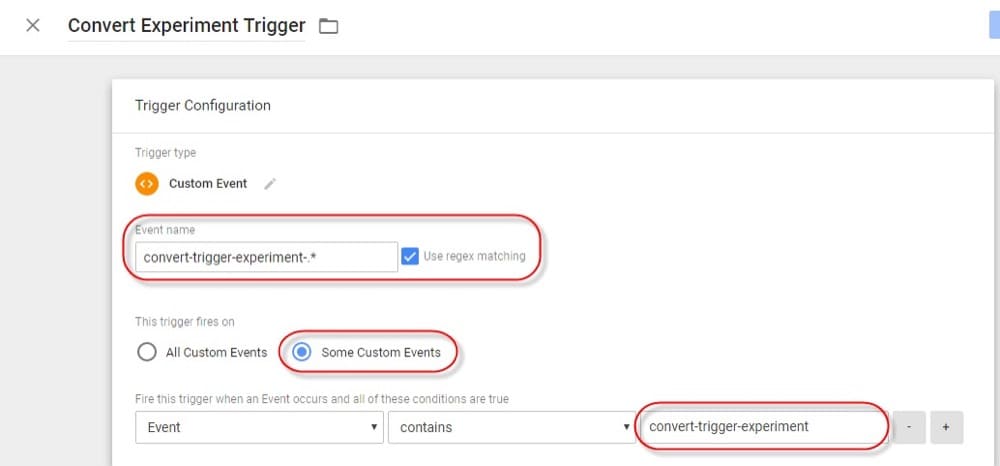
This rule will fire the tag every time an experiment is fired.
7. Create a Custom Report in GA
A/B testing is an essential part of marketing, but it’s not enough to just run tests. You need the insights generated from these experiments in order for them to be effective. So let’s see how you can analyze your results in Google Analytics.
In GA, go to “Customisation”, then create a new “Custom Report”. Select the drill-down dimension in Custom Dimensions. Configure any filters you might need, and hit Save.
8. View Data in your GA Events report
In your Events report, you’ll also find the Convert data we sent as an event in Behaviour-Events, looking like this:

Push GTM Data Layer Info to Your Convert A/B Tests
So far we’ve covered how to add data from Convert Experiences to your GTM Data Layer. But you didn’t think that was it, did you?
With these two powerful platforms, there are more cool things you can do.
Data that is added to the Data Layer can be sent to Convert Experiences to be used to bucket visitors to your experiences and personalizations.
Currently, you can use the Data Layer targeting with Convert Experiences in three ways:
1. Advanced Goal Setup
If you already track conversions through GTM using dataLayer events, you’re in for a treat.
You can use these conversion events to trigger goals in Convert Experiences. Some of the events that can be used to trigger a Convert goal are:
- Clicks on different buttons
- Clicks on the phone number
- Clicks on the WhatsApp button
- Thank you landing page (after an order)
- Add to cart buttons
- Remove from cart buttons/links
- Checkout process / funnel
- PDF downloads
- Page load
- YouTube video watched
- Scroll Depth
To set it up, we’ll need to implement a GTM tag with a Convert JavaScript Triggered Goal code that will be used to trigger the GTM dataLayer event we want to track.
First, let’s say you create an event called “TestAction” (for example, for one of the events above) that is being pushed into the GTM dataLayer in the following way:
window.dataLayer = window.dataLayer || []
window.dataLayer.push({
event: 'TestAction'
});
You can then create a Javascript triggered goal in your Convert experience:
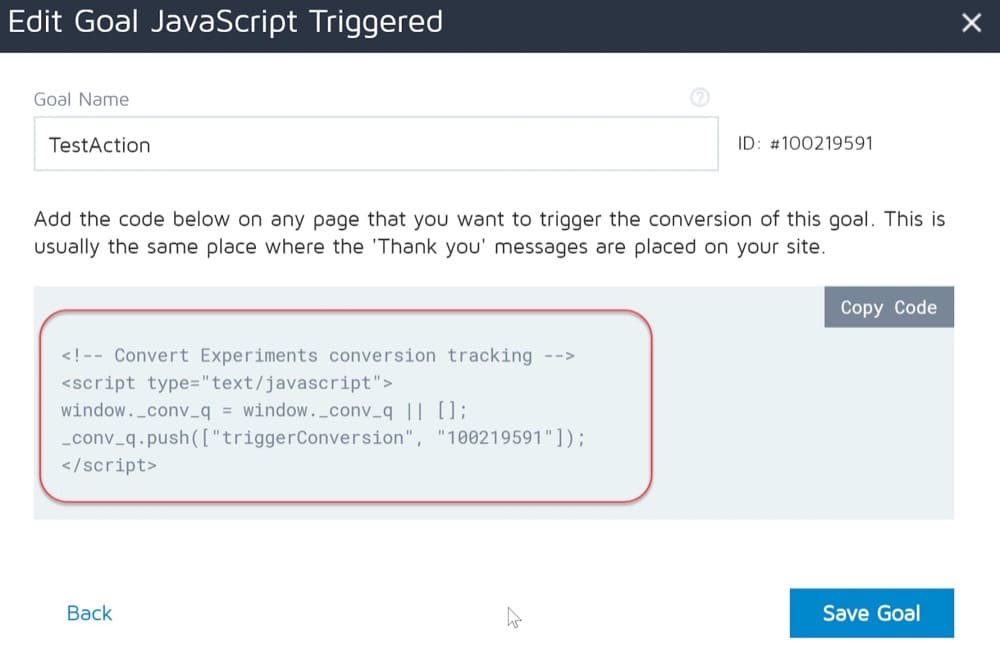
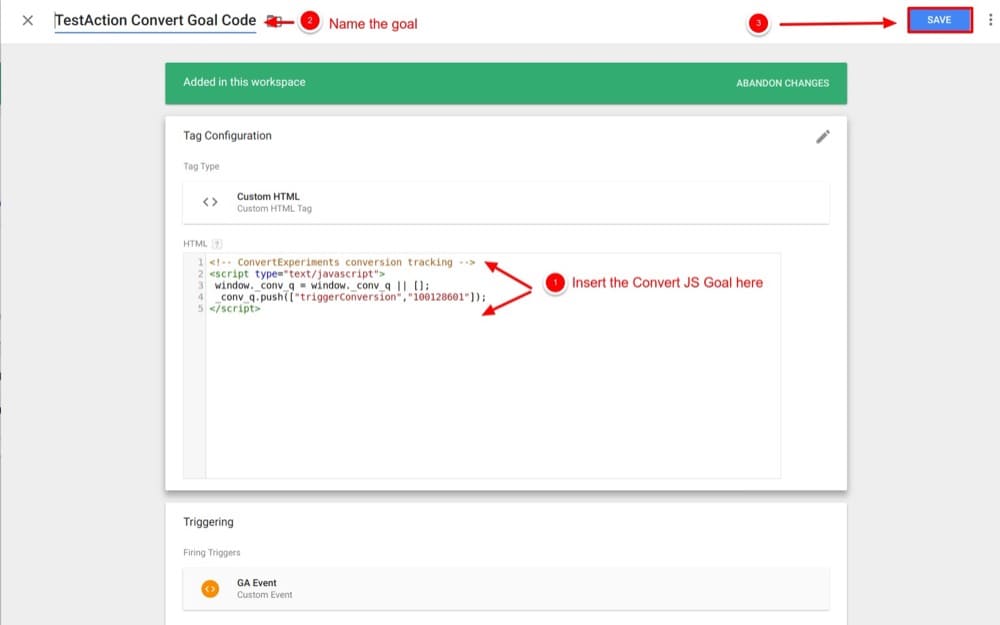
And use the code that is generated inside the GTM tag and specifically into the custom HTML tag:
As a trigger of this tag, you could use the custom event “TestAction”:
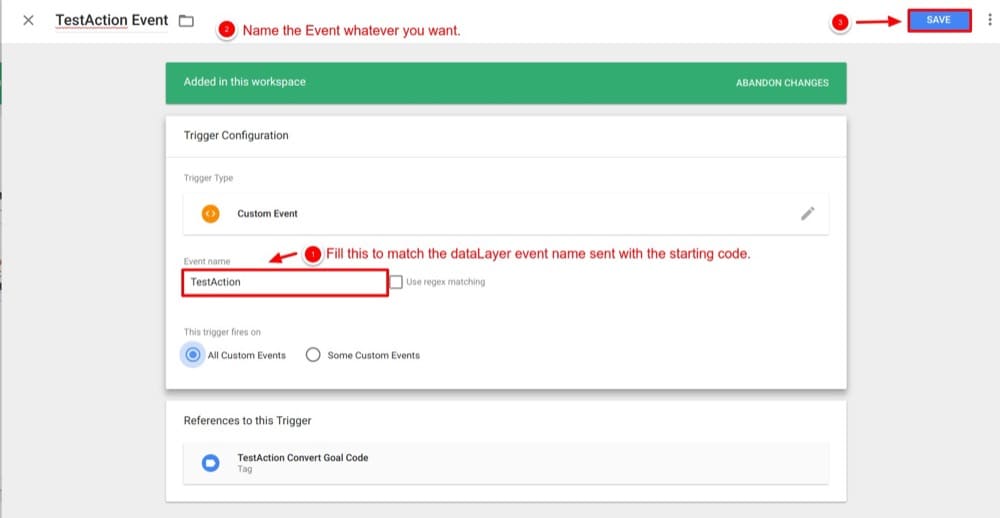
This way, whenever an action is happening on your website, you can trigger a Convert goal and measure its success.
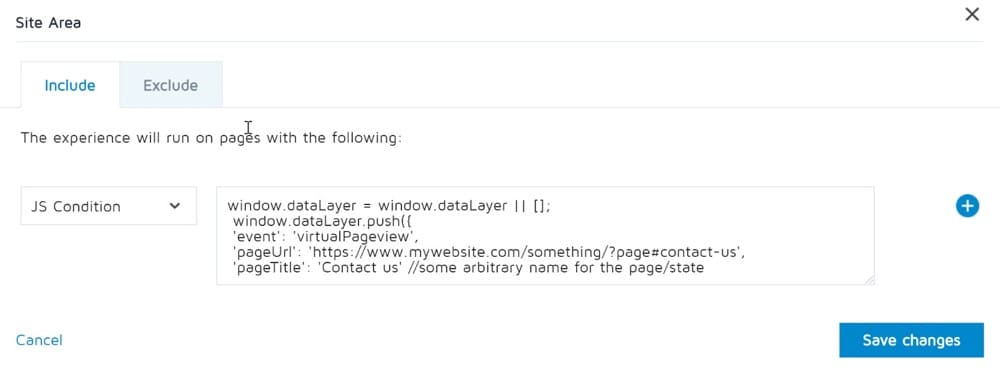
2. Experiment Site Area
You can also run an experiment on specific pages based on a Data Layer attribute.
This feature is very practical for users who employ dataLayer events to keep track of the website state on Single Page Applications (SPAs).
These dataLayer events can be used to trigger experiments with polling. The way this works is by configuring GTM to trigger the polling code or manual experiment activation code when an event is pushed onto the dataLayer.
For example, you can activate a dataLayer.push code and a Convert experience whenever a user navigates between web pages/states of a website/web application.
Here’s a sample code snippet that your dev team could use:
window.dataLayer = window.dataLayer || [];
 window.dataLayer.push({
 'event': 'virtualPageview',
 'pageUrl': 'https://www.mywebsite.com/something/?page#contact-us',
 'pageTitle': 'Contact us' //some arbitrary name for the page/state
 });
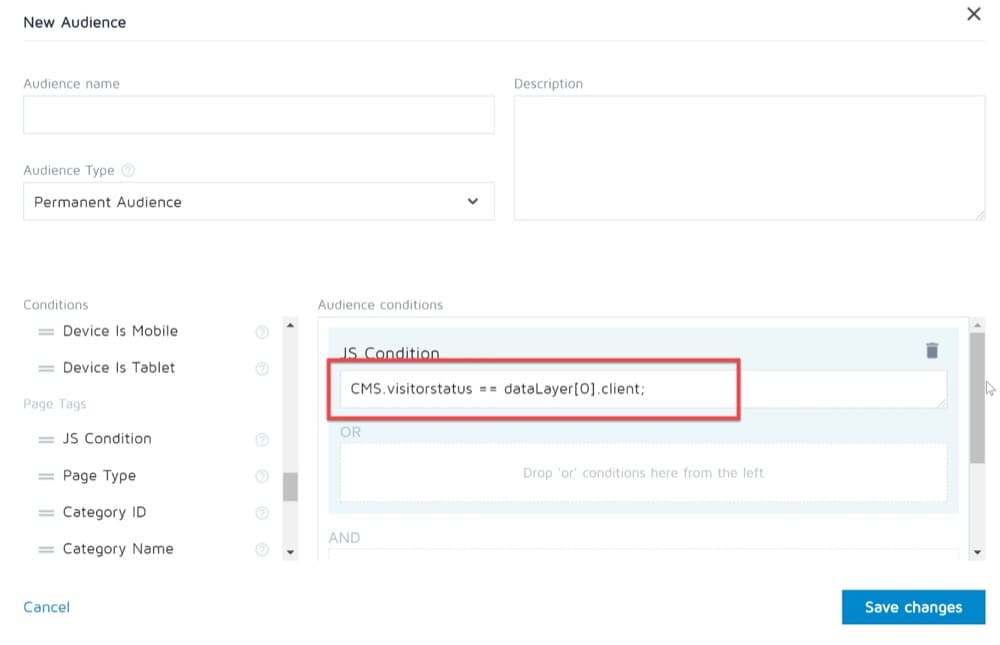
3. Experiment Audience
Finally, you can run an experiment on a particular group of visitors as defined in your Data Layer.
For example, if you’ve set up a Data Layer variable defined by visitor status (client or anonymous), then you could make use of that to run an experiment on a definite segment, like clients:
As you can see, there is data everywhere. As long as users are interacting with your website, there will be data that describes that relationship.
Organizing this data and assessing its impact is key to maximizing your success. Using the Data Layer, you can structure your organization’s information properly to analyze how users interact with different parts of a website – for instance, what pages they visit time after time – and use these insights to optimize their experience going forward!
Conclusion
Ultimately, the Data Layer is a powerful tool that can provide you with unparalleled insights into your customer base. From its broad scope and detailed tracking capabilities, you’ll be able to take advantage of it in your A/B testing and beyond to increase conversion rates and supercharge your metrics.


Written By
Dionysia Kontotasiou

Edited By
Carmen Apostu