Quantifying User Feedback Themes With n8n
Last time, we created a research workflow. This workflow connected to a spreadsheet containing our user feedback, then randomly sampled it and extracted relevant themes. We used a small model, so the entire workflow was highly energy-efficient.
Wouldn’t it be nice if we could quantify the themes by counting how many pieces of feedback relate to each one? That’s what we’re going to build today.
Before continuing, there are a few steps you need to have gone through. If you haven’t watched or read them already, you might find it helpful to catch up on the following:
- You should have a Qdrant vector store with user feedback already loaded
- You should have a research workflow as described above
Note: I’ll be using a version of n8n that’s installed on my server. I’ll still focus on small models, but I’ll use Openrouter. Just something to be aware of in case you’re following along. You can watch my OpenRouter tutorial if you want to use it, too.
Step 1: Sketch out the plan
You should know the drill by now. I like to sketch out my workflow as a rough plan before diving into n8n. Here’s the plan:
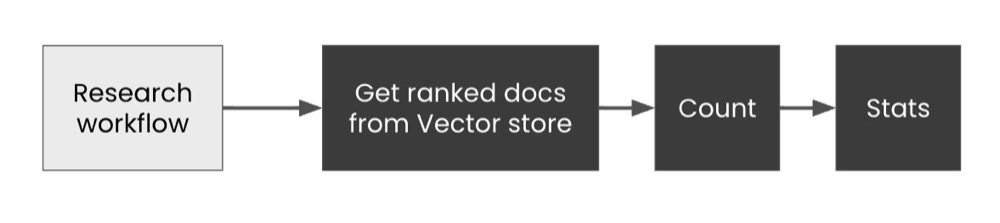
We have our research workflow. We want to build out the workflow to get ranked documents from our semantic database, count the closest matches, and then generate stats, perhaps inserting the output back into our spreadsheet.
But there’s a problem.
You see, our current output is text. But n8n nodes prefer working with more structured outputs, such as lists and JSON.
Let’s fix that first.
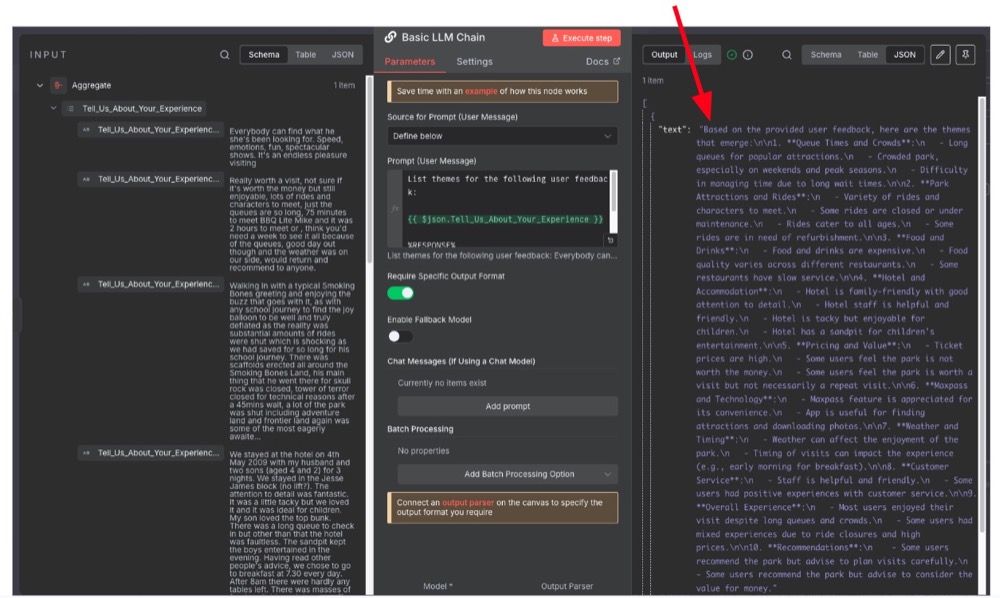
Step 2: Ensure the output is JSON
If we go back to our Basic LLM Chain node, notice there is an option to Require Specific Output Format. Select that, and you’ll notice we now require a new subnode called Output Parser:

Here’s the structure we need:

Overall, it needs to be in JSON format, but specifically, we want each theme to be a JavaScript Array (i.e., a list). The example structure should be something like this:
{
	“themes”: [“Theme 1”, “Theme 2”, “Theme 3”]
}
Once we’ve done that, we also need to update our prompt to ensure our language model returns data in that same structure. Here’s my example prompt:

Language models are pattern-matching autocomplete engines. And so a few-shot is the most effective way to prompt, thinking output-first. A few-shot is just a “few” examples of input and output pairs, i.e., here’s an example input, here’s an example of what I want, three times.
To create the “few-shot”, I take extracts of actual user feedback and then write an example of how I expect the AI to respond. When you do this, ensure the examples are representative of the actual user feedback. And if the output is still not great, then add some additional context.
Prompt:
%USER FEEDBACK%
Spent two days with a park hopper pass so we bounced back and forth between Smoking Bones Land and California Adventure. Two days was enough time to see the highlights but three days might have been better since our 3 year old daughter really enjoyed meeting the characters and we missed out on a few. More time is needed if you want to enjoy all of the shows. There were many attractions closed for refurbishment or maintenance.

%RESPONSE%
{
	"themes": ["Spent two days, needed three", "Kids enjoy meeting the characters", "Many attractions closed for refurbishment"]
}

%USER FEEDBACK%
We love Smoking Bones, no matter the location. I have to say, though, I liked California Adventure more than Smoking Bones Land. Smoking Bones Land tries to stay true to the original, with staff in old-fashioned attire. There was a lot to do, but we didn't get to see everything. The lack of fast passes was disappointing; not all rides have them, and only a few offer them.

%RESPONSE%
{
	"themes": ["Preferred California Adventure to Smoking Bones Land", "True to the original with old-fashioned attire", "Disappointed: Not all rides had fast passes"]
}

%USER FEEDBACK%
The queues for the rides were horrendous and the fast track facilities were either broken or fully issued, by 10:30. The Smoking Bones Park staff were exceptionally rude and could not have been less interested in helping us.

%RESPONSE%
{
	"themes": ["Queues for rides were bad", "Fast track problems", "Staff were rude"]
}

%USER FEEDBACK%
{{ $json.Tell_Us_About_Your_Experience }}

%RESPONSE%
Now, when we run the workflow, we should have output in the structured format we’re after. It should also capture themes, using the provided themes as samples.
Step 3: Get data for processing
Now that we have theme labels in the right format, we’re ready to fetch data from our vector store. For this, we need two more nodes, both of which we’ve used before.
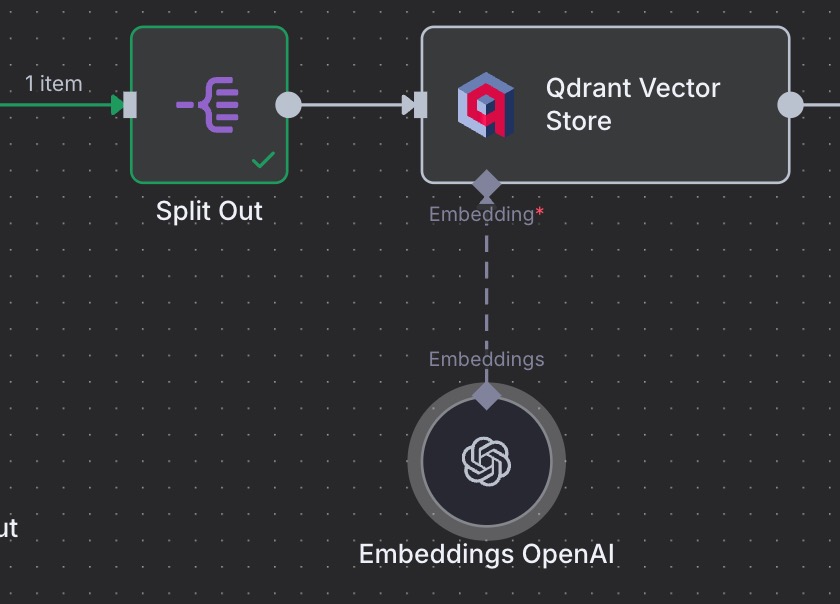
Here are the nodes to get:
Split Out: creates a list and runs subsequent nodes for each item of the list. It’s like a loop, but easier to use.
Qdrant Vector Store → Get ranked documents from Vector store: fetches documents based on a query, along with a score for the closeness of the match.
The two key things to focus on are to ensure you drag the correct element over as the prompt/query, and also set the limit to something high:

Remember, Qdrant retrieve will always return the number of items you request, even if they’re not a close match. You do get a similarity score, though. The score is what we will use to filter the final list. This is how we’ll figure out counts.
For the limit, we’re using 14 just to test, but we can edit that afterwards.
Now, you’ll see there is an issue when you run the workflow with these nodes. It’s to do with the nature of the Split Out node and the Qdrant node.
See, Split Out has a list of themes, and runs the Qdrant node for each item in the list. The Qdrant node returns a list of documents for each theme and appends items to the same list!

This will make counting documents matching a theme difficult, since it’s a single list and matching the query to the retrieved documents gets tricky.
Now, we can work around it, but it will require some coding. Better would be if we could figure out a way to get an accurate count without needing to write any code.
Step 4: Counting closest matches per theme
Here’s the plan for counting the closest themes.
- Create a loop to iterate over each theme
- Extract a list of documents with the closest score
- Filter out documents that are not relevant (i.e., not close enough)
- Get a count for the number of documents that’s left

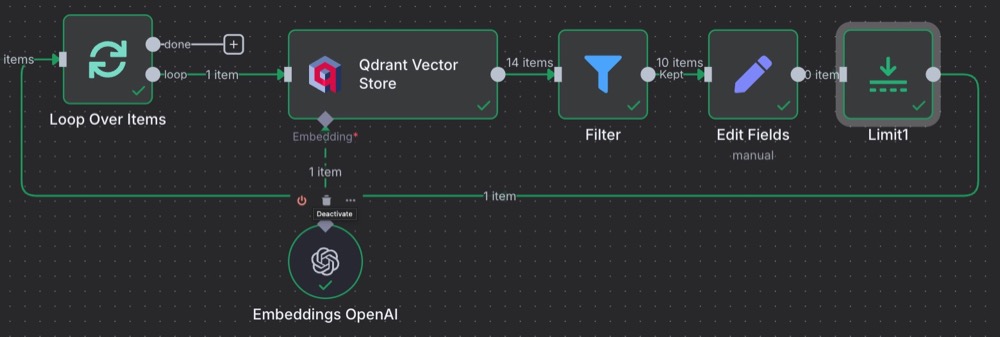
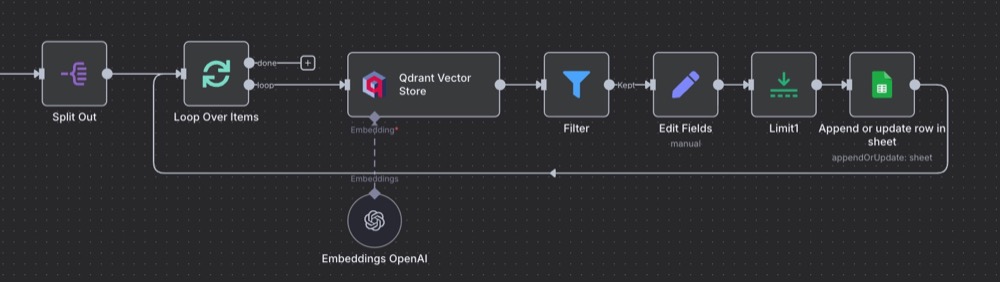
The Split Out remains as it creates a list for us to iterate over. The Loop Over Items iterates over the list of themes provided by Split Out.
For each of these themes, the Qdrant node fetches 14 documents, each with a similarity score. These 14 documents are fed into Filter. And in the filter, we decide how we want to decide what to keep. So drag the score over to the condition, and set a number that is greater than 0.25.
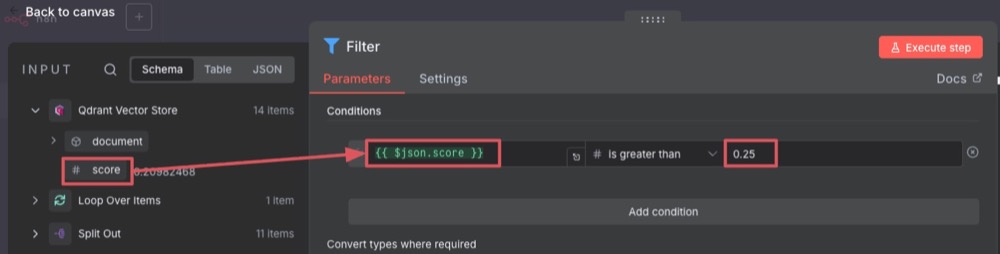
Note: 0.25 is kind of arbitrary, but I’m just using a value as a starting point. The idea is to tweak this until I’m happy with the accuracy.
The final step is to count the number of documents we’ve kept. For this, we use the Edit Fields node. This node allows us to define a new data structure and specify any transformations we want to apply during the process.

We want a new dataset that contains the name of the theme and the number of documents. Here’s how we do that. In the Edit Fields node, create a new String field, call it “query” (though you can call it whatever you want), then drag the theme name from the Loop Over Items input.
After that, create a new field, call it “num” (or whatever you want), but the type of the field must be a number. Then, in the field, set to expression, and this is where we have to add some code (sorry!). But the code is easy:
{{ $input.all().length }}
The curly braces tell n8n that this is an expression. $input refers to the previous input, and the all() part says get all items from the list, and the length is to get the length of the list.
That’s it! But wait, we’re just looping over the themes, but the data is lost like tears in the rain (ahem, Bladerunner reference alert). Anyway, let’s fix that in the next step.
Step 5: Collect stats into Google Sheets
This is where we want to send the stats to Google Sheets to add them to a new sheet. But before we do that, let’s take a closer look at the Edit Field output, so we know exactly what we’re planning to save.
Yikes! Look at all those repeat items:
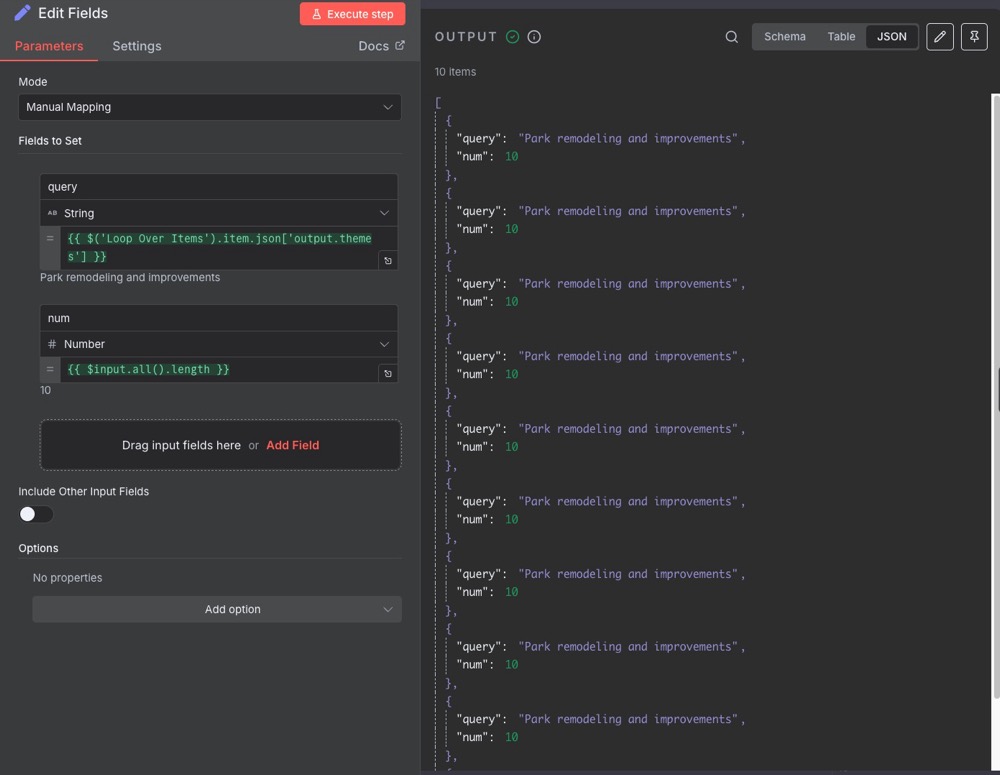
What’s going on? Well, remember that we fetch 14 documents from Qdrant. We then filter this list of documents (in the above case, to 10 documents). We then count the document lengths, but we still have 10 documents in the list. We only need one document once we’ve counted them.
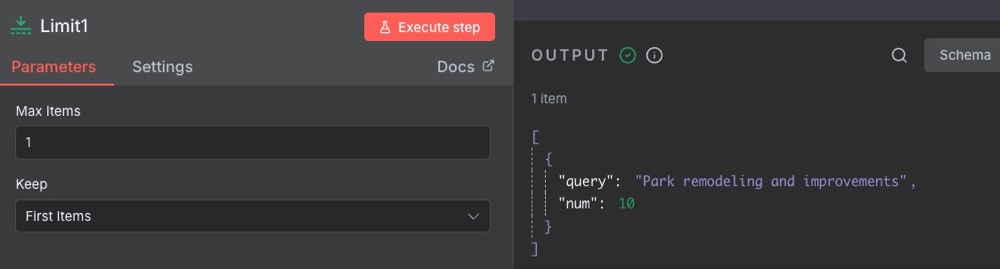
This is easily fixed. We can add a limit and set it to 1 to remove the duplicates.
And then, done:
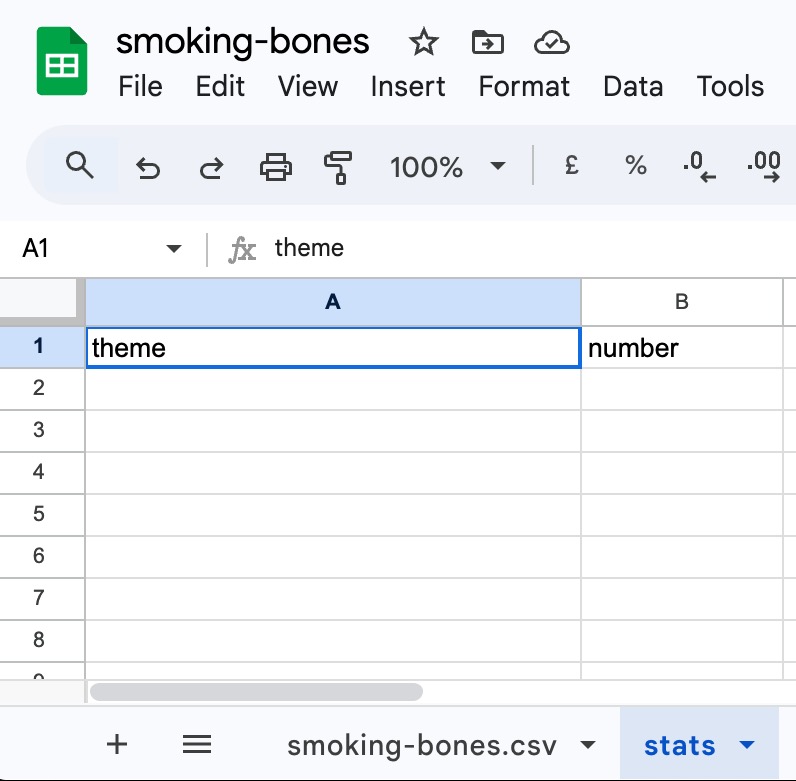
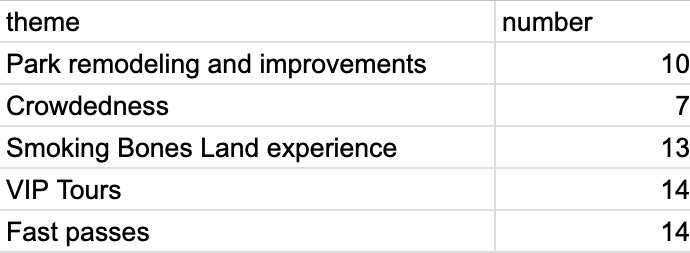
Finally, to collect all that data into Google Sheets, we first need to create a new sheet called “stats” (you can name it whatever you want). Also, name two columns: theme and number.
Then add a new node after the limit to Append or update row in sheet:
Here’s the settings:

It breaks down like this:
- Pick the document
- Select the Sheet
- Column to match on is theme
- Drag the theme/query to the selection area
- Drag the num to the number field
The final workflow:
Execute the workflow (we still have it connected to Chat trigger, so type whatever you want to trigger the workflow). Now, when you run it, watch n8n count as the loop iterates. Then, check the sheet for the data!
Conclusion
Isn’t this so much better than throwing data into ChatGPT and hoping it gets it right? (It doesn’t get it right, by the way.) What’s more, check out all the points to validate the workflow and assess accuracy.
We’re not done with this yet. We can now tweak prompts, check different models, tweak the similarity scores, as well as the limit for Qdrant retrieval. By making those tweaks, we’ll have a workflow we’re confident with.
We’ve also learned the distinction between Split Out and Loop and when to use which. All this with almost no code!
Editor’s note: This guide is part of a broader series on building practical AI systems. To see how the pieces fit together, explore our guides on getting started with AI automation in n8n, building your first AI agent, connecting Google Sheets to n8n, building RAG workflows with n8n and Qdrant, extracting themes from user feedback with n8n, and connecting chat interfaces to real tools.


Written By
Iqbal Ali
Edited By
Carmen Apostu