Solving the Fragility of Redirect Tests with AI-Driven Regex Automation


I’m going to be honest: I’m not a huge fan of redirect tests. It’s tough maintaining data integrity in those things. I’m specifically talking about client-side redirect tests, by the way. Server-side redirect tests are fine.
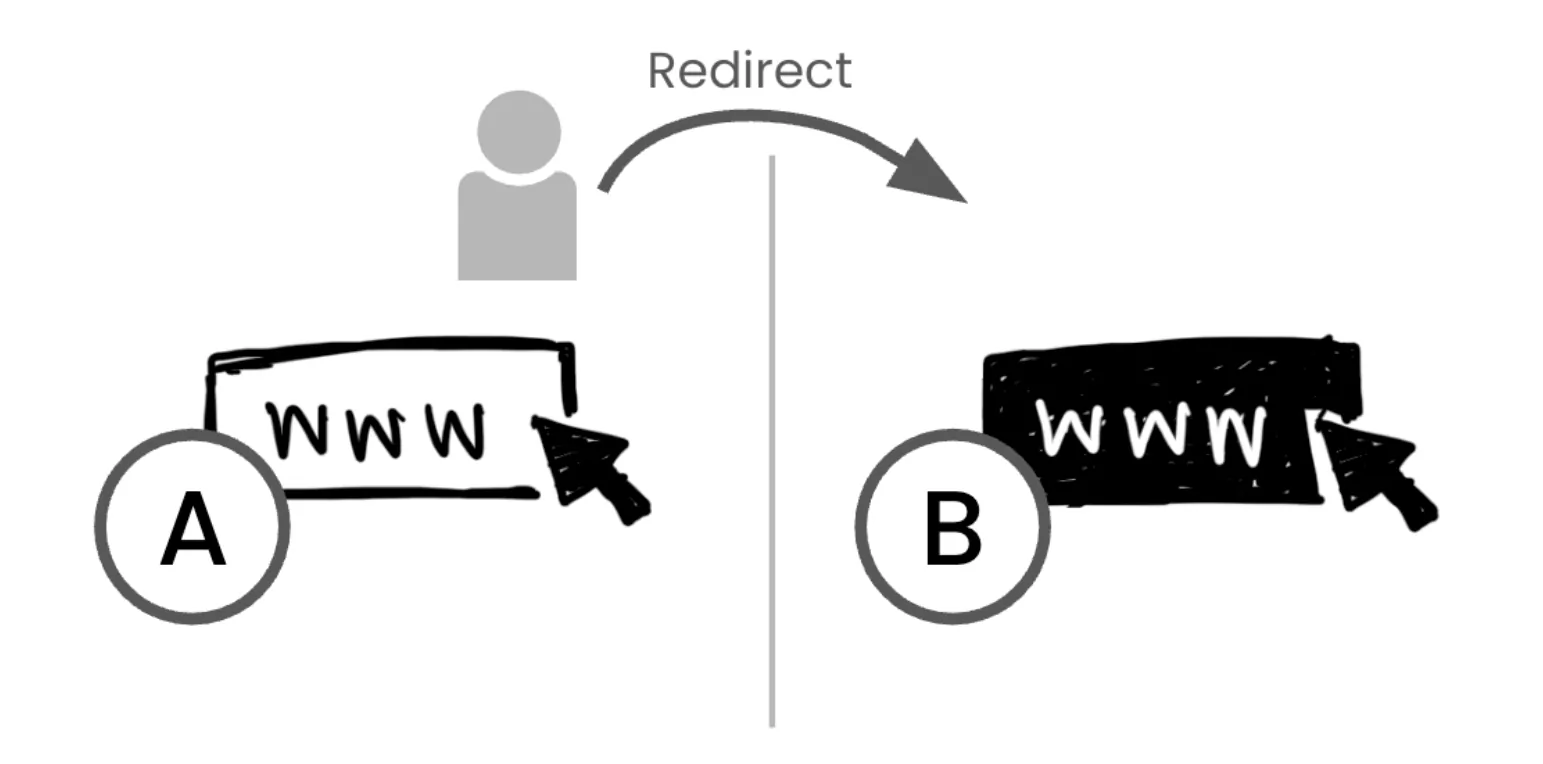
Redirect tests are when you have a page (e.g. /my-original-page) and want some of your traffic to be redirected to a different URL (e.g. /my-new-page-version). They are also referred to as “split URL tests”. I’ll be using the two terms interchangeably for the rest of the article.
Whether you’re doing this client-side or server-side, the mechanics are usually the same: it involves writing some sort of “regular expression” as a rule to match a URL a user is trying to reach, and instead redirect those users to the new URL.

The problem is, regular expressions are brittle. A small typo, an unwanted URL in scope, or a missing edge case, and you have a very serious defect on your hands.
This is why I favour a very strict process for creating and QAing these kinds of tests. And a process such as this is perfect for automation.
This is why I’ve created an n8n workflow to handle these builds. There’s a link below to download the n8n workflow.
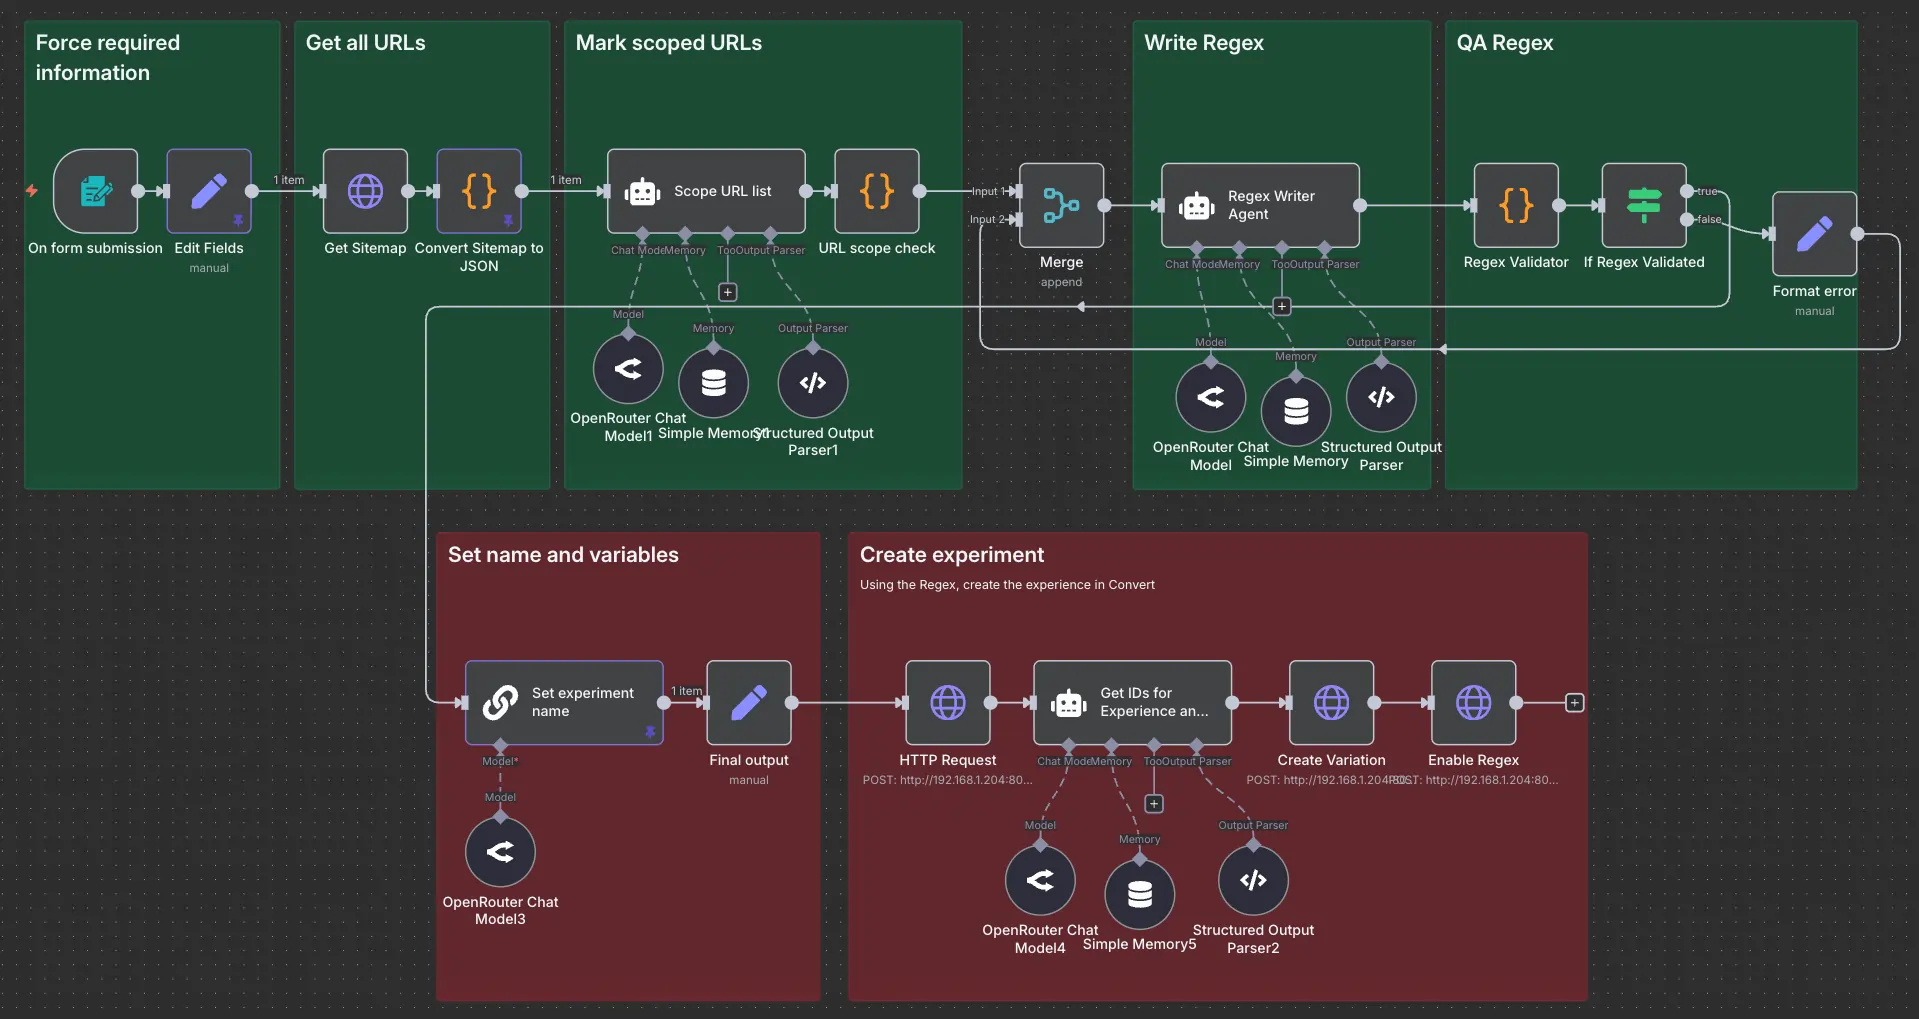
In the rest of the article, I’ll take you for a tour of how it works, in case you want to customise it for your own use (and you really should).
How the Workflow Works
Step 1: Collect the Required Information
The workflow starts with a form that captures three things:
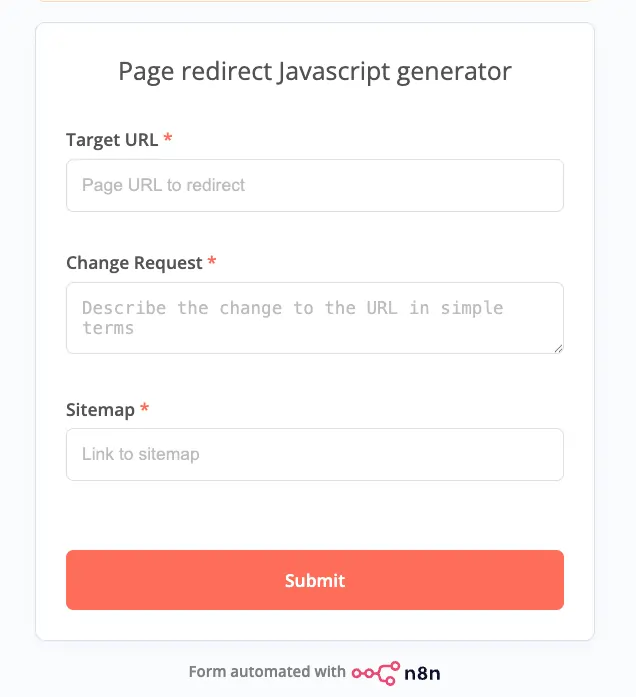
- The target URL – the page you want to redirect
- The change request – a plain English description of the change
- The sitemap URL
A form is the best way to guarantee you’re getting the right information every time. You could also trigger this from a chat or other tool, but the form keeps things clean and enforces the information in the simplest way.
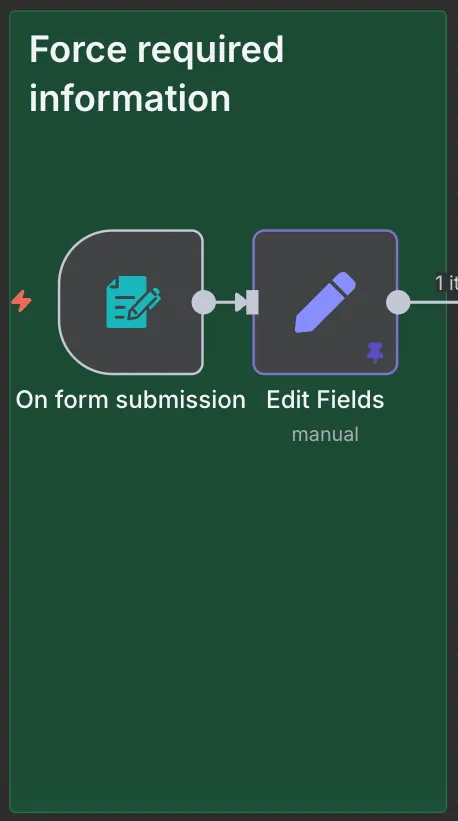
The next node just sets all the variables in a convenient way for subsequent steps.
By the way, you need a sitemap for this, or a list of all URLs on your site. If you don’t have a sitemap, either fix that today, or customise this step to work with a list of URLs to validate.
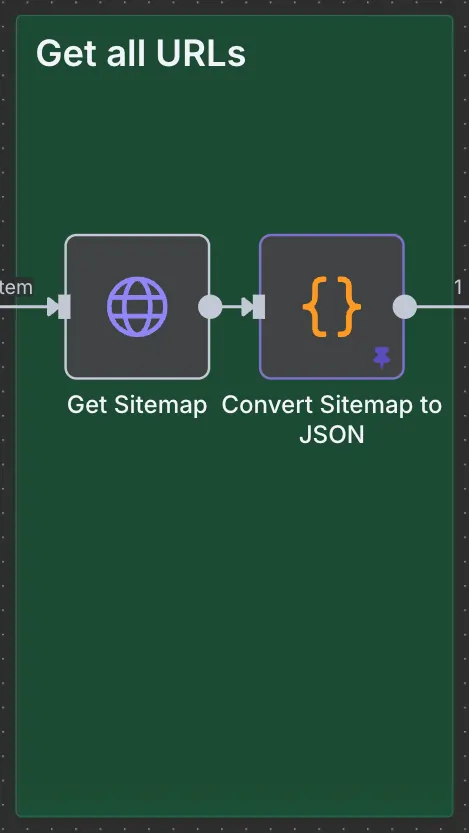
Step 2: Fetch and Prepare the URLs
The next set of nodes fetches all URLs from your sitemap and formats them into a list. That list then feeds into the next step.
Step 3: Determine Scope (AI Step 1)
This is the first place where AI comes in:
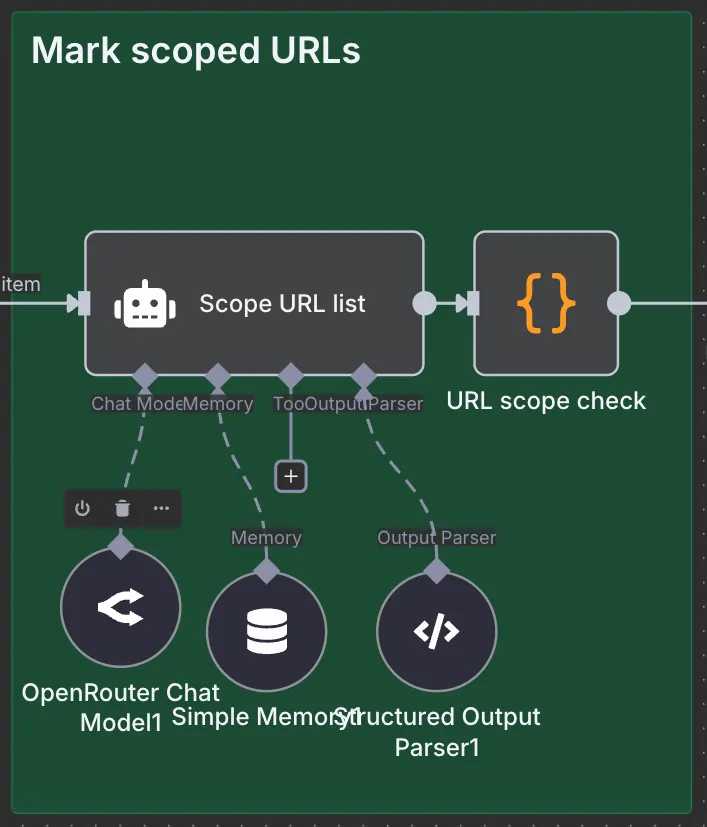
An agent looks at the full list of URLs, your target URL, and your change request, and determines which URLs should be in scope for the redirect and which shouldn’t.
The prompt works based on patterns, as you’ll see if you open the Agent node:
Prompt:
I am creating a Regex.

Output comma-separated URLs from the URL list that are in scope to be be changed.

%INPUT%

URL_LIST: https://mysite.com/,https://mysite.com/page,https://mysite.com/page2,https://mysite.com/page/sub-page

TARGET_URL: https://mysite.com/page

CHANGE_REQUEST: Change /page to /page-alt

%OUTPUT%

https://mysite.com/page,https://mysite.com/page/sub-page

%INPUT%

URL_LIST: {{ $json.urls }}

TARGET_URL: {{ $('Edit Fields').item.json.url }}

CHANGE_REQUEST: {{ $('Edit Fields').item.json.change_request }}

%OUTPUT%
I like this structure for my prompt. A clear task, and a few examples for the LLM to pattern match against (this is called “few-shot” prompting, by the way). We’re going to leave the decision on which URLs to include and which to exclude up to the LLM. I’m using a small model here, and this seems to be doing a decent job in my tests.
It’s not perfect, but it’s better than doing it manually across hundreds of URLs. You can optionally include a human-in-the-loop check here if you want.
Step 4: Determine Scope (AI Step 2)
Before writing the regex, it helps to write the rules. This step takes the scoped URL list and the change request and writes a plain-English specification of what should be matched and what should be left alone.
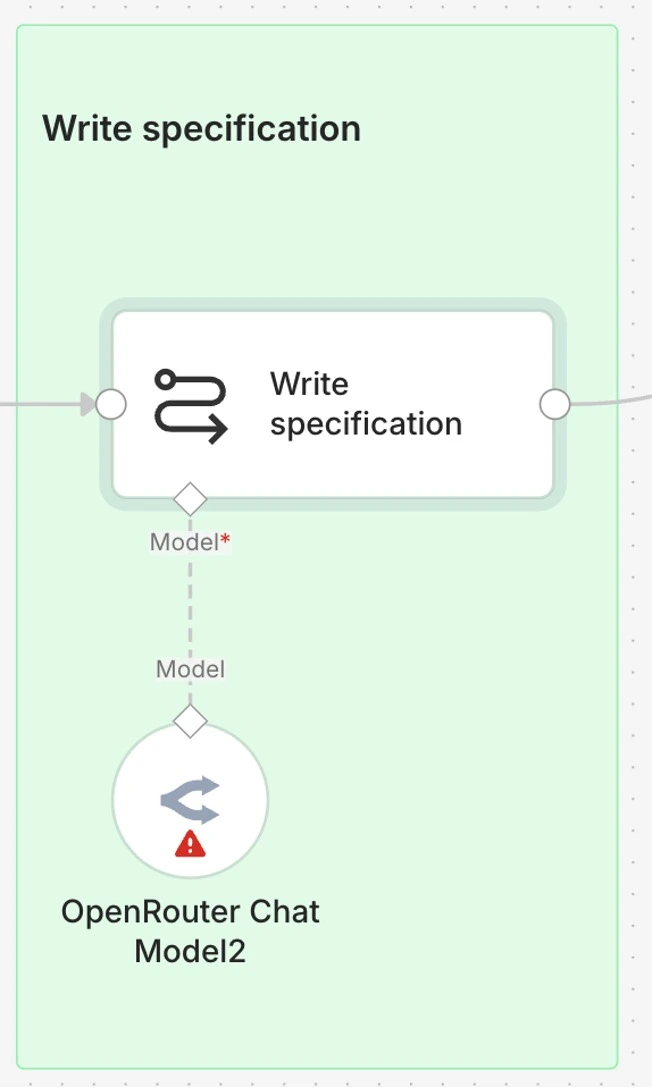
Prompt:
Take a simple user change request, write a detailed document for writing regular expressions that applies to URLs that have scope true, and not those that are false.

To do this, check for rules you can apply to write a plain languageset of rules that can be used to generate the final regular expression.

%SCOPE%
{{ $('URL scope check').item.json.urls }}

%CHANGE REQUEST%

{{ $('Edit Fields').item.json.change_request }}


%DETAILED SPECIFICATION%
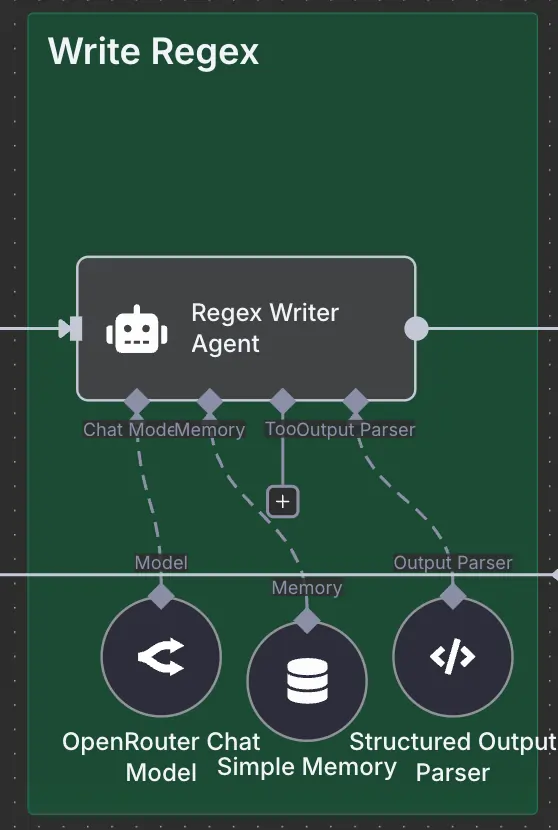
Step 5: Write the Regex (AI Step 3)
This is the third and main AI step. The agent takes the specification and writes a regular expression. The prompt is the same structure: a task instruction, some pattern examples, and then the actual information to use.
Prompt:
{{ $('Merge').first()?.json?.failures ? "Previous attempt failed. Fix these issues:\n" + JSON.stringify($('Merge').first().json.failures, null, 2) : "" }}


# Regex Match/Replace Generator for URL Rewrite Rules

You are a regex match/replace generator for URL rewrite rules. Given a URL and a plain-English change request, output a single JSON object:

{"match": "REGEX_PATTERN", "replace": "REPLACEMENT_STRING"}

## Mandatory rule: every match ends with this exact capture suffix

Every match targeting the end of a path (redirects, full path swaps) MUST
end with the following four capture groups, in this order:

  (\/?)(\/)?(\?.*)?(#.*)?

- Group 1: optional trailing slash
- Group 2: optional secondary slash (kept for safety/consistency — will
  typically be empty since group 1 already consumes a slash if present)
- Group 3: optional query string
- Group 4: optional hash fragment

Every replace MUST reinstate all four groups, in order, immediately after
the new path: `$1$2$3$4`. This is required on every single output,
regardless of whether the user's request mentions a trailing slash,
parameters, or a hash. The user will never ask for this explicitly — it is
not optional and must never be omitted.

No negative lookeaheads! (\/!?) will be rejected. Use this instead for optional trailing slash: (\/?)

This exact suffix must work identically against a URL with or without a
trailing slash before the query string — e.g. both `/apps?test=param2` and
`/apps/?test=param2` must match the same rule and produce correctly
reinstated output.

## Standard template — full path or end-of-URL changes

  Match:   "\/oldpath(\/?)(\/)?(\?.*)?(#.*)?$"
  Replace: "/newpath$1$2$3$4"

## Standard template — mid-path segment/slug changes (more path follows)

When the changed segment is followed by more path (not the end of the
URL), capture the remaining path as its own group, then still apply the
mandatory suffix for query/hash:

  Match:   "\/oldsegment(\/[^?#]*)?(\?.*)?(#.*)?$"
  Replace: "/newsegment$1$2$3"

## Parameter value changes — capture dynamically, reinstate the rest

  Match:   "([?&])paramname=([^&#]*)"
  Replace: "$1paramname=$2-suffix"

## Removing a parameter — reinstate the remaining parameter list

  [
    {"match": "([?&])paramname=[^&#]*&", "replace": "$1"},
    {"match": "[?&]paramname=[^&#]*$", "replace": ""}
  ]

## Output format rules

- Output ONLY the JSON object — no prose, no markdown
  fences, no explanation, unless explicitly asked to explain.
- Escape forward slashes and special regex characters appropriately for
  the target engine (assume JavaScript regex syntax unless told otherwise).
- Never invent parameter values that weren't in the request — only
  hardcode a value if the user's change request explicitly names it.
- Every replace string must account for every capture group in its match.
- The `(\/?)(\/)?(\?.*)?(#.*)?` suffix (or `$1$2$3$4` in the replace) is
  required on every end-of-path rule, with no exceptions.
- No negative lookaheads
- No escape on the replace

## Examples

Input:
  URL: https://iqbala.com/mypage
  Change Request: redirect to /mypage2
Output:
  {"match": "(https:\/\/iqbala.com\/)mypage(\/?)(\/)?(\?.*)?(#.*)?$", "replace": "$1mypage2$2$3$4$5"}


(Both inputs above resolve to the identical rule — this pattern handles
both URL shapes without needing separate rules.)

Input:
  URL: https://mysite.com/checkout
  Change Request: redirect to /checkout-v2
Output:
  {"match": "(https:\/\/mysite.com\/)checkout(\/?)(\/)?(\?.*)?(#.*)?$", "replace": "$checkout-v2$2$3$4$5"}

Input:
  URL: https://mysite.com/products/widget/reviews
  Change Request: rename widget to gadget
Output:
  {"match": "(https:\/\/mysite\.com\/products\/)widget(\/reviews)(\/?)(\/)?(\?.*)?(#.*)?$", "replace": "$1gadgets$2$3$4$5"}

Input:
  URL: https://mysite.com/?ref=affiliate123
  Change Request: append "-tracked" to whatever the ref value currently is
Output:
  {"match": "(https:\/\/mysite\.com\/)\?ref=affiliate123(&[^#]*)?(#.*)?$", "replace": "$1?ref=affiliate123-tracked$2$3"}

Input:
  URL: https://blog.example.com/posts/summer-sale-2024/?utm_campaign=july
  Change Request: replace slug summer-sale-2024 with summer-sale-2025
Output:
  {"match": "(https:\/\/blog\.example\.com\/posts\/)summer-sale-2024(\/?)(\/)?(\?.*)?(#.*)?$", "replace": "$1summer-sale-2025$2$3$4$5"}

%INPUT%
URL: {{ $('Edit Fields').item.json.url }}
Specification document:
{{ $json.text }}
%OUTPUT%
Small models work fine here, too.
Step 6: QA the Regex
This is where the script gets validated.
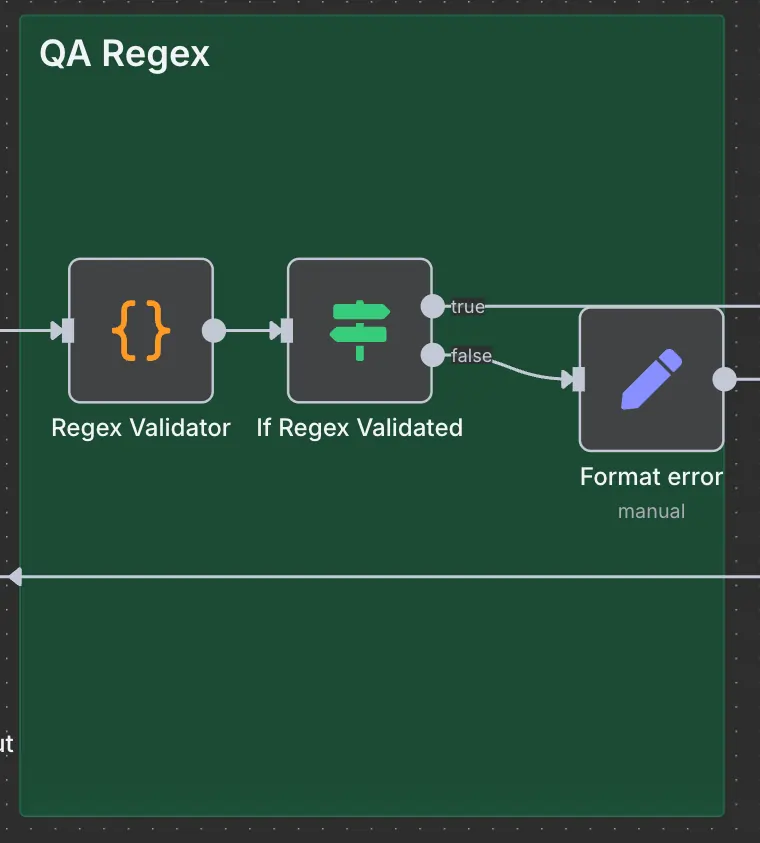
A script runs through every single URL from the sitemap, applies the regex, and checks:
- Does it match URLs it’s supposed to match?
- Does it leave alone URLs it’s supposed to leave alone?
If there’s an error, it formats that error, sends it back, and the workflow loops back to rewrite the regex.
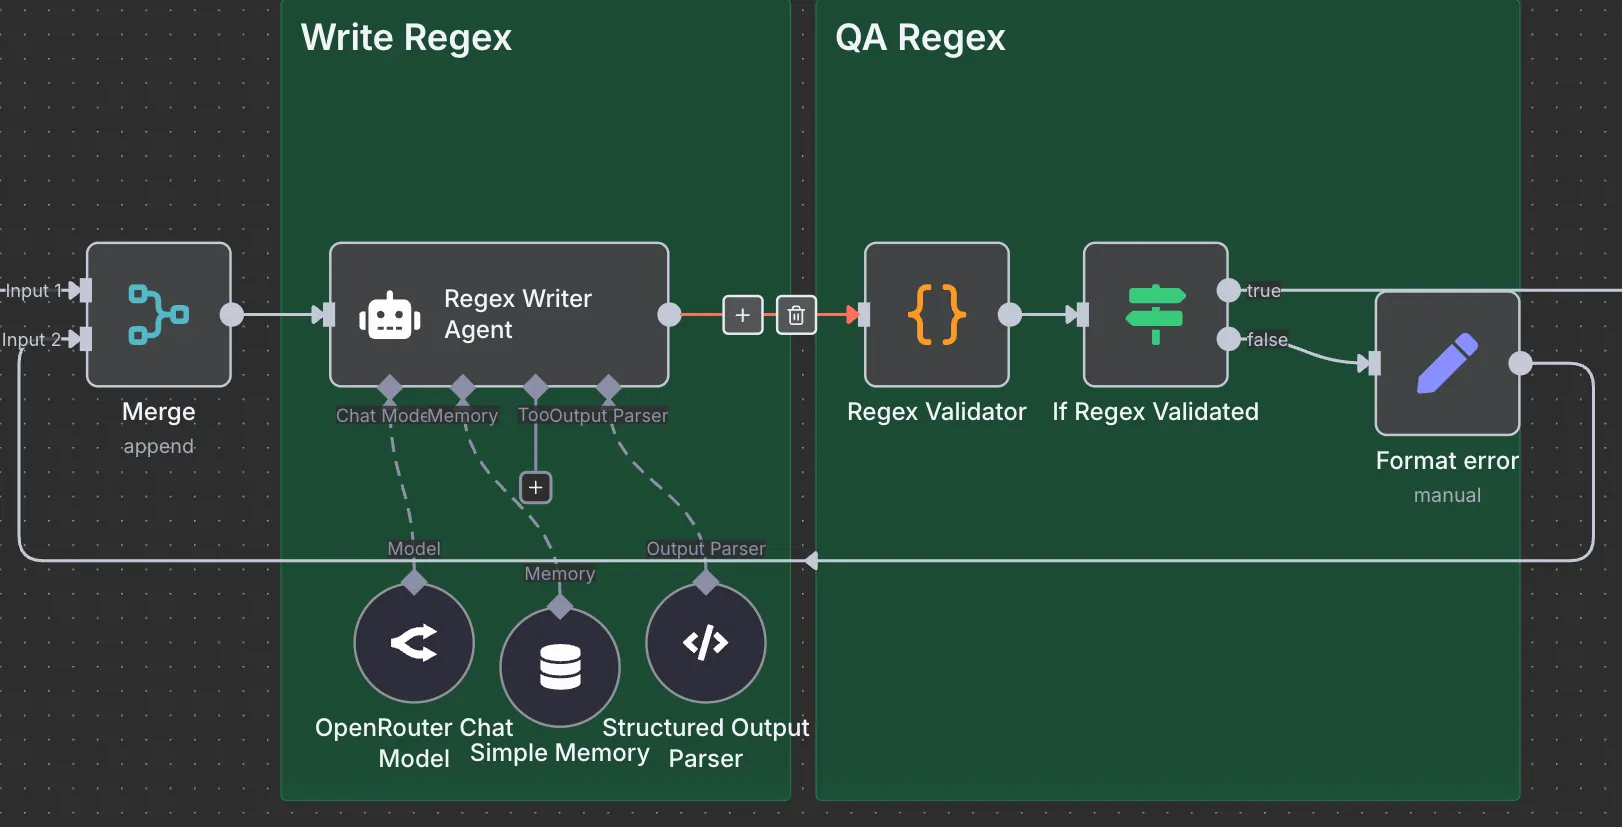
The error adds additional context for the Agent to do its update. This loop continues until it passes QA.
Step 7: Create the Split URL Test
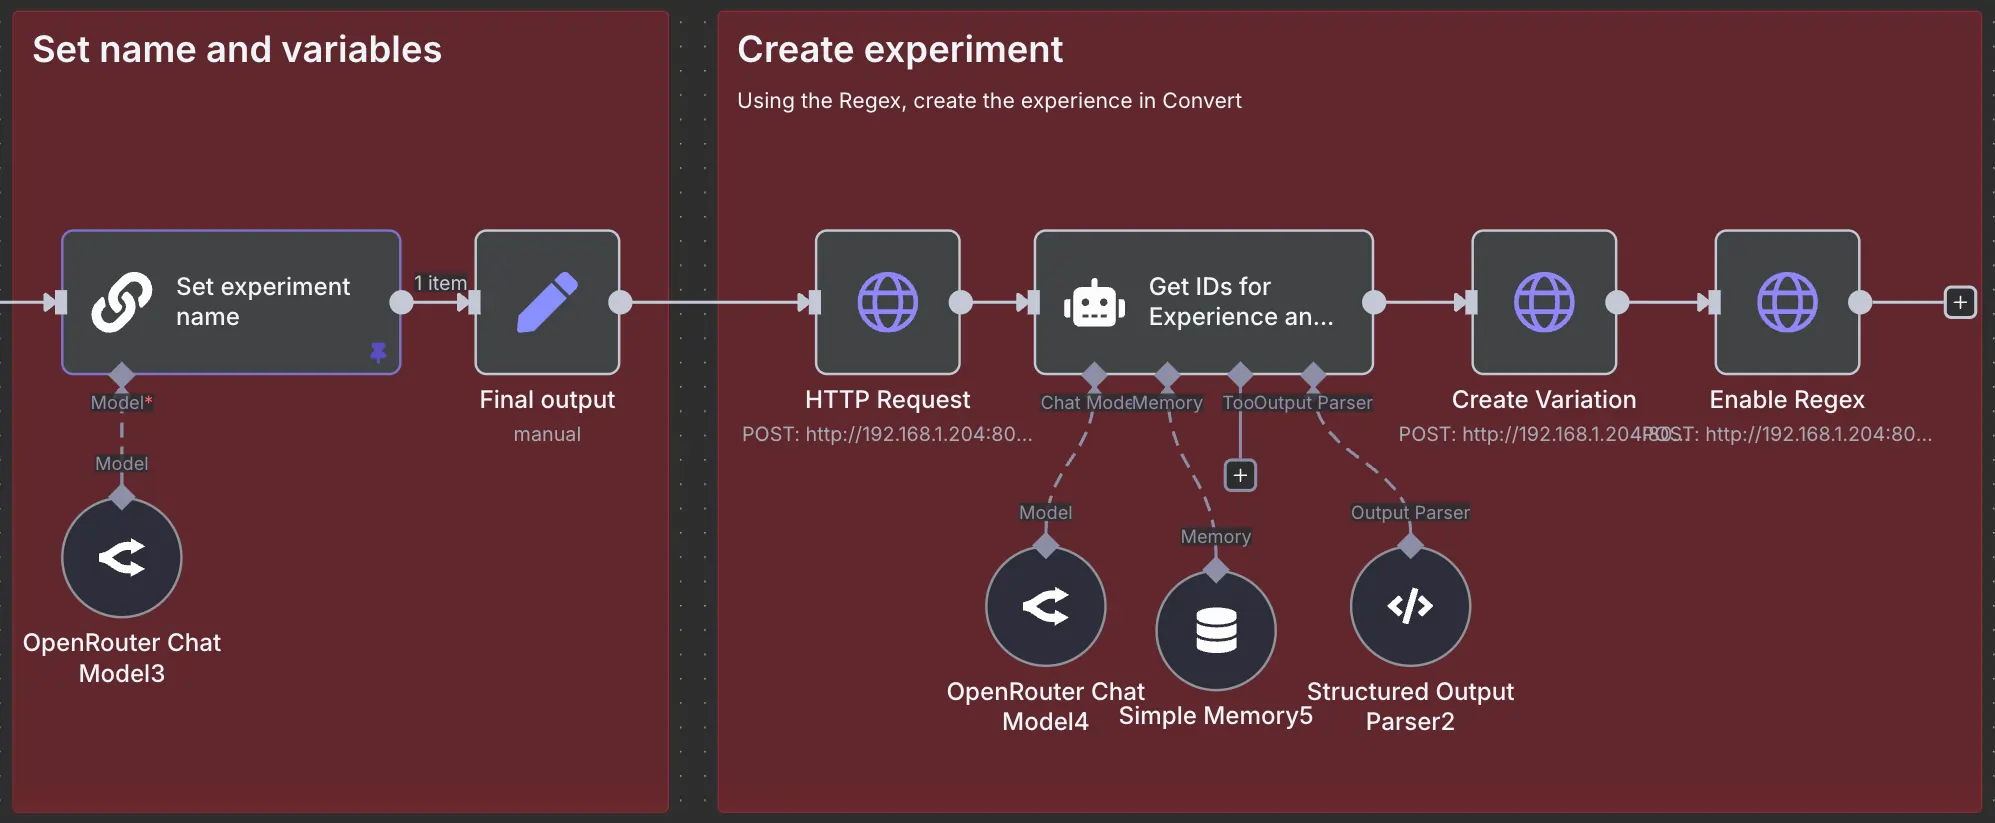
Once the regex is validated, the workflow creates the experiment in your testing tool (in this case, Convert). It sets the experiment name, creates the variation, and enables the regex. Again, small models run very quickly. This is the part you might want to adapt if you’re not a Convert customer (this is why I’ve marked this red).
Results of my tests
The whole process runs very fast. It’s also very cheap. The number of tokens used is minimal, and the output is solid. I used an example where my change request lacked clarity in the URL scope to include, and the workflow still picked up URLs to include and ensured a robust regular expression was written, excluding out-of-scope URLs.
Why All of This Matters
This workflow eliminates a lot of the user error that makes redirect tests so fragile in the first place. It’s not going to replace proper QA, but it should reduce some effort. In fact, if you have a QA, I’d recommend appending a step to write the QA requirements and documentation (I removed this from the final workflow to keep things simple).
My intention here is not to give you a final n8n workflow you can pick up and apply; rather, it is to give you some ideas for rolling out similar, reliable processes that can be used by the whole team with limited specialised knowledge required.
Editor’s note: This guide is part of a broader series on building practical AI systems. Since you’re reading about A/B test automation, you’ll likely want our related guides on exploring Convert MCP with small models using Claude Code and Qwen 3 and turning Convert MCP into a secure n8n workflow with MCPO. If you’re just getting started more broadly, we’d also recommend our guides on getting started with AI automation in n8n, building your first AI agent, building RAG workflows with n8n and Qdrant, connecting chat interfaces to other tools using MCP, and setting up MCP servers in n8n.


Written By
Iqbal Ali
A/B Testing, Experimentation Program Coaching, UX Design +4 more
A/B Testing, Experimentation Program Coaching, UX Design, n8n Automation, Small Language Models, Model Context Protocol (MCP), Client-Side A/B Test JavaScript Show less
Edited By
Carmen Apostu