A Developer’s Guide to Prompt-Based A/B Testing with Convert and Cursor
There is an ongoing debate in the CRO and tech community about whether experiments or products can be effectively built or enhanced with AI and how capable LLMs truly are.
The team at Optiphoenix has been experimenting with GenAI since its inception, and here are some insights on leveraging powerful tools like Cursor and Convert to reduce experiment development time.
Mapping Out the Developer’s A/B Test Process
A developer typically executes the following tasks while building an A/B test:
- Understanding the brief
- Understanding the existing UI structure and functionality on the website
- Creating UI elements using HTML and CSS
- Injecting them into the DOM using JavaScript
- Building functional components using JavaScript
- Setting up metrics and adding their code into the experiment or global code
- Creating the experiment in the tool, setting variations, targeting, and audience
- Development testing
We’re listing these tasks to make you aware of all the steps required to set up an experiment and provide the LLM with a series of prompts to take action. Before we proceed further, let’s cover some basic terminology and learn about the tools we’re using.
Key Terms:
- LLM: Large Language Models (Claude, ChatGPT, Gemini, Deepseek, etc.).
- Cursor: A powerful code editor with deep AI integration.
- MCP: Model Context Protocol, which allows AI to communicate with external data sources, tools, and services. This enables the code editor (Cursor) to communicate with Convert (the A/B testing tool).
- Cursor Rules: Instructions to Cursor in a markdown file.
- Autocomplete and Smart Coding Assistance: Your AI knows your entire project and provides autocomplete features with great accuracy. Cursor suggests real-time completions, even across multiple files, making coding feel seamless.
- Inline Chat: Why switch windows when you can chat directly in your files or terminal? Fix errors, run commands, or address linting issues in natural language. Make changes to small portions of code using inline chat.
- Context Window and LLM Options: With a huge context window, Cursor understands your entire project. Pick from multiple LLMs for suggestions, and set custom rules for AI behavior.
- Agent-Based Automation: Turn Cursor into a team of AI agents that can handle end-to-end A/B testing workflows, from creating and deploying tests to event tracking and repetitive operations.
Establishing Some Ground Rules Before Using AI
Before diving into the technical implementation, you need clear boundaries for AI-assisted development.
The fundamental principle is straightforward: Never implement code you don’t fully understand.
This means every developer must be able to explain what each line of AI-generated code does, understand the logic flow, identify potential side effects, and possess the ability to modify or debug the code independently.
For A/B testing work, approved use cases include:
- Generating boilerplate code and test templates
- Converting designs to HTML/CSS/JavaScript
- Creating utility functions
- Debugging issues
- Learning best practices.
However, there are strict prohibitions: never share client data, proprietary algorithms, security credentials, or internal URLs with AI tools. All AI-generated code must undergo mandatory human review, comprehensive testing, and security scanning before deployment.
The goal is to use AI as a productivity booster while maintaining human oversight and understanding at every step.
Setting Up Convert MCP in Cursor
Before you can start building experiments, you need to configure the Convert MCP server in Cursor. Here’s how:
Prerequisites
Ensure your system’s default Node.js version is 20 or higher. If you’re using an older version, the MCP tools will not load properly and you’ll see an error like “No tools or prompts found.”
Getting Your Convert API Credentials
- Go to your Convert account settings
- Navigate to API Keys and click Create New API Key
- You’ll receive two values:
- API Key (Application ID)
- API Secret Key
Installing the Convert MCP Package
Run the following command in your terminal:
npm i @convertcom/mcp-server
Configuring MCP in Cursor
- Open Cursor and go to Settings, then Tools & MCP
- Click on New MCP Server, which will open a file named mcp.json
- Add the following configuration:
{
  "mcpServers": {
    "convert": {
      "command": "npx",
      "args": ["-y", "@convertcom/mcp-server@latest"],
      "env": {
        "CONVERT_API_KEY": "your_application_id",
        "CONVERT_API_SECRET": "your_secret_key",
        "TOOLS_FOR_CLIENT": "all"
      }
    }
  }
}
Verifying Your Setup
Once saved, Cursor will load the MCP. If everything is configured correctly, you’ll see the Convert tools available inside Cursor. You can hover over any tool to check what input it expects.
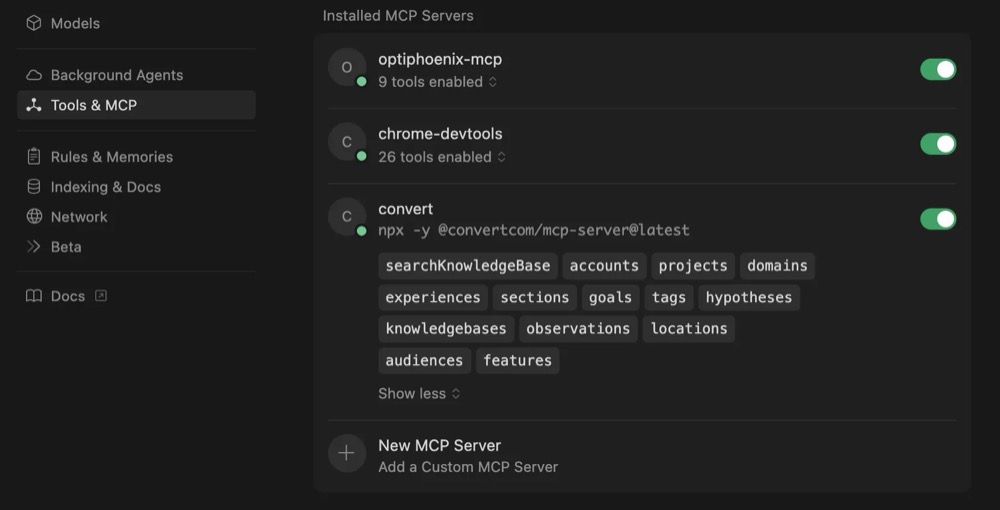
Using Convert Tools
You can now interact with Convert directly through natural language in Cursor. Specify which action you want to perform, such as create, get, update, or list for any given MCP. The available actions can be viewed by hovering over the MCP in Cursor’s Tools & MCP section.

One-time Setup for Experiment Development
You can start building the experiment directly; however, the result that AI will generate will be sub-optimal. GenAI works best when you tell it what to do and how to do it. Setting up a .cursorrules file tells Cursor how exactly you want your code to be.
Create a file with the name .cursorrules in the workspace root folder to define the steps for generating an A/B test. Add Cursor rules to enforce your working standards.
This document defines a general workflow that any automation or AI agent should follow to create A/B tests. Use this format to tell AI about:
- What input the AI needs – e.g., experiment name, brief, testpage HTML or URL, etc.
- Where to output the code – as it will be further used to push to Convert
- File templates – how should it write the code?
- Coding standards and naming conventions – be very specific with the AI
- Structure of the prompt that you will use to create the test.
If this sounds a bit complex, simply copy and paste the code below and put it in a file:
## A/B Test Automation: General Workflow and Standards

This document defines a single, general workflow that any automation or AI agent should follow to create A/B tests.

### Inputs the AI must collect from the user
- **Experiment name**: UPPERCASE with underscores (e.g., `MT_01`, `UL_65`). This name forms the folder name.
- **Test brief**: What needs to be done in the test.
- **Control HTML**: Either pasted markup or a URL with instructions to fetch and parse. Use this to derive/select elements.
- **Key selectors (optional)**: If provided, prefer these; otherwise derive from control HTML. This can help to fine tine the

### Output directory structure (required)
EXPERIMENT_NAME/
├── src/
│   ├── config.js        # Experiment config: selectors, html, text, styles
│   ├── utils/           # Shared utilities (optional)
│   └── v1/
│       ├── v1.js        # Main experiment logic
│       └── v1.css      # Styles
└── dist/ # Optional, if you  use a compiled code

### This output directory structure can be completly changed based on what your needs are

### Standard file templates: Define the file templates here

**src/v1/v1.js:**
const config = {
  selectors: {
    targetElement: 'selector_from_user_brief'
  },
  html: {}
};

((cName, cVar) => {
  const EXPERIMENT_workflowFn = ([targetElement]) => {
    document.body.classList.add('experiment_name');
    // Implement experiment logic using config.selectors/html/text/styles
  };

  EXPERIMENT_workflowFn();
})('EXPERIMENT_NAME', 'v1');

**src/v1/v1.css:**
body.experiment_name {
  // Experiment styles
}

@media only screen and (max-width: 767px) {
  body.experiment_name {
    // Mobile styles
  }
}

### Coding standards and conventions
- **Naming:**
  - Experiments: UPPER_CASE_WITH_UNDERSCORES (e.g., MT_01)
  - CSS classes: lowercase with experiment prefix (e.g., mt_01_sticky_btn)
  - Functions and variables: camelCase
- **JavaScript:**
  - Use const/let; avoid var
  - Arrow functions where suitable
- **DOM manipulation:**
  - Prefer querySelector/querySelectorAll
  - Insert with insertAdjacentHTML (strings) or insertAdjacentElement (nodes); don't use innerHTML or createElement
- **Styles:**
  - Prefer class-based styling; avoid inline styles
  - Handle responsiveness via media queries
  - Body and CSS classes: lowercase, prefixed with experiment (e.g., opti_01_sticky_btn)
- **Linting:**
  - ESLint with max-len disabled in experiment files

### Build process
Run npm run build command to make build.

### QA checklist
- No console errors; selectors resolve
- Visual checks desktop/mobile; responsive behavior verified
- Event handlers work; sticky CTAs proxy original behavior
- HTML validated; CSS specificity OK; minimal conflicts

### Automation flow (what the AI does upon a user prompt)
1. Ask for: experiment name, test brief, control HTML/URL, optional selectors
2. Parse control HTML to identify targets referenced in the brief; derive selectors if missing
3. Create the folder structure and boilerplate files exactly as specified above
4. Implement variation logic in src/v1/v1.js using provided selectors, HTML, and text
5. Add styles in src/v1/v1.css using experiment-scoped classes on body
6. Build assets into dist/v1/ with minified output [Optional]
8. Share a brief summary of changes and next steps for QA

### Prompt template to start a new test
Create an A/B test.
- Experiment name: MT_XX
- Test brief: <expected changes>
- Control HTML: <paste HTML>
- Known selectors (optional): <list>
Let’s Start Building
Now let’s walk through a concrete example.
A/B test idea: Make the “Book Now” CTA section sticky at the bottom of the screen for this event details page.
Here’s what the control looks like:

And what the variation looks like:

Create a Test Brief for Cursor
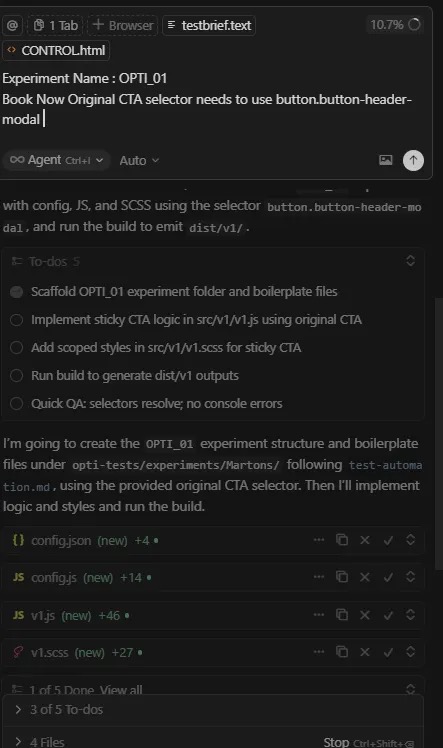
A/B Test Brief: Sticky "Book Now" CTA

Test Name:
Sticky Book Now Section on Booking page

Device Targeting:
Desktop and Mobile

Control (A):
The “Book Now” button appears in the body

Variant (B):
Keep the book now CTA section sticky at bottom.

The sticky CTA should:
Design will be same as Original Book now Button
Working should be also same as Original Book Now Button

Ensure accessibility (keyboard focusable, ARIA label if needed).
Now type “create A/B test” in Cursor. It’ll run through the steps defined in the .cursorrules file, and if something’s missing, it asks you for the required inputs:
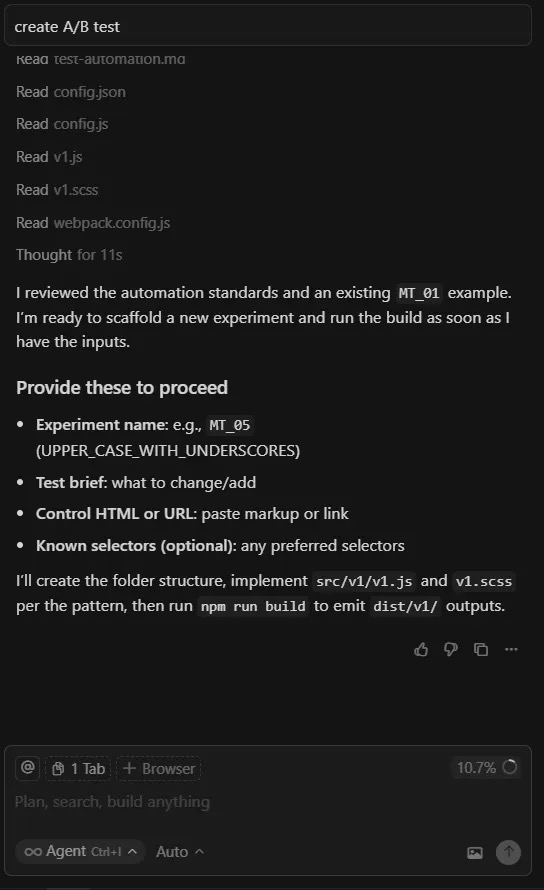
I provide the required inputs, such as the test brief, control HTML, and the selector for the original “Book Now” button, which makes the process more reliable.
You can also extend the prompt with additional details if you want to follow specific implementation rules. Otherwise, the default coding standards defined in the Cursor rules will be applied. You can even create your own Cursor rules to guide how tests are built.
Just create two files: one for the control HTML and one for the brief. Add them in context as input.
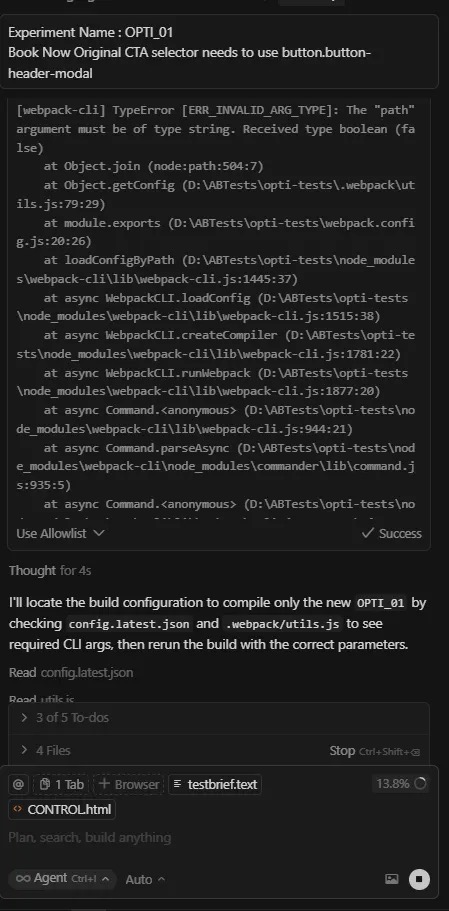
Once all required inputs are provided, Cursor automatically starts building your experiment. You can see the progress in the images below. I use webpack to compile the experiment, and if any issues occur during the build, it attempts to resolve them automatically.
Once development is complete, the experiment is ready for review. You can either request that Cursor make any modifications or adjust them manually yourself.
Automatic Error Handling During Build
When it encounters errors, Cursor automatically identifies the issue and attempts to resolve it:
Experiment Coding Complete
Once the build completes, Cursor generates all necessary files and provides a summary of what was created, along with next steps for QA:
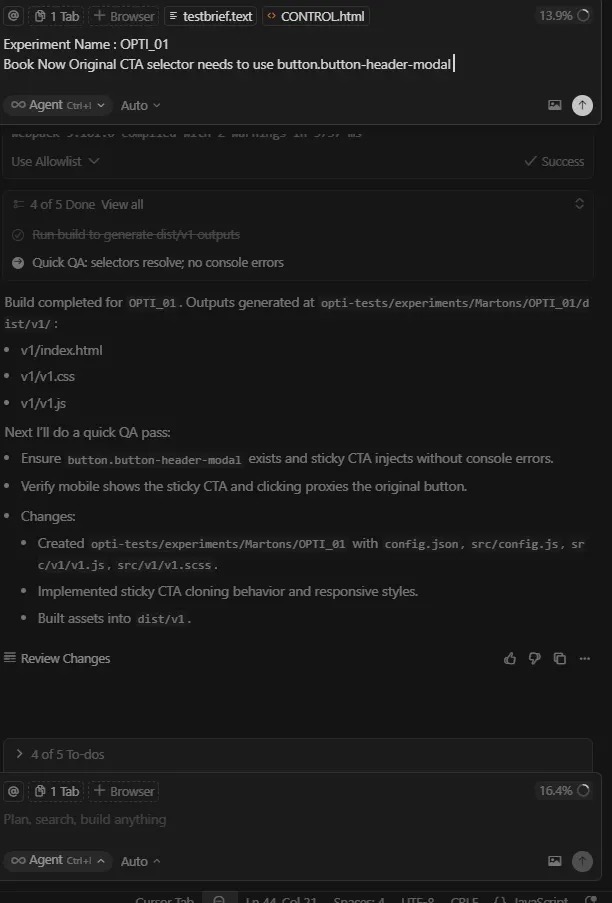
Make sure you go through and understand the code generated by AI. Once you’ve reviewed the experiment and confirmed everything is working as expected, we’ll use Convert MCP to create the experiment in Convert.
Setting Up Experiments Using a Prompt
Specify which action you want to perform — for example, create, get, update, or list — for any given MCP.
You can view the available actions by hovering over the MCP in Cursor’s Tools & MCP section.
I’ve already provided my account ID and project ID where the experiment needs to be created. You can find them directly in your Convert URL by logging in to your Convert account.
I’ve created a reusable JSON file that defines the body schema for the MCP. You can use it to understand what data needs to be sent when using any specific Convert MCP.
You can check the required body schema in two ways:
- Refer to the Convert API documentation, or
- Use the Convert SearchKnowledgeBase MCP to get detailed information.
If you don’t provide the required input, Convert will automatically run the SearchKnowledgeBase MCP to show you what inputs are needed for that specific operation.
Below is the convert_experience_payload.json file you can create and reuse:
{
  "audiences": [
    100278
  ],
  "locations": [
    100244
  ],
  "goals":  [1002467, 1002467],
  "variations": [
    {
      "name": "Control",
      "description": "This is the control variation.",
      "is_baseline": true,
      "traffic_distribution": 0,
      "key": "control_var",
      "concurrency_key": "control_conc_key",
      "changes": [
        {
          "type": "defaultCode",
          "data": {
            "css": "body { background-color: #f0f0f0; }",
            "js": "console.log('Control variation loaded');",
            "custom_js": "window.controlLoaded = true;"
          }
        }
      ]
    },
    {
      "name": "Variation",
      "description": "This is the test variation.",
      "is_baseline": false,
      "traffic_distribution": 100,
      "key": "variation_var",
      "concurrency_key": "variation_conc_key",
      "changes": [
        {
          "type": "defaultCode",
          "data": {
            "css": "body { background-color: #e0ffe0; }",
            "js": "console.log('Variation loaded');",
            "custom_js": "window.variationLoaded = true;"
          }
        }
      ]
    }
  ],
  "description": "Homepage CTA Button Optimization",
  "start_time": 169683,
  "end_time": 1699516,
  "global_js": "console.log('Homepage CTA Button Optimization')",
  "global_css": "body.sm_01",
  "name": "Homepage CTA Button Optimization",
  "key": "Homepage CTA Button Optimization",
  "primary_goal": 301,
  "objective": "MCP integration and improve conversion rates",
  "status": "draft",
  "traffic_distribution": 100,
  "type": "a/b",
  "url": "<https://optiphoenix.com/>"
}
Currently, the convert-mcp server allows JS and CSS as a string, so we wrote a simple NodeJS utility that picks the code from the files, converts it to strings and passes it to the payload JSON. Refer to this GitHub to access the code.
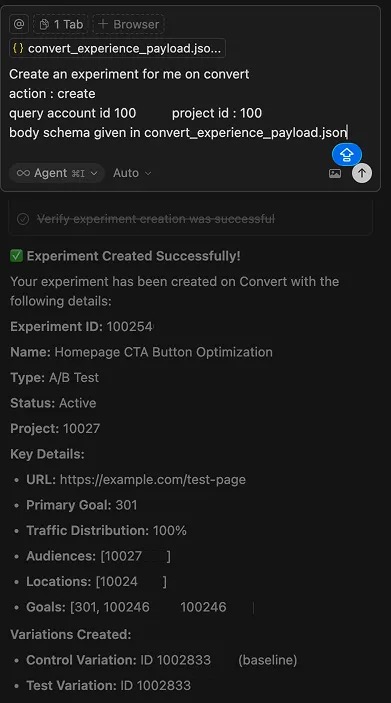
Your experiment is now set up in Convert. Proceed with QA and make any adjustments required.
Types of Experiments Where Cursor Excels
Here are the experiments that Cursor handles exceptionally well, while just needing human review and adjustments:
- Adding a new section: Imagine you want to highlight key USPs on your page with a fresh banner. Cursor can automatically insert the section, position it correctly, and even wire up basic interactions.
- Changing layouts or repositioning elements: If you need to swap button positions or transform a two-column layout into a three-column one, Cursor can handle these structural changes effortlessly, letting you focus on design logic and user experience rather than tedious DOM manipulation.
- Updating copy or text: Whether it’s tweaking a CTA, refreshing a headline, or updating microcopy, Cursor can make these changes across multiple sections instantly, ensuring consistency and speed without human error.
And here are the experiments that require human strategy and step-by-step execution:
- Complex redesigns: When you’re redesigning an existing section with intricate logic, for example, redesigning an entire Landing Page, refactoring how data is displayed with great look and feel, Cursor can assist with scaffolding and code generation, but it needs your strategic input to ensure the design aligns with business goals and technical feasibility.
- Adding new functionality/features: Experiments that introduce new features, like a mini cart drawer, dynamic filters, or custom form validation, often require deep understanding of the site’s architecture and integration with backend systems or analytics. Cursor can write some of the implementation, but you define the logic and connections that make it truly functional.
- Complex user flows: When dealing with multi-step user journeys or improving any complex website functionality, such as breaking a long checkout form into a multi-step form, automation alone isn’t enough. You need to think through edge cases. Cursor can generate and optimize code for each step, but you — the developer — ensure it all works seamlessly together.
Final Thoughts
AI can help you write code, streamline your workflow, and even anticipate your next step — but it can’t replace human intuition and strategic thinking. Real intelligence will always come from you and AI is a productivity booster, not a decision-maker.
AI is reshaping how developers build, test, and iterate, but it’s not replacing the craft.
Tools like Cursor and Convert MCP can drastically reduce experiment build time, enforce standards, and eliminate repetitive work, yet the real intelligence still lies in human judgment.
At Optiphoenix, we’ve learned that the most effective experimentation programs strike a balance, AI accelerates execution, while human intuition drives impact.
When you merge both, velocity turns into real business outcomes.
If you’re curious about how AI-assisted experimentation could improve your team’s speed, consistency, and output, connect with usto explore co-building your first GenAI-powered test setup.
Let’s reimagine how A/B tests are built – faster, smarter, and with purpose.
People Also Ask
- How does AI-assisted development with Cursor reduce A/B test build time for CRO teams?
By automating repetitive coding tasks like generating boilerplate code/files, utility functions, coding basic UI, and experiment setup saves up to 60–70% of manual dev time. - What role does Convert MCP play in automating experiment creation within AI-enabled IDEs like Cursor?
MCP enables the communication between the LLM and Convert. When we give any command to Cursor to create the experiment, it uses convert APIs under the hood to set up the experiment based on the details provided. - Can AI tools like Cursor fully replace front-end developers in experimentation workflows?
Cursor can’t replace front-end developers. It will make the coding sophisticated by emphasizing skills like deep thinking and debugging. It is a very important tool for front-end developers to code efficiently and much faster. It takes away the “memorising the syntax part” and allows them to focus on logic. The front-end developers would need to enhance their skills by focusing more on thinking clearly, debugging and code reviewing skills. - How can developers ensure security and code integrity while using AI for CRO experiments?
Establish a clear step by step coding and review process, a guideline on what do’s and don’ts are, prevent exposure of client or internal information. Anonymize or use synthetic data wherever data usage is required. - What types of A/B experiments are best suited for AI automation versus human-led development?
UI tweaks, text changes, rearranging sections are easy to build, while “human-critical” ones are feature builds, multi-step flows, implementing pixel perfect designs.
FAQ’s
- How do Convert MCP and Cursor work together to create an AI-powered experimentation workflow?
Convert MCP acts as the communication bridge between Cursor (the IDE) and Convert (the A/B testing tool). Developers can issue natural-language prompts inside Cursor, which the MCP translates into API calls that create or update experiments directly in Convert — minimizing context switching and setup time. - What are the risks of relying too heavily on LLMs for experiment development, and how can they be mitigated?
We suggest not going the vibe coding route. The awareness of the code that AI has generated is very crucial, otherwise, one would be spending hours fixing the issues with AI. The other risks involve code opacity, dependency on AI logic, and potential leakage of private data. These are mitigated by maintaining strict Cursor Rules, enforcing human QA, reviewing every AI-generated line, and using isolated environments for test deployment. - How do AI-generated experiments compare in performance and reliability to manually coded ones?
When standards and prompt rules are enforced, AI-built tests perform comparably in reliability but deliver faster turnaround. However, human-built experiments often demonstrate stronger contextual decisions — especially in multi-layered CRO setups with analytics dependencies. - Can AI tools like Cursor integrate directly with other testing platforms beyond Convert?
Yes — through MCP (Model Context Protocol), Cursor can connect to any API-based A/B testing or analytics tool. While Convert offers a native MCP package, other platforms can integrate via custom server definitions, allowing developers to extend automation to QA or analytics logging as well. - What measurable impact has AI-driven development shown in CRO and experimentation programs?
Early adopters report 40–70% faster test build cycles, fewer syntax and DOM-related errors, and more consistent code formatting across projects. However, the greatest ROI comes from freeing developers to focus on experiment strategy and insights rather than repetitive coding.


Written By
Shashi Ranjan, Kamal Sahni
Edited By
Carmen Apostu