Unrestricted MCP Access is Risky. Here’s How to Turn It into a Secure, Efficient n8n Workflow
Part of the Small Models series: This article explores one way to interact with the Convert MCP server. It’s an advanced use case for those who want to experiment with small, cost-efficient, and secure models and alternative tooling.
The biggest benefit of using n8n is that you get to create a well-defined workflow that an entire team can plug into. This means that whether they realise it or not, when they perform a particular task, they’re using that optimised process of yours.
In this guide, I’ll show you how you can go from using MCP (Model Context Protocol) in a tool like Claude Code, and strip out the risky and inconsistent parts to create a structured, secure n8n workflow that:
- Uses fewer tokens and smaller models (more sustainable)
- Delivers consistent, high-quality output every time
- Reduces API risks (no accidental deletions or live experiment pushes)
This isn’t going to be a step-by-step guide to building a workflow; instead, my intention here is to show you the techniques and processes to build an n8n workflow like the one I gave away in my previous article. The workflow generates JavaScript for an A/B test and then uploads the experiment to Convert.
Quick recap of MCPO
MCPs come with an element of risk. They’re powerful, which is exactly the problem. When you give an LLM MCP access, you’re essentially handing it the tools to cause havoc and trusting that it won’t. That doesn’t sound like a good idea to me.
At the same time, MCPs solve one of the main frustrations with APIs: while APIs are great, they can be cumbersome to work with.
This is where MCPO comes in.
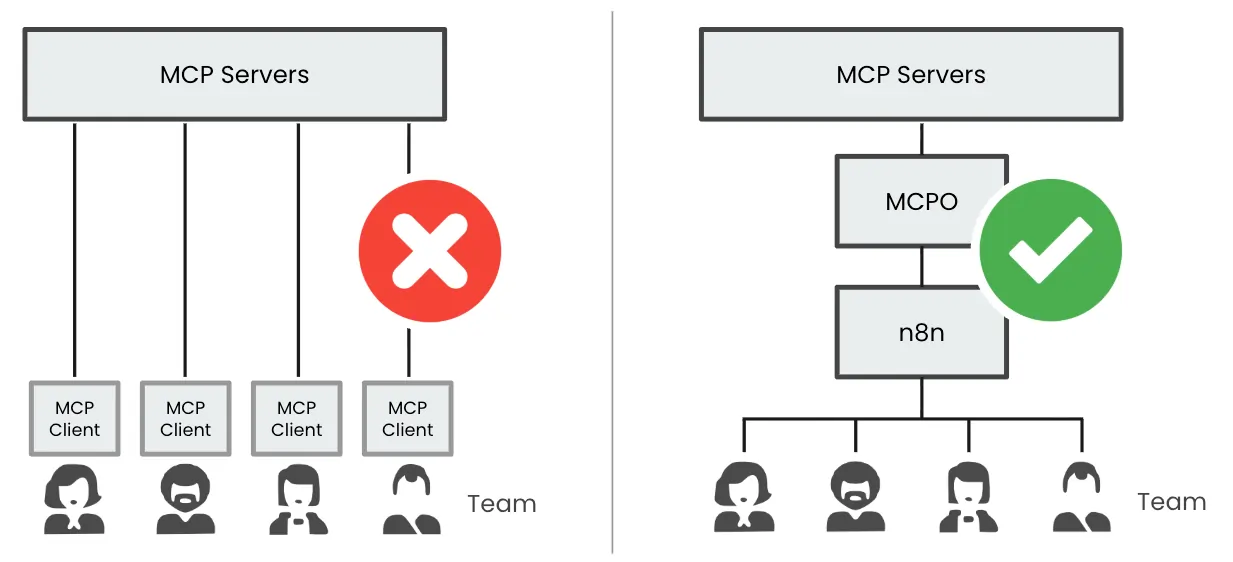
MCPO converts MCP services into well-documented API endpoints, giving you a clean, structured API to work with. And because everything is now exposed as API endpoints, you get the best of both worlds: the power of MCP, but with controlled access. You only expose the specific endpoints the LLM actually needs, which eliminates most of the risk.
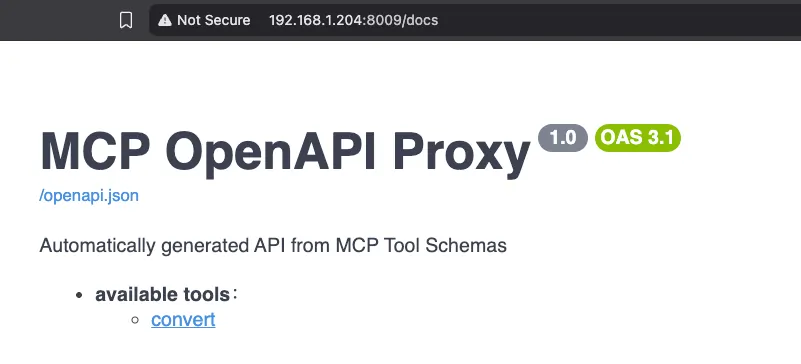
Once you install MCPO, you’ll be able to access it in your browser.
MCPO also provides a config file for adding your MCP servers. This means that if you are working with a team, there’s no need to manage multiple MCP configs and access privileges. You’re essentially creating an API server for everyone to use.
I’m not going to go over how to install MCPO. The documentation there is pretty good around this. Instead, I’m going to assume you’ve got it installed, along with n8n. With that out of the way, let me take you through the n8n workflow and show you an organised way to create workflows like this.
Building the Workflow
Step 1: Install & configure the services you need
I used Docker Compose for my setup. Here’s my docker-compose.yml (which links to an MCP config file):
services:
  mcpo:
    image: ghcr.io/open-webui/mcpo:main
    container_name: mcpo
    restart: unless-stopped
    ports:
      - "8009:8000"
    volumes:
      - ./config.json:/config/config.json
    command: ["--config", "/config/config.json","--hot-reload", "--port", "8000","--api-key","CREATE_A_SECURE_KEY"]
The mcpo-config file defines all my MCP clients. In this case, I just need to provide access to Convert’s MCP server:
{
   "mcpServers": {
     "convert": {
       "command": "npx",
       "args": [
         "-y",
         "@convertcom/mcp-server@latest"
       ],
       "env": {
         "CONVERT_API_KEY": "YOUR_API_KEY",
         "CONVERT_API_SECRET": "YOUR_API_SECRET",
         "TOOLS_FOR_CLIENT": "all"
       }
     }
   }
 }
I’ve also secured the whole thing with an API key. Now, all of the services are protected.
Step 2: Set up the first part of the n8n workflow
The first part of the workflow is pretty straightforward. It creates the JavaScript to upload to our Convert app. This part of the workflow consists of the following parts:
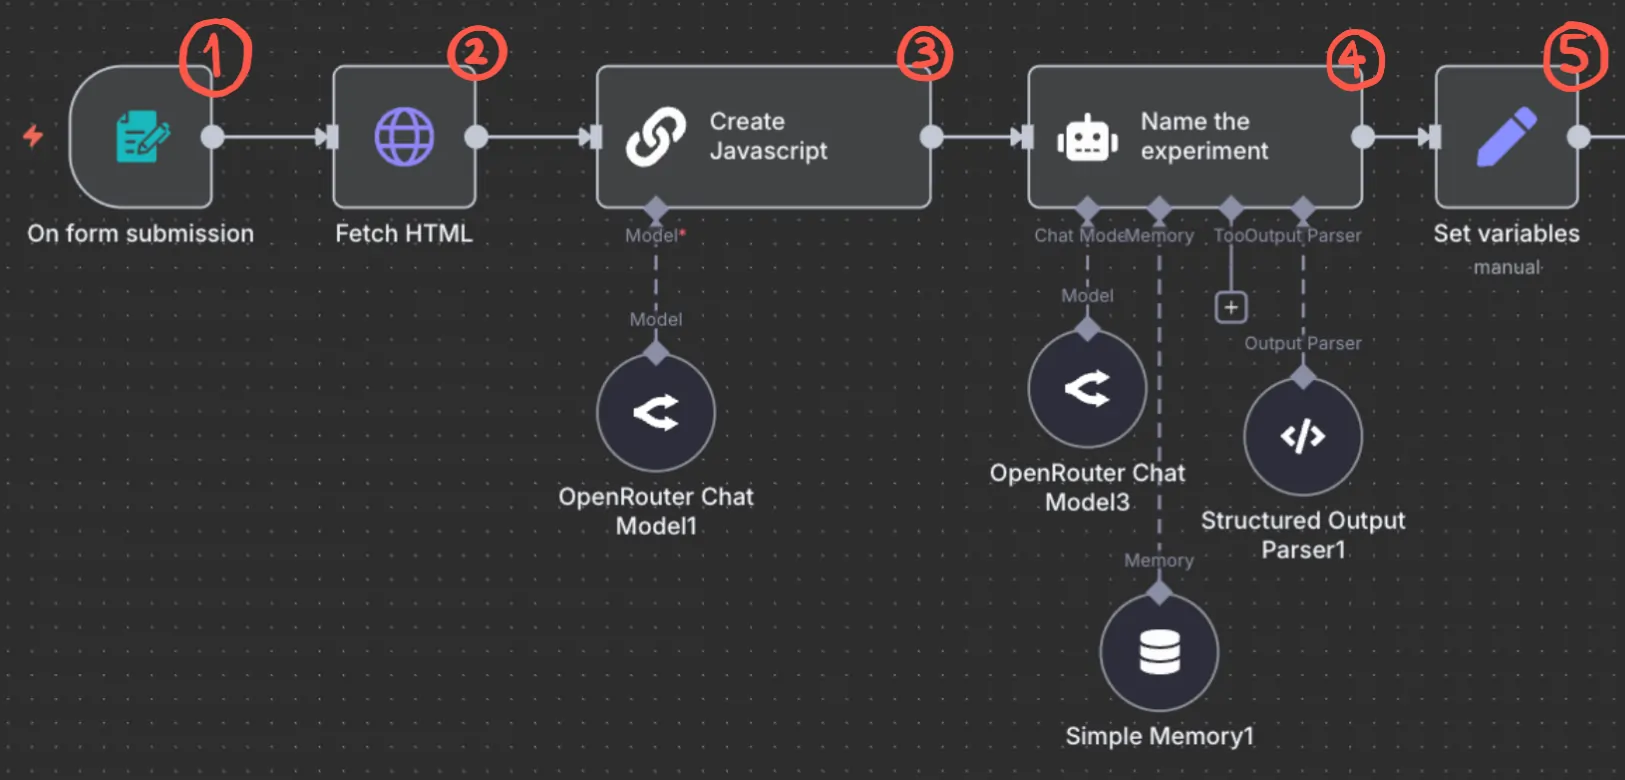
1: Form submission
I’m starting with a form to make sure the workflow receives exactly the right information. You don’t have to use a form. You could use a webhook, for instance. But a form is a quick, simple way to make sure people fill in what’s needed. One of those fields is the page URL where the requested change will be applied.
2: Fetch HTML
This step takes the page URL and fetches the page’s HTML.
3: AI agent generates JavaScript
That HTML is fed to a small LLM model with a simple prompt: “You’re a developer; you’ll receive an HTML change request, along with the HTML. Generate the JavaScript.” After you’ve run it a few times, you can add examples here to fine-tune the output format.
4: Name the experiment
A simple step that generates a name for the experiment. I’ve given mine some examples to enforce a naming convention. Feeding examples like this is the best way to get consistent output here.
5: Set variables
This bundles all the variables I need in subsequent steps. More about this later.
Step 3: Figuring out the right API calls to use
Now, here’s the reason why we’re all here. We turned easy MCP into an API. Now, how do you figure out the API calls to use? Our goal here is to create an experience (or experiment) in Convert. Here’s the process I used for this:

1: Use Claude Code or Cowork with MCP
Stick with me here, I know we’re back to using MCP. But we’re going to use this as a quick way to learn how to use the API services.
So, use Claude Code (or Cowork) to create an experience with some JavaScript (you can tell Claude to also write your JavaScript).
Note: You can use Claude Code with small models, or use the free version of the tool. No need to buy a subscription for this part. Check out the following guide.
Keep iterating until Claude Code has built exactly the experience in exactly the way you want. After that, review the steps Claude used along with the API calls:
Or just ask what steps it took to build the experience, along with the relevant JSON for those API calls. In our example, we learnt that:
- It needed the account_id and project_id
- It then needed two API calls:
- one to create the experience,
- and another to update the experience with the JavaScript
The account_id and project_id are always going to stay the same for our example. So, I can add those as static variables in the ‘Set variables’ node.
Then, for each of the two API calls, I ask Claude Code for the JSON to make the API call. Let’s start with the first part, creating an experience…
2: Test the API calls in the MCPO UI
Head on over to the MCPO service, then navigate to the relevant endpoint. The API’s user interface is built with the Swagger framework, allowing us to make test API calls. Use the JSON we got from Claude Code and make a test call.
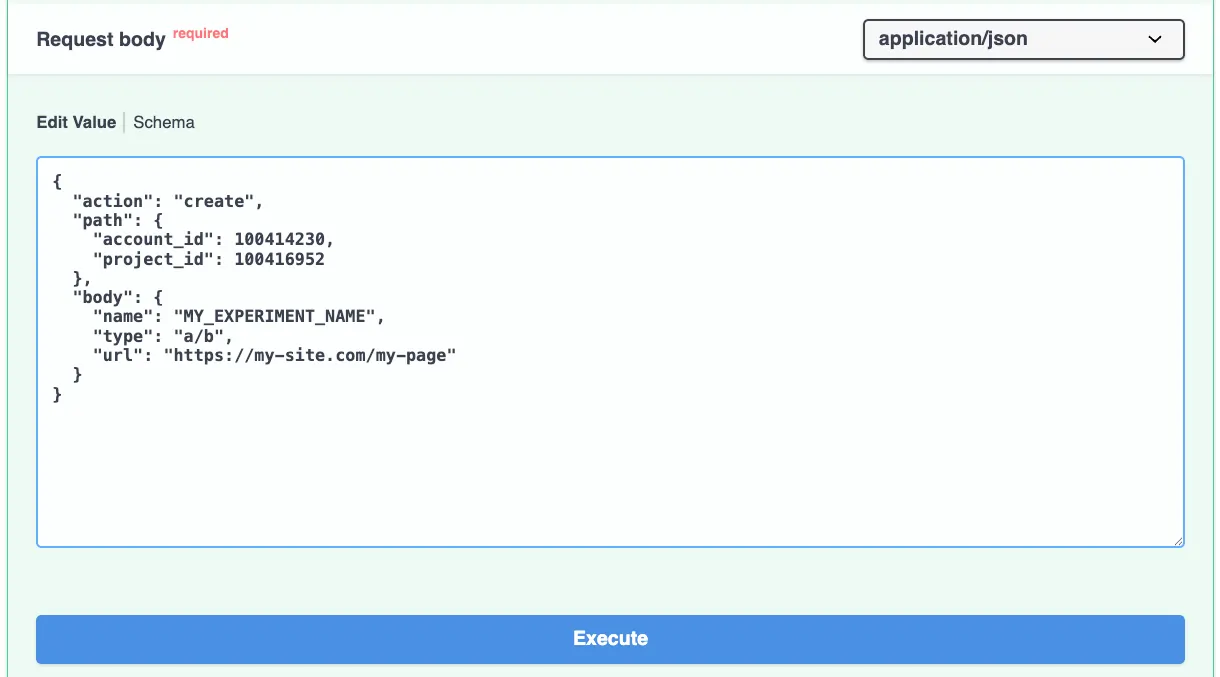
Verify that everything worked the way it should.
We should have our experience created in the Convert dashboard. We should also see a response on our MCPO web page. Notice that it gives us an experience and a set of variation IDs.

3: Set up the HTTP node in n8n
Congratulations, we now have everything we need to set up the HTTP endpoint in n8n. Enter the endpoint path, add the API key to n8n, and paste the JSON. For the JSON, replace relevant parts with the necessary variables.
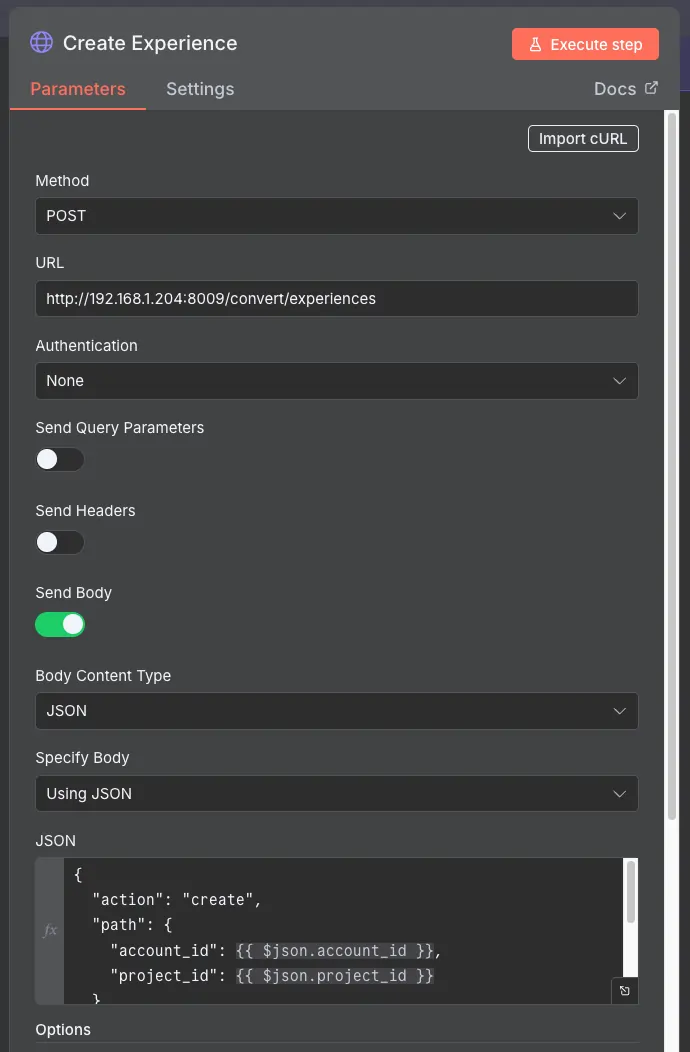
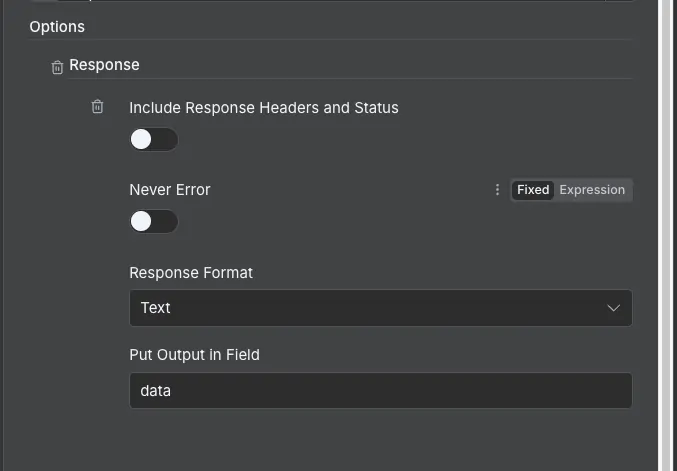
Sidenote: For Convert API call, you need to ensure that the Response is set to Text.
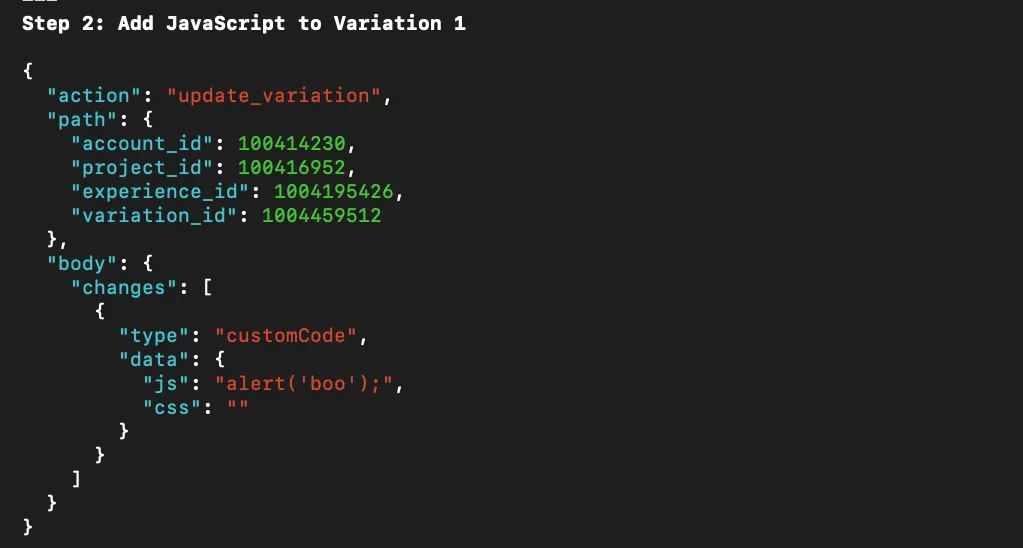
4: Repeat the process for the second API call
The second API call sets up the variation with JavaScript. For this, we need the experience ID and the variation ID, which we receive in the response after creating the experience. We just need to ensure that we extract the information from the response. Luckily, this is easy enough with another call to a small model (though if you’re up to it, you could probably write some code to extract it).
We then create another HTTP node and, this time, use JSON (we should also have tested this in the Swagger UI).
And that’s it!
Wrapping Up
This process isn’t a one-size-fits-all for every MCP tool, but it works really well when you want to make an MCP tool easy and safe for a team to use. Plug a small model into Claude Code, extract the JSON you need, and build it out in n8n.
The whole point is for you to go away and build your own systems that your team can actually use. This is a solid process for building n8n workflows around MCPs.
Thanks for following along. And join me next time, where I’ll be giving away another n8n workflow.
Editor’s note: This guide is part of a broader series on building practical AI systems. If you’re just getting started, we’d recommend our guides on getting started with AI automation in n8n, building your first AI agent, building RAG workflows with n8n and Qdrant, extracting themes from user feedback with n8n, quantifying themes with n8n, connecting chat interfaces to other tools using MCP, and setting up MCP servers in n8n.

Written By
Iqbal Ali
Edited By
Carmen Apostu